Hey, community! 👋
I'm Vicky, currently working as a data scientist intern at IBM, and I'm thrilled to share my insights with all of you.
In today's competitive job market, having a portfolio is more than just a nice-to-have; it's a must. Your portfolio is the visual companion to your resume, helping you stand out and show what you're capable of. It's the proof behind the promises on your resume, making it an essential tool to make a strong impression on potential employers.
With Streamlit, you can take your resume to the next level, setting you apart from other candidates. Create an interactive app to showcase your own data work, achievements, and personality. Then, pair that with an AI-powered chatbot where recruiters can talk to your resume!? Step aside, “other candidates!”
I hope you find this guide helpful, and it helps you land your dream job!
In this tutorial, you’ll learn how to build a portfolio with:
- An AI-powered chatbot that includes custom data, such as a self-introduction
- Animations
- Career snapshot with a timeline
- HTML and JavaScript with custom CSS
- RSS feeds (such as Medium posts)
- Images and a resume PDF
- Colleague endorsement slideshow
- Contact form
Let’s get started
Clone the GitHub repository for this project’s starter code by entering the following command in your terminal:
git clone <https://github.com/vicky-playground/portfolio-template/>
Before proceeding, it's crucial to personalize both the constant.py and images files with your own information. This step ensures that your portfolio accurately represents your unique profile and content. Please exercise caution and avoid altering the names of keys within the constant.py file and the names of files in the images folder.
Step 1: Add an introduction file to your app
Inside the bio.txt file, I've included a sample self-introduction that will guide the chatbot's responses. Customize it with your own introduction to potential recruiters. The chatbot will base its answers on a combination of the info provided in bio.txt and the large language model of your choice.
Step 2: Build your chatbot
This step will walk you through building an AI chatbot using LlamaIndex and OpenAI. LlamaIndex is your go-to tool for creating applications (like Q&A, chatbots, and agents) powered by large language models (LLMs) and tailored to your specific data. For this app, you’ll use LlamaIndex to enable the chatbot to answer questions about your work history based on the info you provided in the bio.txt file.
Now, let's navigate to the 1_Home.py file to see how this is achieved.
Summary of steps:
- OpenAI API Key Input: The user is prompted to input their OpenAI API key, which can be obtained by creating a new API token on OpenAI's platform in the Streamlit sidebar. This key is required to interact with OpenAI's models.
- Document Loading: The code loads a document (e.g., a file containing information about the user) using
SimpleDirectoryReader. - Query Engine Setup: A query engine is set up to interact with LlamaIndex and OpenAI's GPT-3.5-turbo model.
- User Input: The user can enter questions or queries related to the user's information or profile.
- Chatbot Interaction: When the user enters a question, the chatbot (named Buddy) uses LlamaIndex and GPT-3.5-turbo to provide responses. The user's input is included in a prompt, and the chatbot generates a response based on the indexed documents and the user's query.
- Display Response: The chatbot's response is displayed in the Streamlit app.
- API Key Verification: If the user hasn't entered their OpenAI API key or has entered it incorrectly, appropriate warnings or information messages are displayed.
Here's the code that performs these steps, along with the additional information provided above:
from llama_index import GPTVectorStoreIndex, SimpleDirectoryReader, LLMPredictor, ServiceContext
import openai
from langchain.chat_models import ChatOpenAI
openai_api_key = st.sidebar.text_input('Enter your OpenAI API Key and hit Enter', type="password")
openai.api_key = (openai_api_key)
# load the file
documents = SimpleDirectoryReader(input_files=["bio.txt"]).load_data()
# build a query engine
def ask_bot(input_text):
# define LLM
llm = ChatOpenAI(
model_name="gpt-3.5-turbo",
temperature=0,
openai_api_key=openai.api_key,
)
llm_predictor = LLMPredictor(llm=llm)
service_context = ServiceContext.from_defaults(llm_predictor=llm_predictor)
# load index
index = GPTVectorStoreIndex.from_documents(documents, service_context=service_context)
# query LlamaIndex and GPT-3.5 for the AI's response
PROMPT_QUESTION = """You are an AI agent named Buddy helping answer questions about Vicky to recruiters. Introduce yourself when you are introducing who you are.
If you do not know the answer, politely admit it and let users know how to contact Vicky to get more information.
Human: {input}
"""
output = index.as_query_engine().query(PROMPT_QUESTION.format(input=input_text))
print(f"output: {output}")
return output.response
# get the user's input by calling the get_text function
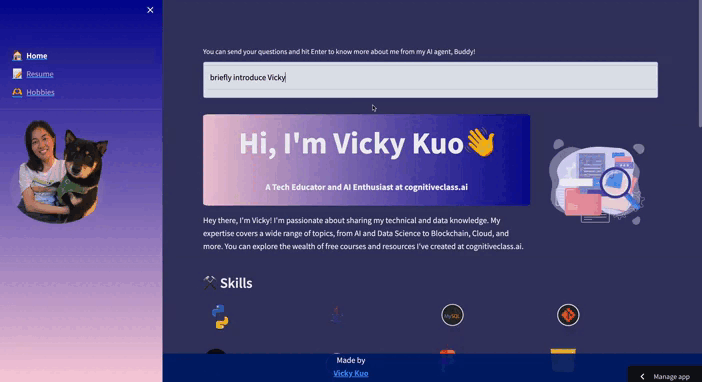
def get_text():
input_text = st.text_input("You can send your questions and hit Enter to know more about me from my AI agent, Buddy!", key="input")
return input_text
user_input = get_text()
if user_input:
if not openai_api_key.startswith('sk-'):
st.warning('⚠️Please enter your OpenAI API key on the sidebar.', icon='⚠')
if openai_api_key.startswith('sk-'):
st.info(ask_bot(user_input))
Step 3: Import the main CSS file and Lottie animation
In this step, we will enhance the appearance of our website by incorporating a CSS file and integrating Lottie animation JSON URLs to Streamlit.
Here's a visual guide for your reference:
import requests
from streamlit_lottie import st_lottie

# Load a Lottie animation from a URL
def load_lottieurl(url: str):
    r = requests.get(url)
    if r.status_code != 200:
        return None
    return r.json()

# Apply local CSS styles from a file
def local_css(file_name):
    with open(file_name) as f:
        st.markdown('<style>{}</style>'.format(f.read()), unsafe_allow_html=True)

# Apply local CSS styles from the "style.css" file
local_css("style/style.css")

# Load Lottie animations from various URLs
lottie_gif = load_lottieurl("<https://assets9.lottiefiles.com/packages/lf20_x17ybolp.json>")
lottie_gif = load_lottieurl("<https://assets9.lottiefiles.com/packages/lf20_x17ybolp.json>")
python_lottie = load_lottieurl("<https://assets6.lottiefiles.com/packages/lf20_2znxgjyt.json>")
java_lottie = load_lottieurl("<https://assets9.lottiefiles.com/packages/lf20_zh6xtlj9.json>")
my_sql_lottie = load_lottieurl("<https://assets4.lottiefiles.com/private_files/lf30_w11f2rwn.json>")
git_lottie = load_lottieurl("<https://assets9.lottiefiles.com/private_files/lf30_03cuemhb.json>")
github_lottie = load_lottieurl("<https://assets8.lottiefiles.com/packages/lf20_6HFXXE.json>")
docker_lottie = load_lottieurl("<https://assets4.lottiefiles.com/private_files/lf30_35uv2spq.json>")
figma_lottie = load_lottieurl("<https://lottie.host/5b6292ef-a82f-4367-a66a-2f130beb5ee8/03Xm3bsVnM.json>")
aws_lottie = load_lottieurl("<https://lottie.host/6eae8bdc-74d1-4b5d-9eb7-37662274cd19/Nduizk8IOf.json>")
Step 4: Design the layout using a sidebar, container, columns, and expander
- Add a left panel sidebar using the
streamlit.sidebarfunction.
from constant import *

# Display the photo in the sidebar using HTML content
st.sidebar.markdown(info['Photo'],unsafe_allow_html=True) #info['Photo'] is a reference to the dictionary in constants.py
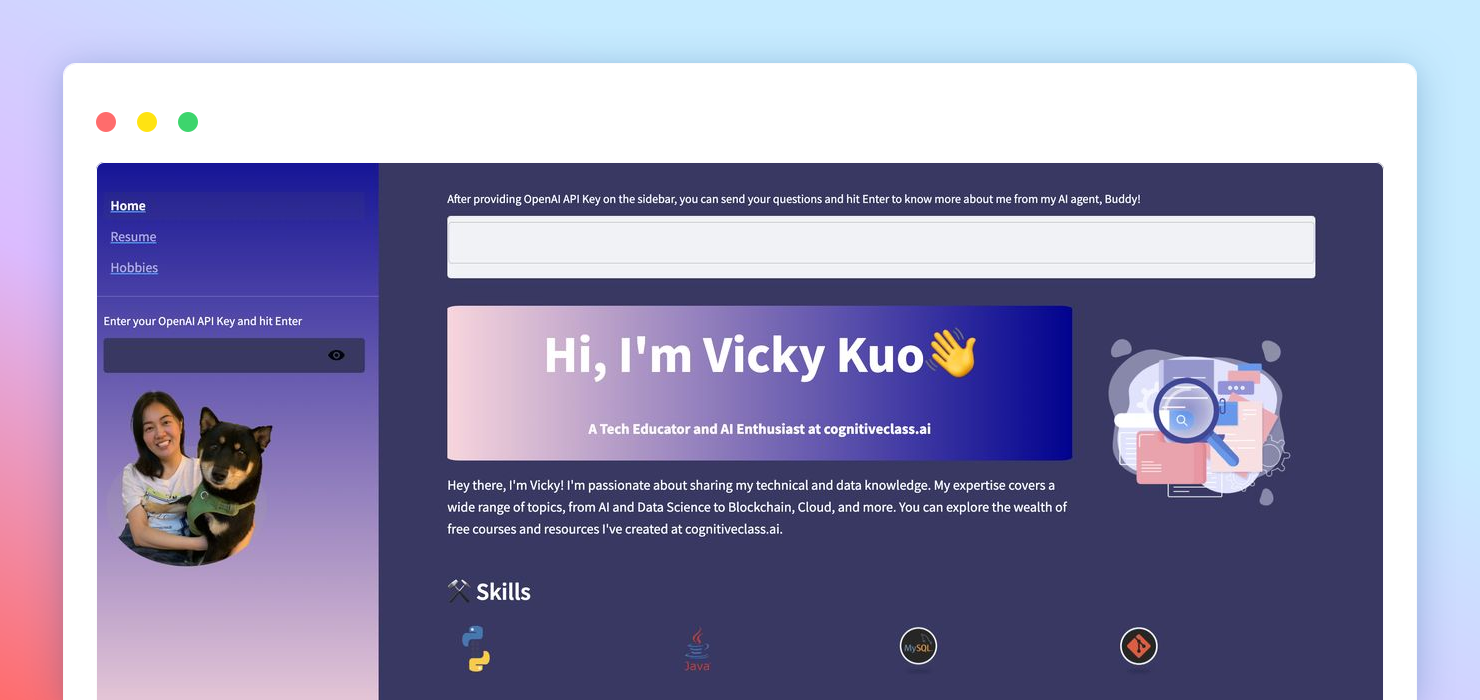
- Design a self-introduction with columns and add it to a container:
# Define a function named "gradient" that generates a colored gradient title with content
def gradient(color1, color2, color3, content1, content2):
    # Create an HTML structure with styling for a gradient header
    st.markdown(f'<h1 style="text-align:center;background-image: linear-gradient(to right,{color1}, {color2});font-size:60px;border-radius:2%;">'
                f'<span style="color:{color3};">{content1}</span><br>'
                f'<span style="color:white;font-size:17px;">{content2}</span></h1>',
                unsafe_allow_html=True)

# Create a container to organize content using Streamlit's container feature
with st.container():
    # Divide the container into two columns, with widths 8 and 3
    col1, col2 = st.columns([8, 3])

# Inside the first column (col1):
full_name = info['Full_Name']
with col1:
    # Call the "gradient" function to display a gradient title
    gradient('#FFD4DD','#000395','e0fbfc',f"Hi, I'm {full_name}👋", info["Intro"])
    st.write("")  # Add an empty line
    st.write(info['About'])  # Display the 'About' information stored in the 'info' dictionary

# Inside the second column (col2):
with col2:
    # Display a Lottie animation using the st_lottie function
    st_lottie(lottie_gif, height=280, key="data")
- Create a layout for displaying the buttons of skills with columns:
# Create a container to organize content using Streamlit's container feature
with st.container():
    st.subheader('⚒️ Skills')
    col1, col2, col3, col4 = st.columns([1, 1, 1, 1])
    with col1:
        st_lottie(python_lottie, height=70,width=70, key="python", speed=2.5)
    with col2:
        st_lottie(java_lottie, height=70,width=70, key="java", speed=4)
    with col3:
        st_lottie(my_sql_lottie,height=70,width=70, key="mysql", speed=2.5)
    with col4:
        st_lottie(git_lottie,height=70,width=70, key="git", speed=2.5)
    with col1:
        st_lottie(github_lottie,height=50,width=50, key="github", speed=2.5)
    with col2:
        st_lottie(docker_lottie,height=70,width=70, key="docker", speed=2.5)
    with col3:
        st_lottie(figma_lottie,height=50,width=50, key="figma", speed=2.5)
    with col4:
        st_lottie(js_lottie,height=50,width=50, key="js", speed=1)
Step 5: Add a career timeline with vis.js
To personalize the timeline, you can update the example.json file with your own timeline data. This allows you to showcase your professional journey in a visually engaging manner.
from streamlit_timeline import timeline

with st.container():
    st.markdown("")
    st.subheader('📌 Career Snapshot')
    # Load data
    with open('example.json', "r") as f:
        data = f.read()
    # Render timeline
    timeline(data, height=400)
Step 6: Add HTML and JavaScript with custom CSS
When working with Streamlit, there are two ways to modify HTML and CSS:
st.markdown: Write and alter HTML code directly within your app, typically within the<body>tag.st.components.v1.html: Embed custom HTML and HTML elements/snippets in your app's UI, with the additional capability to include JavaScript.
To illustrate, here's an example of embedding a Tableau dashboard and using st.expander to show/hide content with an expand/collapse widget:
import streamlit.components.v1 as components
with st.container():
# Display an empty markdown to add some spacing
st.markdown("""""")
st.subheader("📊 Tableau")
col1,col2 = st.columns([0.95, 0.05])
with col1:
with st.expander('See the work'):
# Display Tableau visualization using the components.html method
components.html(
"""
<!DOCTYPE html>
<html>
<title>Basic HTML</title>
<body style="width:130%">
<div class='tableauPlaceholder' id='viz1684205791200' style='position: static'><noscript><a href='#'><img alt=' ' src='https://public.tableau.com/static/images/Su/SunnybrookTeam/Overview/1_rss.png' style='border: none' /></a></noscript><object class='tableauViz' style='display:none;'><param name='host_url' value='https%3A%2F%2Fpublic.tableau.com%2F' /> <param name='embed_code_version' value='3' /> <param name='site_root' value='' /><param name='name' value='SunnybrookTeam/Overview' /><param name='tabs' value='yes' /><param name='toolbar' value='yes' /><param name='static_image' value='https://public.tableau.com/static/images/Su/SunnybrookTeam/Overview/1.png' /> <param name='animate_transition' value='yes' /><param name='display_static_image' value='yes' /><param name='display_spinner' value='yes' /><param name='display_overlay' value='yes' /><param name='display_count' value='yes' /><param name='language' value='en-US' /></object></div> <script type='text/javascript'> var divElement = document.getElementById('viz1684205791200'); var vizElement = divElement.getElementsByTagName('object')[0]; if ( divElement.offsetWidth > 800 ) { vizElement.style.minWidth='1350px';vizElement.style.maxWidth='100%';vizElement.style.minHeight='1550px';vizElement.style.maxHeight=(divElement.offsetWidth*0.75)+'px';} else if ( divElement.offsetWidth > 500 ) { vizElement.style.minWidth='1350px';vizElement.style.maxWidth='100%';vizElement.style.minHeight='1550px';vizElement.style.maxHeight=(divElement.offsetWidth*0.75)+'px';} else { vizElement.style.width='100%';vizElement.style.minHeight='5750px';vizElement.style.maxHeight=(divElement.offsetWidth*1.77)+'px';} var scriptElement = document.createElement('script'); scriptElement.src = '<https://public.tableau.com/javascripts/api/viz_v1.js>'; vizElement.parentNode.insertBefore(scriptElement, vizElement); </script>
</body>
</HTML>
"""
, height=400, scrolling=True
)
st.markdown(""" <a href={}> <em>🔗 access to the link </a>""".format(info['Tableau']), unsafe_allow_html=True)
Step 7: Add RSS feeds with components.html
RSS feeds offer a dynamic way to showcase the latest updates and posts from blogs or other platforms directly in your application.
Streamlit's st.components.v1.html() function simplifies the integration process, allowing for a seamless display of content, such as Medium articles. For the purpose of guiding you through this process, we've provided a sample RSS feed URL from Medium. This sample link can be located in the constant.py file under the variable embed_rss['rss'].
with st.container():
    st.markdown("""""")
    st.subheader('✍️ Medium')
    col1,col2 = st.columns([0.95, 0.05])
    with col1:
        with st.expander('Display my latest posts'):
            components.html(embed_rss['medium'],height=400)

        st.markdown(""" <a href={}> <em>🔗 access to the link </a>""".format(info['Medium']), unsafe_allow_html=True)
Step 8: Add images and a resume PDF
In this step, we'll add images and a resume to our website. To display your resume as a PDF on the web, we'll use base64 encoding in the pages/2_Resume.py file.
import base64

with open("images/resume.pdf","rb") as f:
      base64_pdf = base64.b64encode(f.read()).decode('utf-8')
      pdf_display = F'<iframe src="data:application/pdf;base64,{base64_pdf}" width="1000mm" height="1000mm" type="application/pdf"></iframe>'
      st.markdown(pdf_display, unsafe_allow_html=True)
Additionally, to showcase your hobbies with images, you can include both JPG and PNG images in the pages/3_Hobbies.py file. To do this, you can leverage the Pillow library for image handling.
from PIL import Image

img_1 = Image.open("images/1.jpg")
img_2 = Image.open("images/2.png")
img_3 = Image.open("images/3.png")
Step 9: Add a slideshow of colleague endorsements
Now, let's showcase endorsements from your coworkers in a slideshow. To do this, you'll need to replace the existing image URLs in the constant.py file with your own image URLs.
with st.container():
		# Divide the container into three columns
    col1,col2,col3 = st.columns([0.475, 0.475, 0.05])
    # In the first column (col1)
		with col1:
		        # Add a subheader to introduce the coworker endorsement slideshow
		        st.subheader("👄 Coworker Endorsements")
		        # Embed an HTML component to display the slideshow
		        components.html(
		        f"""
		        <!DOCTYPE html>
		        <html>
		        <head>
		        <meta name="viewport" content="width=device-width, initial-scale=1">
		        <!-- Styles for the slideshow -->
		        <style>
		            * {{box-sizing: border-box;}}
		            .mySlides {{display: none;}}
		            img {{vertical-align: middle;}}

		            /* Slideshow container */
		            .slideshow-container {{
		            position: relative;
		            margin: auto;
		            width: 100%;
		            }}

		            /* The dots/bullets/indicators */
		            .dot {{
		            height: 15px;
		            width: 15px;
		            margin: 0 2px;
		            background-color: #eaeaea;
		            border-radius: 50%;
		            display: inline-block;
		            transition: background-color 0.6s ease;
		            }}

		            .active {{
		            background-color: #6F6F6F;
		            }}

		            /* Fading animation */
		            .fade {{
		            animation-name: fade;
		            animation-duration: 1s;
		            }}

		            @keyframes fade {{
		            from {{opacity: .4}}
		            to {{opacity: 1}}
		            }}

		            /* On smaller screens, decrease text size */
		            @media only screen and (max-width: 300px) {{
		            .text {{font-size: 11px}}
		            }}
		            </style>
		        </head>
		        <body>
		            <!-- Slideshow container -->
		            <div class="slideshow-container">
		                <div class="mySlides fade">
		                <img src={endorsements["img1"]} style="width:100%">
		                </div>

		                <div class="mySlides fade">
		                <img src={endorsements["img2"]} style="width:100%">
		                </div>

		                <div class="mySlides fade">
		                <img src={endorsements["img3"]} style="width:100%">
		                </div>

		            </div>
		            <br>
		            <!-- Navigation dots -->
		            <div style="text-align:center">
		                <span class="dot"></span>
		                <span class="dot"></span>
		                <span class="dot"></span>
		            </div>

		            <script>
		            let slideIndex = 0;
		            showSlides();

		            function showSlides() {{
		            let i;
		            let slides = document.getElementsByClassName("mySlides");
		            let dots = document.getElementsByClassName("dot");
		            for (i = 0; i < slides.length; i++) {{
		                slides[i].style.display = "none";
		            }}
		            slideIndex++;
		            if (slideIndex > slides.length) {{slideIndex = 1}}
		            for (i = 0; i < dots.length; i++) {{
		                dots[i].className = dots[i].className.replace("active", "");
		            }}
		            slides[slideIndex-1].style.display = "block";
		            dots[slideIndex-1].className += " active";
		            }}

		            var interval = setInterval(showSlides, 2500); // Change image every 2.5 seconds

		            function pauseSlides(event)
		            {{
		                clearInterval(interval); // Clear the interval we set earlier
		            }}
		            function resumeSlides(event)
		            {{
		                interval = setInterval(showSlides, 2500);
		            }}
		            // Set up event listeners for the mySlides
		            var mySlides = document.getElementsByClassName("mySlides");
		            for (i = 0; i < mySlides.length; i++) {{
		            mySlides[i].onmouseover = pauseSlides;
		            mySlides[i].onmouseout = resumeSlides;
		            }}
		            </script>

		            </body>
		            </html>

		            """,
		                height=270,
		    )
Step 10: Add a contact form
Let's create a contact form that allows visitors to get in touch with you and connect it with your email using FormSubmit.
Copy and paste the provided code at the bottom of the 1_Home.py file. Ensure that your email address is stored in constant.py under the key Email in the info dictionary. This will ensure that messages submitted through the contact form are sent to your email.
with col2:
        st.subheader("📨 Contact Me")
        email = info["Email"]
        contact_form = f"""
        <form action="<https://formsubmit.co/{email}>" method="POST">
            <input type="hidden" name="_captcha value="false">
            <input type="text" name="name" placeholder="Your name" required>
            <input type="email" name="email" placeholder="Your email" required>
            <textarea name="message" placeholder="Your message here" required></textarea>
            <button type="submit">Send</button>
        </form>
        """
        st.markdown(contact_form, unsafe_allow_html=True)
Step 11: Deploy on Streamlit Community Cloud
After building your app, deploy it on Streamlit Community Cloud:
- Create a GitHub repository.
- Navigate to Streamlit Community Cloud, click
New app, and pick the appropriate repository, branch, and file path. - Hit
Deploy - Share with recruiters and hiring managers!
Wrapping up
Thank you for reading my post! I hope you enjoyed this tutorial and found it inspiring.
I can’t wait to see the amazing portfolios you’ll create. Once you have, tag me on LinkedIn. I'd love to celebrate your accomplishments and get inspired by your work! 🎉💡
If you have any feedback or questions, please feel free to post them in the comments below or contact me on LinkedIn.
Let’s continue to learn and grow together! 👩💻🌱
Comments
Continue the conversation in our forums →