
The essential Streamlit for all your data science needs
To build a web app you’d typically use such Python web frameworks as Django and Flask. But the steep learning curve and the big time investment for implementing these apps present a major hurdle.
Streamlit makes the app creation process as simple as writing Python scripts!
In this article, you’ll learn how to master Streamlit when getting started with data science.
Let’s dive in!
1. Getting up to speed
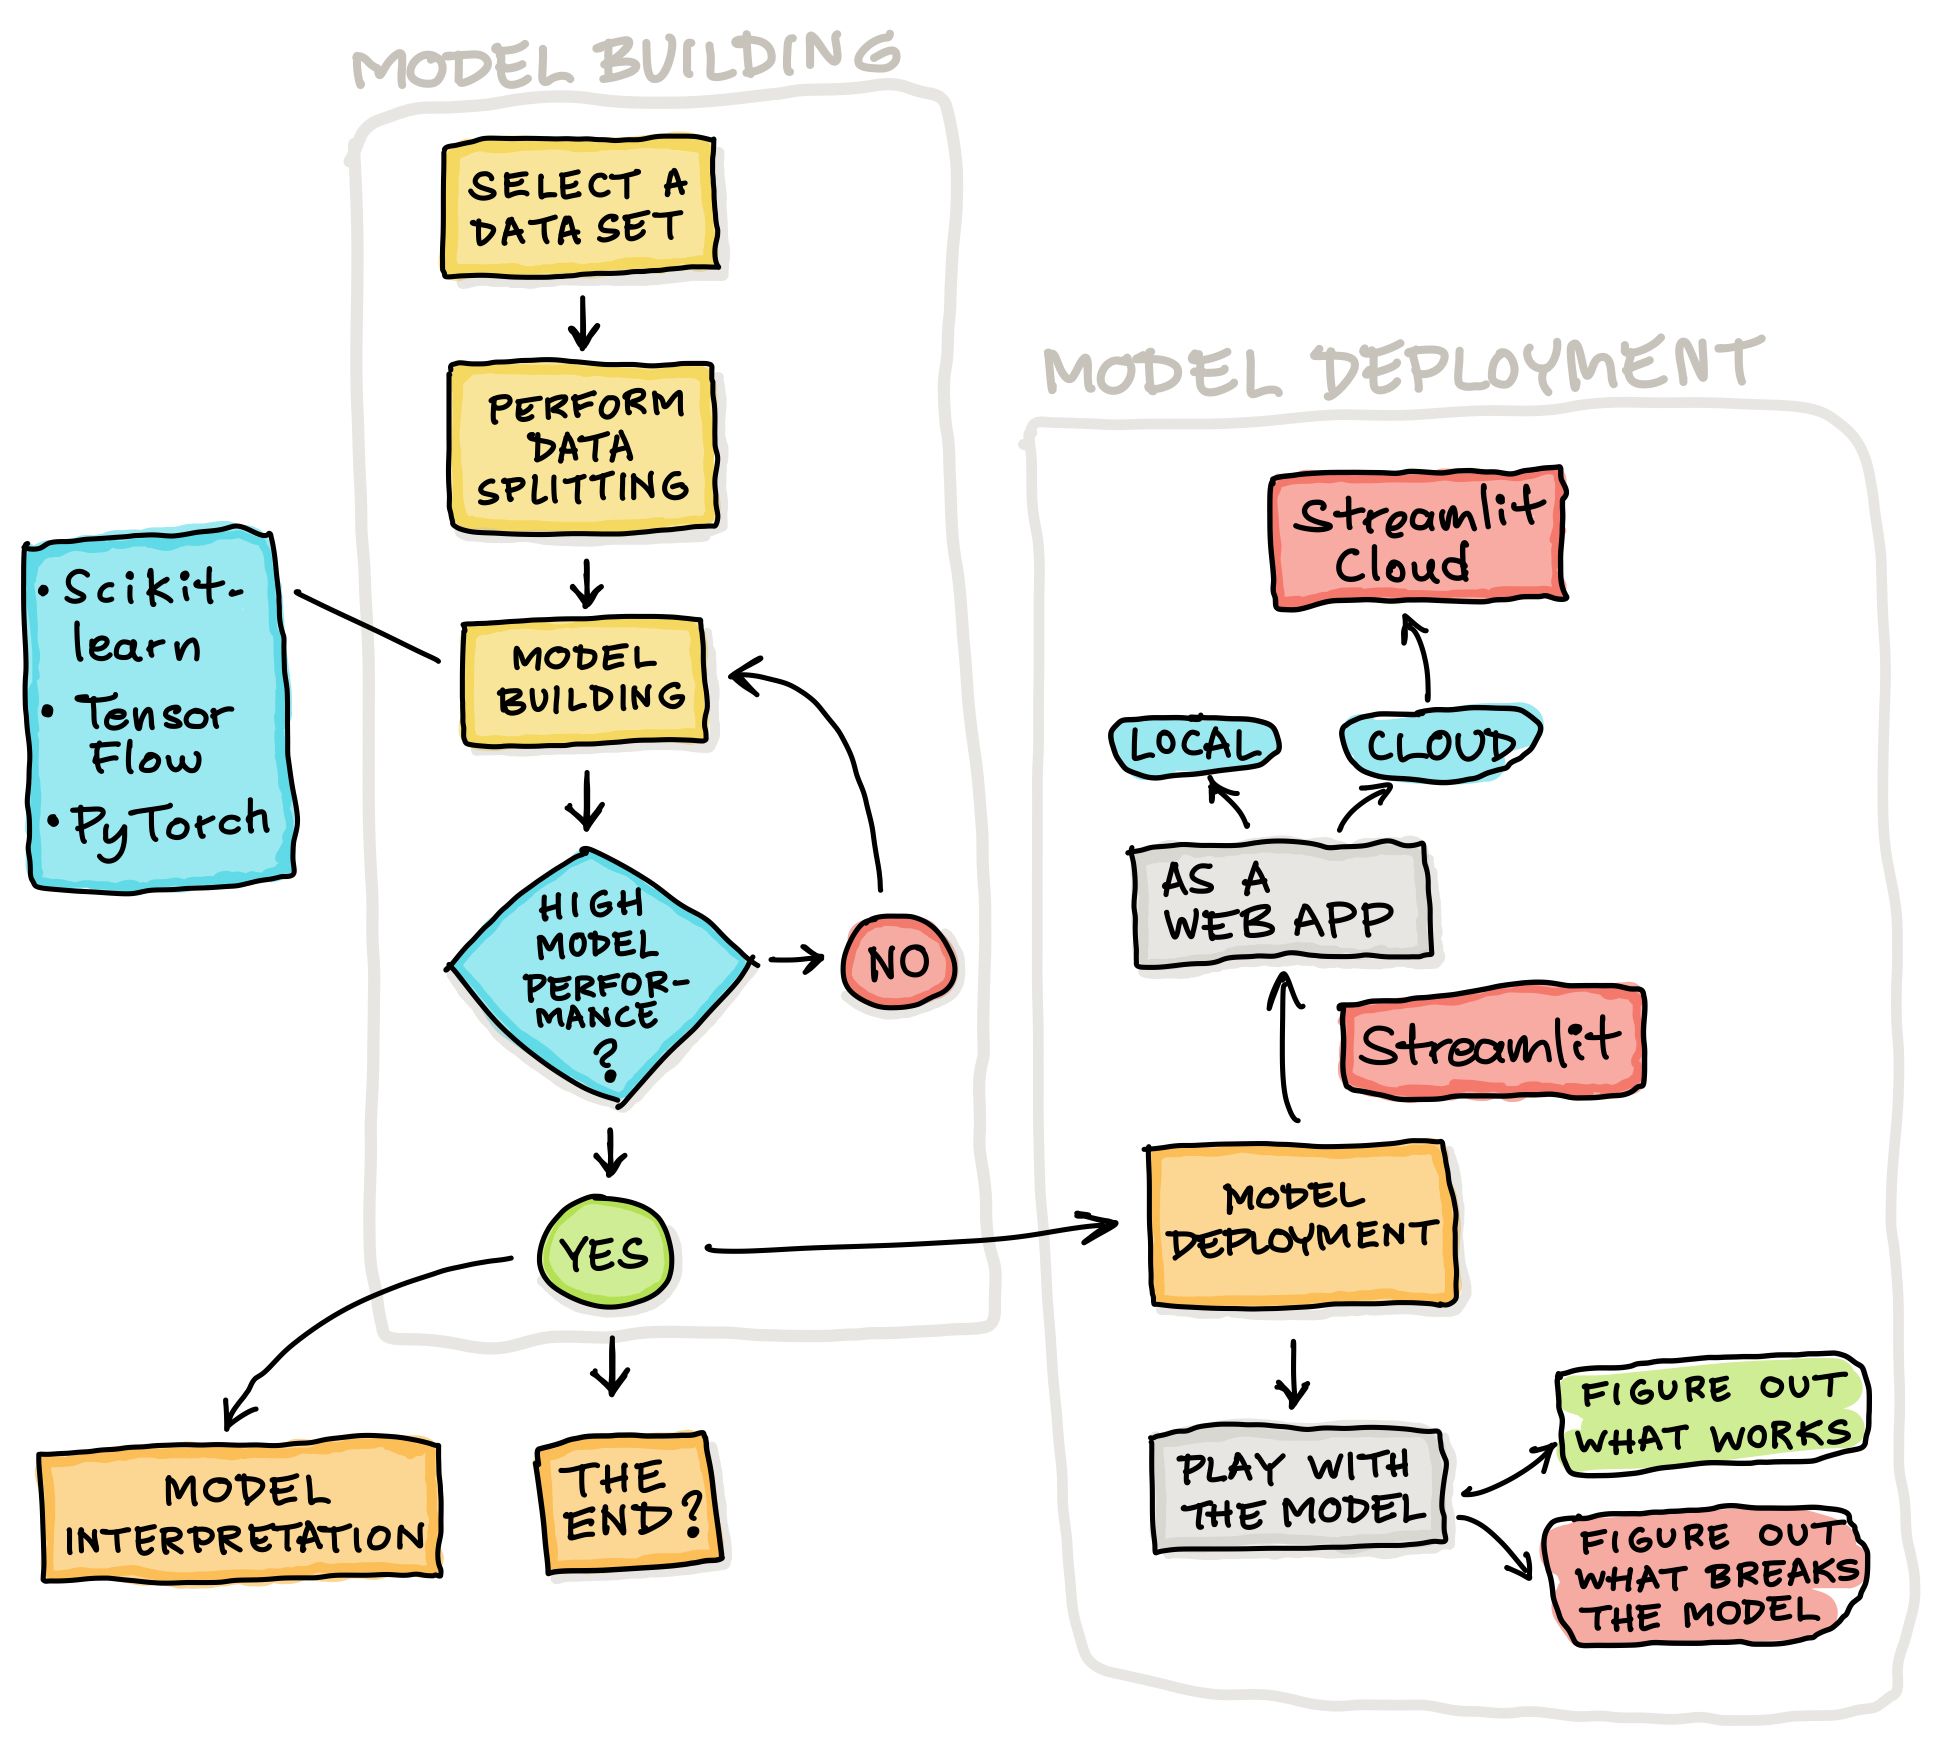
1.1. Why deploy models?
The data science process boils down to converting data to knowledge/insights while summarizing the conversion with the CRISP-DM and OSEMN data frameworks. Aside from knowledge/insights, a data project can make a greater impact if you deploy your machine learning models as web apps.
Why? Because deployed models can be accessed by stakeholders who can play with them and figure out what works and what doesn't.
1.2. Types of model deployment
Model deployment is the endpoint of a data science workflow. Models can be deployed as:
- Jupyter notebooks
- API
- Web apps
Jupyter notebooks. Jupyter notebooks are commonly used for prototyping the data science workflow and they can be:
- Uploaded to GitHub
- Shared as a link via Google Colab
- Shared via Binder
API. Models can also be deployed as a REST API using tools such as FastAPI. This approach does not have a frontend for displaying it graphically for ease of use.
Web apps. This brings us to deploying machine learning models as web applications. The traditional approach is to wrap the API via the use of web frameworks such as Django and Flask. A much simpler approach is to use a low-code solution such as Streamlit to create a web app.
Let’s explore this in more depth in the following section.
1.3. Traditional vs. low-code web frameworks
Though Django and Flask may be the gold standard for developing web apps, the technical barriers limit their usage by the wider data community. Low-code solutions such as Streamlit have lowered the barrier to entry by enabling data enthusiasts (e.g. data scientists, analysts, and hobbyists) to easily convert machine learning models into interactive data-driven web apps.
Here are the low-code solutions:
2. Streamlit 101
Streamlit is a Python library you can use to build interactive data-driven web apps.
2.1. What you need to use Streamlit
To use Streamlit, you need to:
- Have basic Python knowledge.
- Write scripts to perform specific tasks (like taking several Excel files as input and combining them into one).
- Build and grow the Streamlit app line by line instead of starting with a predefined layout (it takes only a few lines of code).
If you can do all this, congratulations! You're ready to plunge into the world of Streamlit.
2.2. Four Streamlit design principles
According to Adrien Treuille, co-founder and CEO of Streamlit, Streamlit was originally based on three principles (as mentioned in the 2019 PyData LA talk and the Medium launch post). The fourth principle was introduced at the launch of Streamlit Cloud:
- Embrace Python scripting. Build and grow Streamlit apps line by line.
- Treat widgets as variables. Widgets are input elements that let users interact with Streamlit apps. They’re presented as basic input text boxes, checkboxes, slider bars, etc.
- Reuse data and computation. Historically, data and computations had been cached with the
@st.cachedecorator. This saves computational time for app changes. It can be hundreds of times if you actively revise the app! In 0.89.0 release Streamlit launched two new primitives (st.experimental_memo and st.experimental_singleton) to afford a significant speed improvement to that of@st.cache. - Deploy instantly. Easily and instantly deploy apps with Streamlit Cloud.
3. How to set up your Streamlit workspace
3.1. Install Streamlit
Install the Streamlit library by using pip:
pip install streamlit
3.2. Code a Streamlit app
After doing so, you can start to code an app by creating a Python script file (e.g. app.py). Inside this file, you can import the Streamlit library via import streamlit as st and use any of the available Streamlit functions.
3.3. Launch your Streamlit apps
Once the app has been coded, launching it is as easy as running streamlit run app.py.
For first time users, you can also type streamlit hello into the command line to see Streamlit in action.
Go ahead and give it a try!
3.4. Create a conda environment
As I show on my YouTube channel, I like to house my Streamlit apps in a dedicated conda environment. This way the library dependencies don’t get entangled with my other Python libraries. I recommend you do the same.
Begin by building an EDA app. Read how I created a dedicated conda environment in the GitHub repo’s readme.md file, then watch this tutorial video on How to Build an EDA app using Pandas Profiling and follow these steps:
Step 1. Create a conda environment called eda:
conda create -n eda python=3.7.9
Step 2. Activate the eda environment:
conda activate eda
Step 3. Install prerequisite libraries by downloading the requirements.txt file (it contains the library version numbers):
wget https://raw.githubusercontent.com/dataprofessor/eda-app/main/requirements.txt
Step 4. Install libraries via pip:
pip install -r requirements.txt
Step 5. Download and unzip contents from the GitHub repo: https://github.com/dataprofessor/eda-app/archive/main.zip
Step 6. Launch the app:
streamlit run app.py
You’ll see the web app browser pop up:
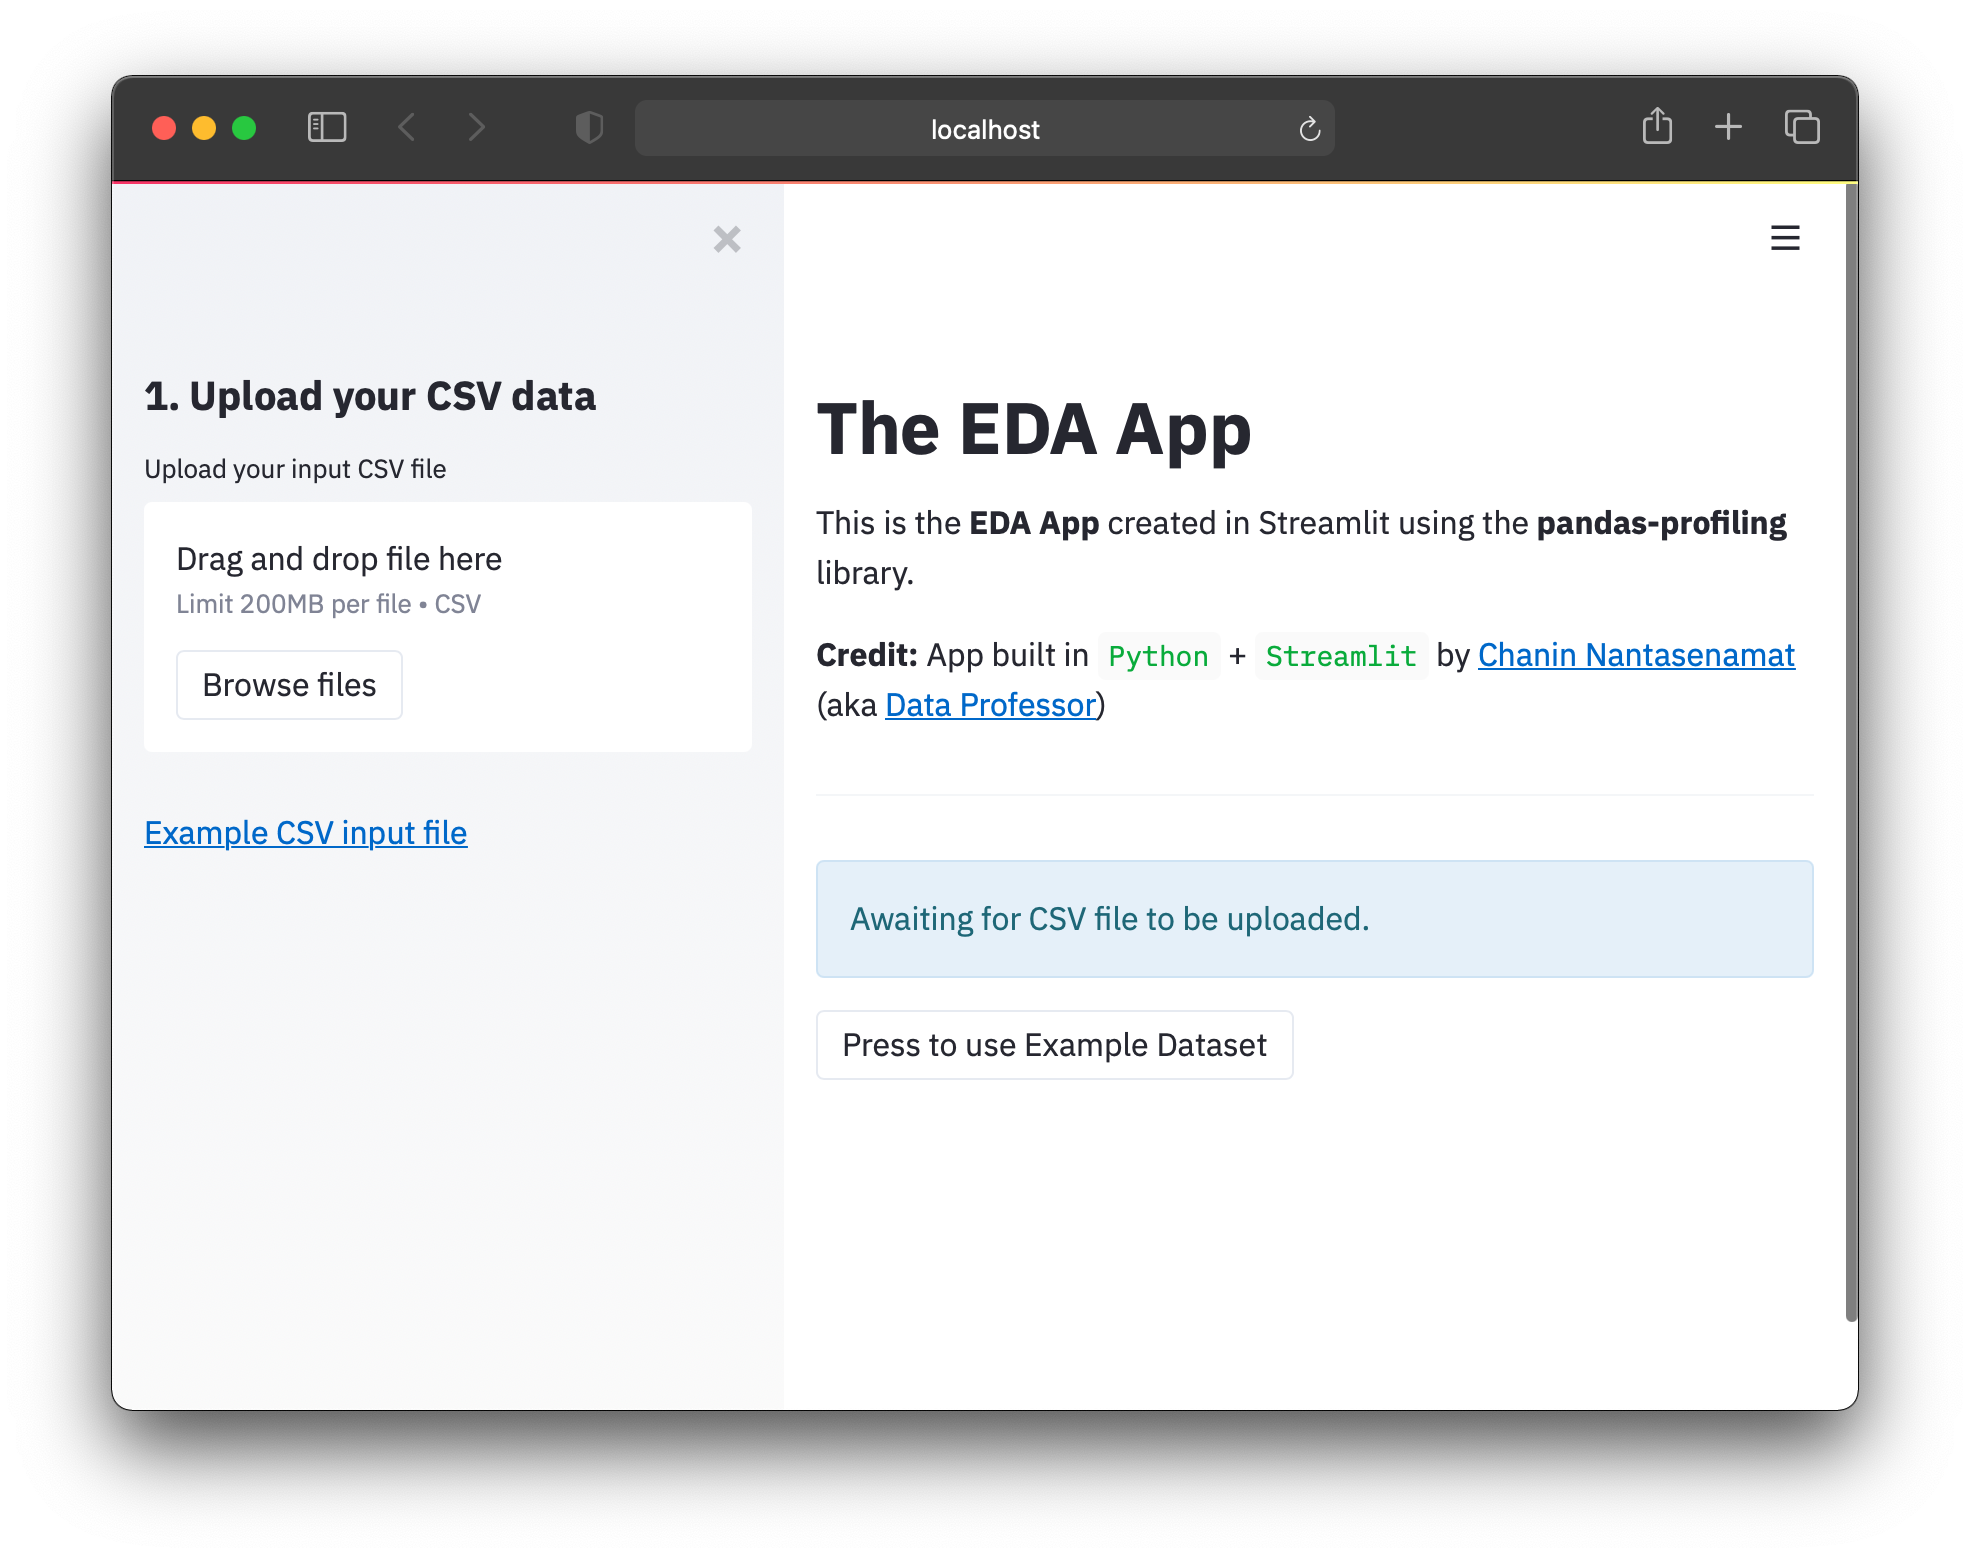
The functionality of this EDA app leverages the capabilities of pandas-profiling:

Congratulations! You now know how to clone a Streamlit app from a GitHub repo, setup a dedicated conda environment, and successfully launch the app!
Next, customize the app to your own liking.
4. Practice by building the “Hello, World!” app
Now that you know Streamlit principles, let’s build some apps. It’s not as hard as you may think. A typical rite of passage for learning any new programming language is to start with printing Hello World!.
Here is how to do it in Streamlit in four easy steps:
Step 1. Launch your favorite code editor (Atom.io, VS Code, etc.).
Step 2. Create a file and name it app.py.
Step 3. Add this code into the app.py file:
import streamlit as st

st.write('Hello world!')
Step 4. Launch the app by typing this into the command line:
streamlit run app.py
5. Build your Own Streamlit App
I like to start my Streamlit projects by coding the “brains” of the app on Google Colab.
At a high level, a web app is comprised of three key elements:
- Input. Widgets make it possible to take in user input. They can be sliders, text/number boxes, file upload widgets, etc.
- The “brains” of the app. The brains or the inner workings of the app is what differentiates one app from another. It performs the function of transforming user inputs into outputs.
- Output. This can be anything: DataFrame printouts, images, plots, numerical values, text, or embeddings of audio, videos, and tweets.
Because web apps adopt a similar structure, some of the elements used in one project can be repurposed and reused in the next project.
5.1. Elements of a Streamlit app
- Contents (text, images, embedded videos, audio, tweets, etc.)
- Widgets
- Auxillaries (balloons, code box, etc.)
5.2. The “Brains” of the Streamlit app
- Use Streamlit components
- Make use of existing functions from Python libraries of interest
- Code your own custom function
5.3. Lay out the app
I like to put widgets on the left-hand sidebars of the app. Use st.sidebar. in front of any widget functions of interest (instead of st.). For example, to place the text input box in the sidebar, use st.sidebar.text_input(‘Name’) instead of st.text_input(‘Name’) (which would place the text input box into the main panel).
6. Deploy your Streamlit app
Now that you’ve built a Streamlit app, deploy it to the cloud for general public access. The easiest way to do this is with Streamlit Cloud:
- Create a GitHub repo of the app files (
app.py,requirements.txt, and dependency files) - In Streamlit Cloud, link your GitHub account and select the app’s repo to deploy.
You can also watch this video on how to deploy Streamlit apps.
7. Resources
7.1. Documentation
Streamlit’s documentation website is the best place to get you started:
- Streamlit library. A guide on how to build Streamlit apps with various Streamlit functions (the API reference), “Get started” tutorials, and a cheat sheet.
- Streamlit Cloud. Everything you need to know on how to deploy apps to Streamlit Cloud.
- Knowledge base. A growing collection of tutorial articles and FAQs about using Streamlit and troubleshooting problems.
7.2. Discussion forum
Can’t find the information on the documentation website? Check out the Streamlit discussion forum and read the troubleshooting guide for tips on resolving problems.
7.3. YouTube tutorials
Here’s a list of these YouTube channels about Streamlit:
- Streamlit. The official Streamlit YouTube channel with official announcements of the latest features.
- Data Professor. My YouTube channel with videos on data science and bioinformatics and a growing playlist of 30 videos on Streamlit.
- JCharisTech. Jesse’s YouTube channel with tutorial videos on Python and Streamlit and with a playlist of almost 70 videos on Streamlit.
- 1littlecoder. AbdulMajed’s YouTube channel with tutorial videos on Python and Streamlit and with a playlist of almost 20 videos on Streamlit.
7.4. Books
Tyler Richards wrote a book titled Getting Started with Streamlit for Data Science: Create and Deploy Streamlit Web Applications from Scratch in Python. It takes readers on a journey of how they can build interactive data-driven apps. The last chapter was super-fun to read as Tyler interviewed Streamlit power users.
I also interviewed Tyler in the hour-long podcast Data Science Podcast with Tyler Richards - Facebook Data Scientist. We talked about his journey into data science, his experience as a data scientist, and his thoughts and inspiration for writing a book about Streamlit.
Wrapping up
You’ve learned Streamlit essentials that will start you on building your own interactive data-driven Python apps. Well done! Of course, there’s always more to learn. Feel free to drop a comment or a suggestion below on the topics that you'd like to learn more about.
Happy Streamlit-ing! 🎈


Comments
Continue the conversation in our forums →