Hey, community! 👋
We’re two graduating MSBA students at Fordham University, Todd Wang (also known as Zicheng Wang) and Haoxiang Jia. Both of us struggle with interview preparations, so we discovered a shared goal: to make generative AI play an interviewer for us!
In this post, we’ll show you how you can build your own AI Interviewer:
- Create a chatbot interviewer
- Create vector embeddings and initialize session state
- Create a callback function that memorizes conversation history
- Build your app!
Why AI Interviewer?
When we started looking for jobs, we saw lots of job listings under the same title but with different descriptions. Many graduates resort to a "one size fits all" approach, but that meant potentially missing a particular job’s requirements.
After much thought, we decided to build an app that could help with:
Customized interview preparation. Just type in a job description and get targeted interview questions that simulate a real-life interview (no need for prompt engineering). This helps you prepare for interviews perfectly aligned with every job posting.
Comprehensive coverage. Prepare for various types of interviews:
- Professional interview—focuses on technical skills and industry knowledge. For example, you may be asked to design and implement a feature.
- Behavioral interview—focuses on how the candidate handles specific situations in the workplace. For example, you may be asked to describe how you dealt with a difficult coworker.
- Resume interview—focuses on the candidate's work experience, education, and skills as listed on their resume. For example, you may be asked to elaborate on past job responsibilities or explain a particular accomplishment.
Personalized evaluation and guidance. Get interview evaluations with feedback and actionable insights to refine your interview skills and improve your performance!
App overview
Before we dive into coding, let’s take a look at a two-step development process instead of a single RetrievalQA step (it leads to better performance):
- Creating vector embeddings. This is a technique of representing words as numbers to make them more computationally accessible.
- Developing an interviewer guideline. This requires careful planning to ensure that the questions asked are relevant and comprehensive. Once the guidelines are established, the actual interview can take place.

Now, let’s get to coding!
1. Create a chatbot interviewer
To start, create an efficient chatbot interviewer that can help you develop prompt templates and save them for later use.
Use this template to construct an interview guide for behavioral screening:
class templates:
	""" store all prompts templates """
	behavioral_template = """ I want you to act as an interviewer. Remember, you are the interviewer not the candidate.
            Let's think step by step.

            Based on the keywords,
            Create a guideline with the following topics for a behavioral interview to test the soft skills of the candidate.

            Do not ask the same question.
            Do not repeat the question.

            Keywords:
            {context}

            Question: {question}
            Answer:"""

	conversation_template = """I want you to act as an interviewer strictly following the guideline in the current conversation.
                            Candidate has no idea what the guideline is.
                            Ask me questions and wait for my answers. Do not write explanations.
                            Ask each question like a real person, only one question at a time.
                            Do not ask the same question.
                            Do not repeat the question.
                            Do ask follow-up questions if necessary.
                            Your name is GPTInterviewer.
                            I want you to only reply as an interviewer.
                            Do not write all the conversation at once.
                            If there is an error, point it out.

                            Current Conversation:
                            {history}

                            Candidate: {input}
                            AI: """)
2. Create vector embeddings and initialize session state
Next, create a function that utilizes FAISS to generate vector embeddings. Since the job description or resume text isn’t long, use the NLTKTextSplitter instead of RecursiveCharacterTextSplitter for better results. For longer texts, split them into chunks and process them individually to avoid loss of information or context.
When working with vector embeddings, use the appropriate text splitter and chunk size to get desired results:
from langchain.vectorstores import FAISS
from langchain.embeddings import OpenAIEmbeddings
from langchain.text_splitter import NLTKTextSplitter
jd = st.text_area("Please enter the job description here ()")

'''The variable "jd" was passed to the embeddings function later on.'''

def embeddings(text):
	text_splitter = NLTKTextSplitter()
	texts = text_splitter.split_text(text)
	embeddings = OpenAIEmbeddings()
	docsearch = FAISS.from_texts(texts, embeddings)
	retriever = docsearch.as_retriever(search_tupe='similarity search')
	return retriever
The function returns a variable called "retriever", which users can later use to generate interview questions that are relevant, targeted, and effective.
It’s also important to distinguish between messages from AI and humans. Use specific markers or tags to identify the message source, properly attribute each message, and maintain clear communication with their interviewees:
from dataclasses import dataclass
from typing import Literal

@dataclass
class Message:
	origin: Literal["human", "ai"]
	message: str
Now, let's write a function to initialize session states:
from langchain

def initialize_session_state():
    if "retriever" not in st.session_state:
        st.session_state.retriever = embeddings(jd)

    if "chain_type_kwargs" not in st.session_state:
        Behavioral_Prompt = PromptTemplate(input_variables=["context", "question"],
                                          template=templates.behavioral_template)
        st.session_state.chain_type_kwargs = {"prompt": Behavioral_Prompt}
    # interview history
    if "history" not in st.session_state:
        st.session_state.history = []
        st.session_state.history.append(Message("ai", "Hello there! I am your interviewer today. I will access your soft skills through a series of questions. Let's get started! Please start by saying hello or introducing yourself. Note: The maximum length of your answer is 4097 tokens!"))

    # token count
    if "token_count" not in st.session_state:
        st.session_state.token_count = 0
    if "memory" not in st.session_state:
        st.session_state.memory = ConversationBufferMemory()
    if "guideline" not in st.session_state:
        llm = ChatOpenAI(
            model_name="gpt-3.5-turbo",
            temperature=0.8)
        st.session_state.guideline = RetrievalQA.from_chain_type(
            llm=llm,
            chain_type_kwargs=st.session_state.chain_type_kwargs, chain_type='stuff',
            retriever=st.session_state.retriever, memory=st.session_state.memory).run(
            "Create an interview guideline and prepare total of 8 questions. Make sure the questions test the soft skills")

    if "conversation" not in st.session_state:
        llm = ChatOpenAI(
        model_name = "gpt-3.5-turbo",
        temperature = 0.8)
        PROMPT = PromptTemplate(
            input_variables=["history", "input"],
            template=templates.conversation_template)
        st.session_state.conversation = ConversationChain(prompt=PROMPT, llm=llm,
                                                       memory=st.session_state.memory)
    if "feedback" not in st.session_state:
        llm = ChatOpenAI(
        model_name = "gpt-3.5-turbo",
        temperature = 0.5)
        st.session_state.feedback = ConversationChain(
            prompt=PromptTemplate(input_variables = ["history", "input"], template = templates.feedback_template),
            llm=llm,
            memory = st.session_state.memory
        )
Session state has several features that provide a complete interview experience:
- Chain_type_kwargs: responsible for creating a customizable prompt template for the RetrievalQA chain (enables the system to generate questions tailored to the specific job description).
- History: keeps track of the messages exchanged during the interview (helps the system to maintain context and avoid asking repetitive questions).
- Token_count: keeps track of the number of tokens consumed during the interview (measures the interview's duration and ensures that the system doesn’t ask too many questions).
- Memory: initializes a memory buffer to keep track of the context (helps the system to remember important details about the candidate's qualifications and experience).
- Guideline: uses the RetrievalQA chain to generate an interview guideline based on the job description (provides a framework for the interview and ensures that all relevant topics are covered).
- Conversation: uses the conversation chain to conduct the interview based on the guideline (enables the system to ask follow-up questions and engage in a more natural conversation with the candidate).
- Feedback: uses the LLM chain to generate feedback based on the context (provides the candidate with valuable insights into their performance during the interview and helps them to improve their skills for future interviews).
3. Generate interview questions with a similarity search
Now that you’ve completed the initialization steps for your conversation chain, let’s move on to the callback function—the backbone of our chatbot (without it, our chatbot wouldn’t be able to talk to users).
The callback function takes the user's text input (the latest response saved to and pulled from st.session_state.history) and applies the necessary logic to generate an appropriate response. Once it’s generated, it gets appended to the conversation history. This allows the chatbot to remember the context of previous messages.
But that's not all!
We’ve also added an optional voice interaction feature. It allows the user to listen to the chatbot's response and input their own responses using their voice. This can be incredibly helpful for users who wish to practice their speaking skills. The audio widget is returned by the callback function, giving the user the option to listen to the chatbot's response instead of reading it.
from IPython.display import Audio

def answer_call_back():
    with get_openai_callback() as cb:
        # user input
        human_answer = st.session_state.answer
        # transcribe audio
        if voice:
            save_wav_file("temp/audio.wav", human_answer)
            try:
                input = transcribe("temp/audio.wav")
                # save human_answer to history
            except:
                st.session_state.history.append(Message("ai", "Sorry, I didn't get that. Please try again."))
        else:
            input = human_answer

        st.session_state.history.append(
            Message("human", input)
        )
        # OpenAI answer and save to history
        llm_answer = st.session_state.conversation.run(input)
        # speech synthesis and speak out
        audio_file_path = synthesize_speech(llm_answer)
        # create audio widget with autoplay
        audio_widget = Audio(audio_file_path, autoplay=True)
        # save audio data to history
        st.session_state.history.append(
            Message("ai", llm_answer)
        )
        st.session_state.token_count += cb.total_tokens
        return audio_widget
We’ve defined the "transcribe" function for Speech-to-Text and "Audio" for Text-to-Speech. There are many APIs available for performing these tasks. Specifically, we used OpenAI Whisper for Speech-to-Text and Amazon Polly for Text-to-Speech.
OpenAI Whisper
import wave
import os
import openai
class Config:
    channels = 2
    sample_width = 2
    sample_rate = 44100

def save_wav_file(file_path, wav_bytes):
    with wave.open(file_path, 'wb') as wav_file:
        wav_file.setnchannels(Config.channels)
        wav_file.setsampwidth(Config.sample_width)
        wav_file.setframerate(Config.sample_rate)
        wav_file.writeframes(wav_bytes)

def transcribe(file_path):
    audio_file = open(file_path, 'rb')
    transcription = openai.Audio.transcribe("whisper-1", audio_file)
    return transcription['text']
Amazon Polly
import boto3
from contextlib import closing
import sys
from tempfile import gettempdir

Session = boto3.Session(
        region_name = "us-east-1"
    )

def synthesize_speech(text):
    Polly = Session.client("polly")
    response = Polly.synthesize_speech(
        Text=text,
        OutputFormat="mp3",
        VoiceId="Joanna")
    if "AudioStream" in response:
        # Note: Closing the stream is important because the service throttles on the
        # number of parallel connections. Here we are using contextlib.closing to
        # ensure the close method of the stream object will be called automatically
        # at the end of the with statement's scope.
        with closing(response["AudioStream"]) as stream:
            output = os.path.join(gettempdir(), "speech.mp3")

            try:
                # Open a file for writing the output as a binary stream
                with open(output, "wb") as file:
                    file.write(stream.read())
            except IOError as error:
                # Could not write to file, exit gracefully
                print(error)
                sys.exit(-1)
    else:
        # The response didn't contain audio data, exit gracefully
        print("Could not stream audio")
        sys.exit(-1)
    '''
    # Play the audio using the platform's default player
    if sys.platform == "win32":
        os.startfile(output)
    else:
        # The following works on macOS and Linux. (Darwin = mac, xdg-open = linux).
        opener = "open" if sys.platform == "darwin" else "xdg-open"
        subprocess.call([opener, output])
4. Build your app!
With the initialization function and callback function in place, you can build your app!
Here is the code:
# submit job description
jd = st.text_area("Please enter the job description here (If you don't have one, enter keywords, such as PostgreSQL or Python instead): ")
# auto play audio
auto_play = st.checkbox("Let AI interviewer speak! (Please don't switch during the interview)")

if jd:
    # initialize session states
    initialize_session_state()
		# feedback requested button
		feedback = st.button("Get Interview Feedback")

    token_placeholder = st.empty()
    chat_placeholder = st.container()
    answer_placeholder = st.container()

	  # initialize an audio widget with None
		audio = None

		# if feedback button has been clicked, run the feedback chain and terminate the interview
    if feedback:
        evaluation = st.session_state.feedback.run("please give evalution regarding the interview")
        st.markdown(evaluation)
        st.stop()
    else:
        with answer_placeholder:
						# choose the way of input
            voice: bool = st.checkbox("I would like to speak with AI Interviewer")
            if voice:
								# audio input
                answer = audio_recorder(pause_threshold = 2.5, sample_rate = 44100)
            else:
								# message input
                answer = st.chat_input("Your answer")
						# run the callback function, generate response, and return a audio widget
						if answer:
                st.session_state['answer'] = answer
                audio = answer_call_back()

        # chat_placeholder is use to display the chat history
				with chat_placeholder:
            for answer in st.session_state.history:
                if answer.origin == 'ai':
										# if user choose auto play, return both AI outputs and its audio
                    if auto_play and audio:
                        with st.chat_message("assistant"):
                            st.write(answer.message)
                            st.write(audio)
                    else:
										# only return AI outputs
                        with st.chat_message("assistant"):
                            st.write(answer.message)
                else:
										# user inputs
                    with st.chat_message("user"):
                        st.write(answer.message)

				# keep track of token consumed
		    token_placeholder.caption(f"""
        Used {st.session_state.token_count} tokens """)
else:
    st.info("Please submit a job description to start the interview.")
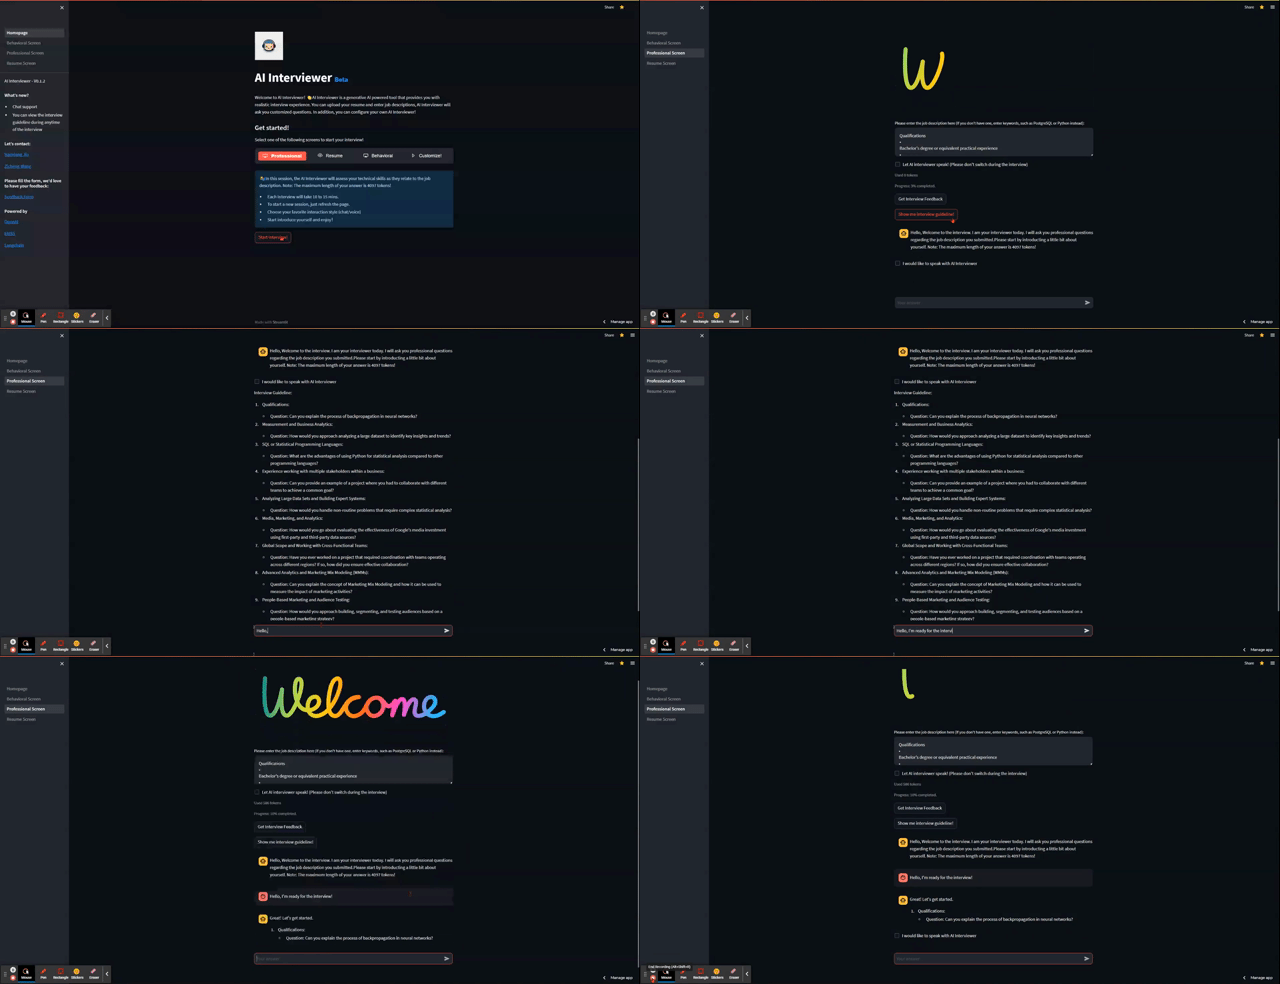
And here is the app in action!

Wrapping up
Thank you for reading our post. We hope it has inspired you to make your own Streamlit app. If you have any questions, please post them in the comments below or contact us on LinkedIn or Twitter.
Happy Streamlit-ing! 🎈


Comments
Continue the conversation in our forums →