
Do you love Notion? Same here. But do you sometimes find it hard to quickly locate the right information in Notion? I faced the same problem at my company (we store literally everything in Notion). So I decided to build a Notion chatbot.
It was inspired by Harrison Chase’s app, and attempts to improve it by:
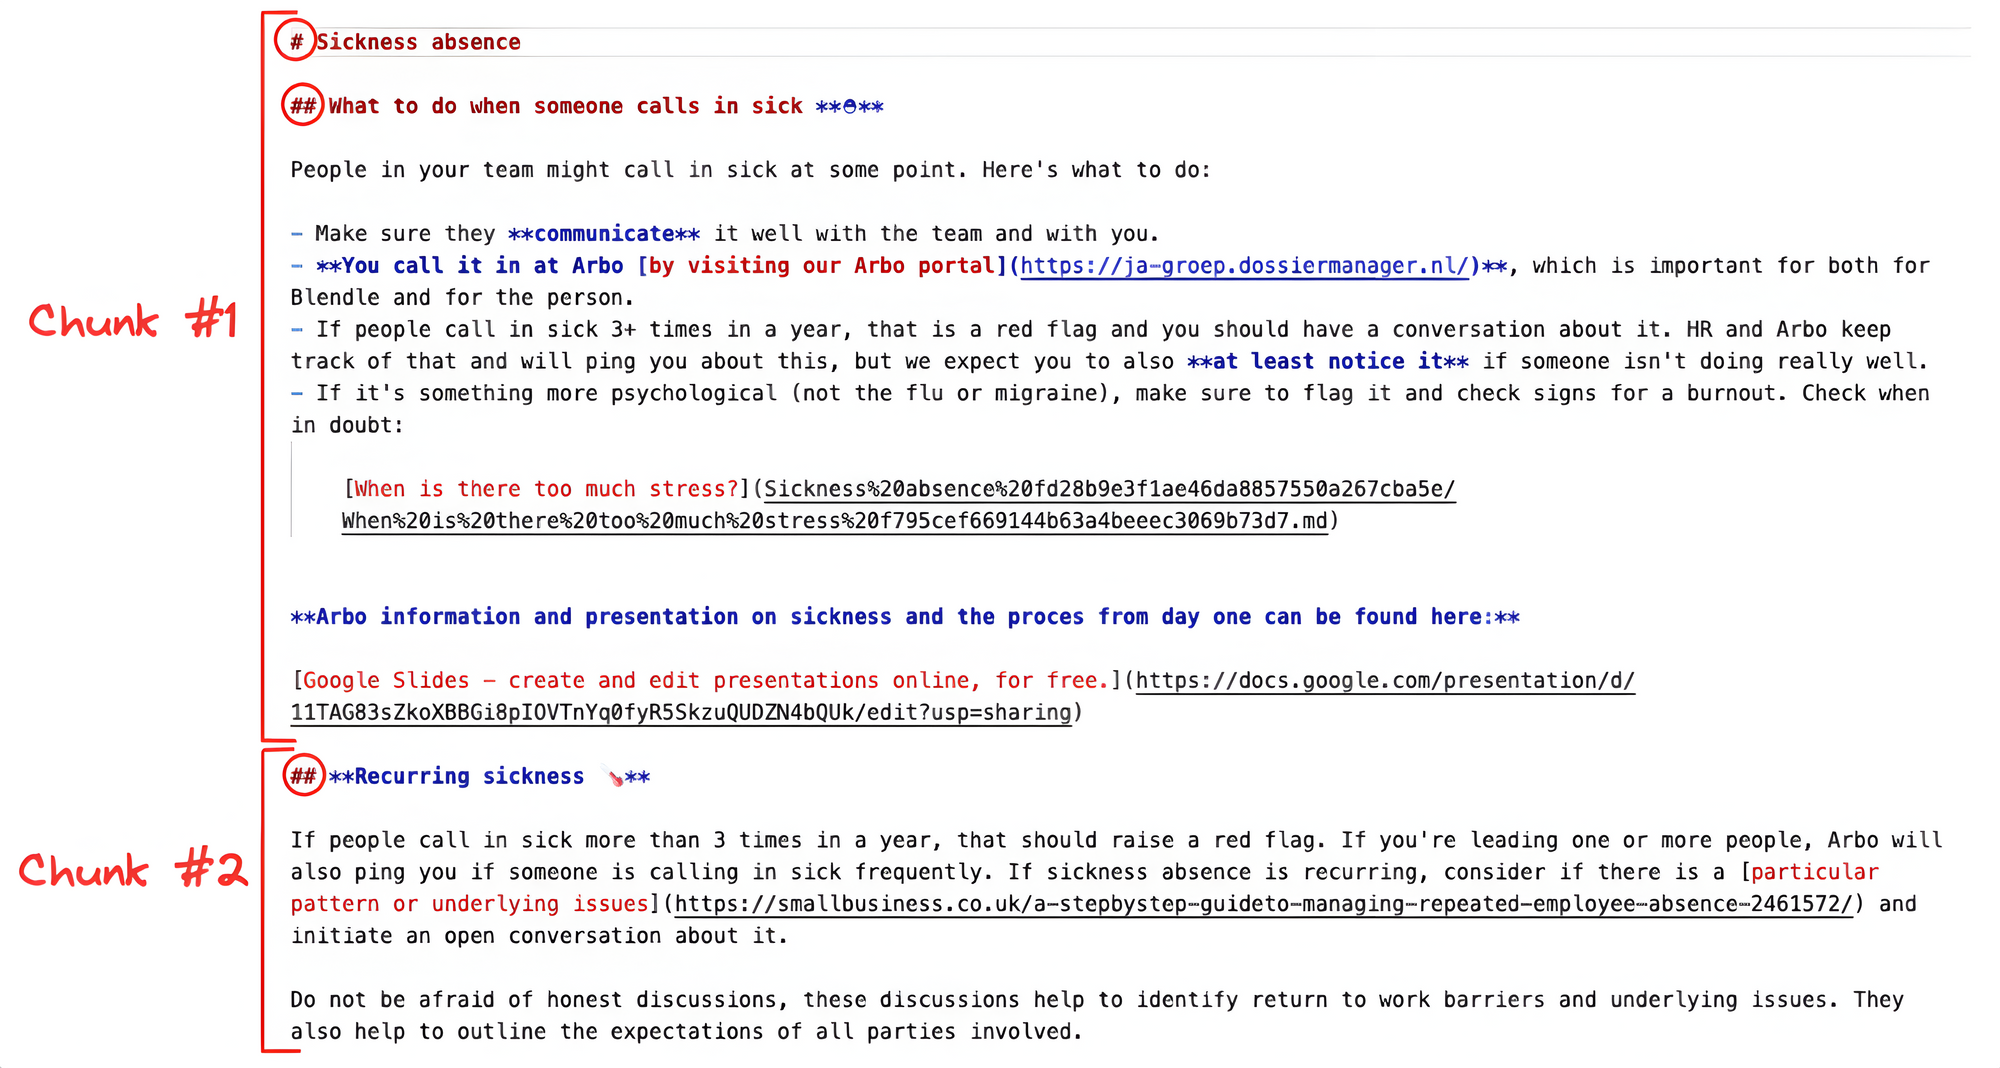
- 🔪 Using specific markdown characters for better content splitting
- 🧠 Adding memory to the bot
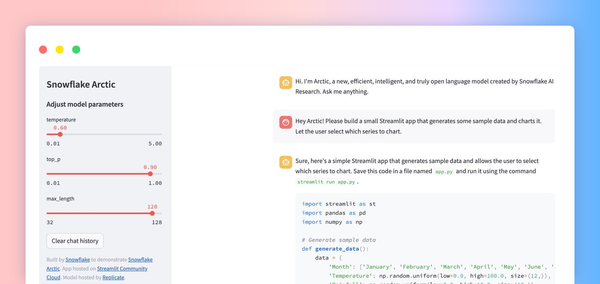
- 💬 Using Streamlit as the front-end chat app with the new chat features
- 📣 Embedding the Streamlit app into a Notion page
Add your OpenAI Key to play with the app!
Let’s walk through how you can build your own Notion chatbot!
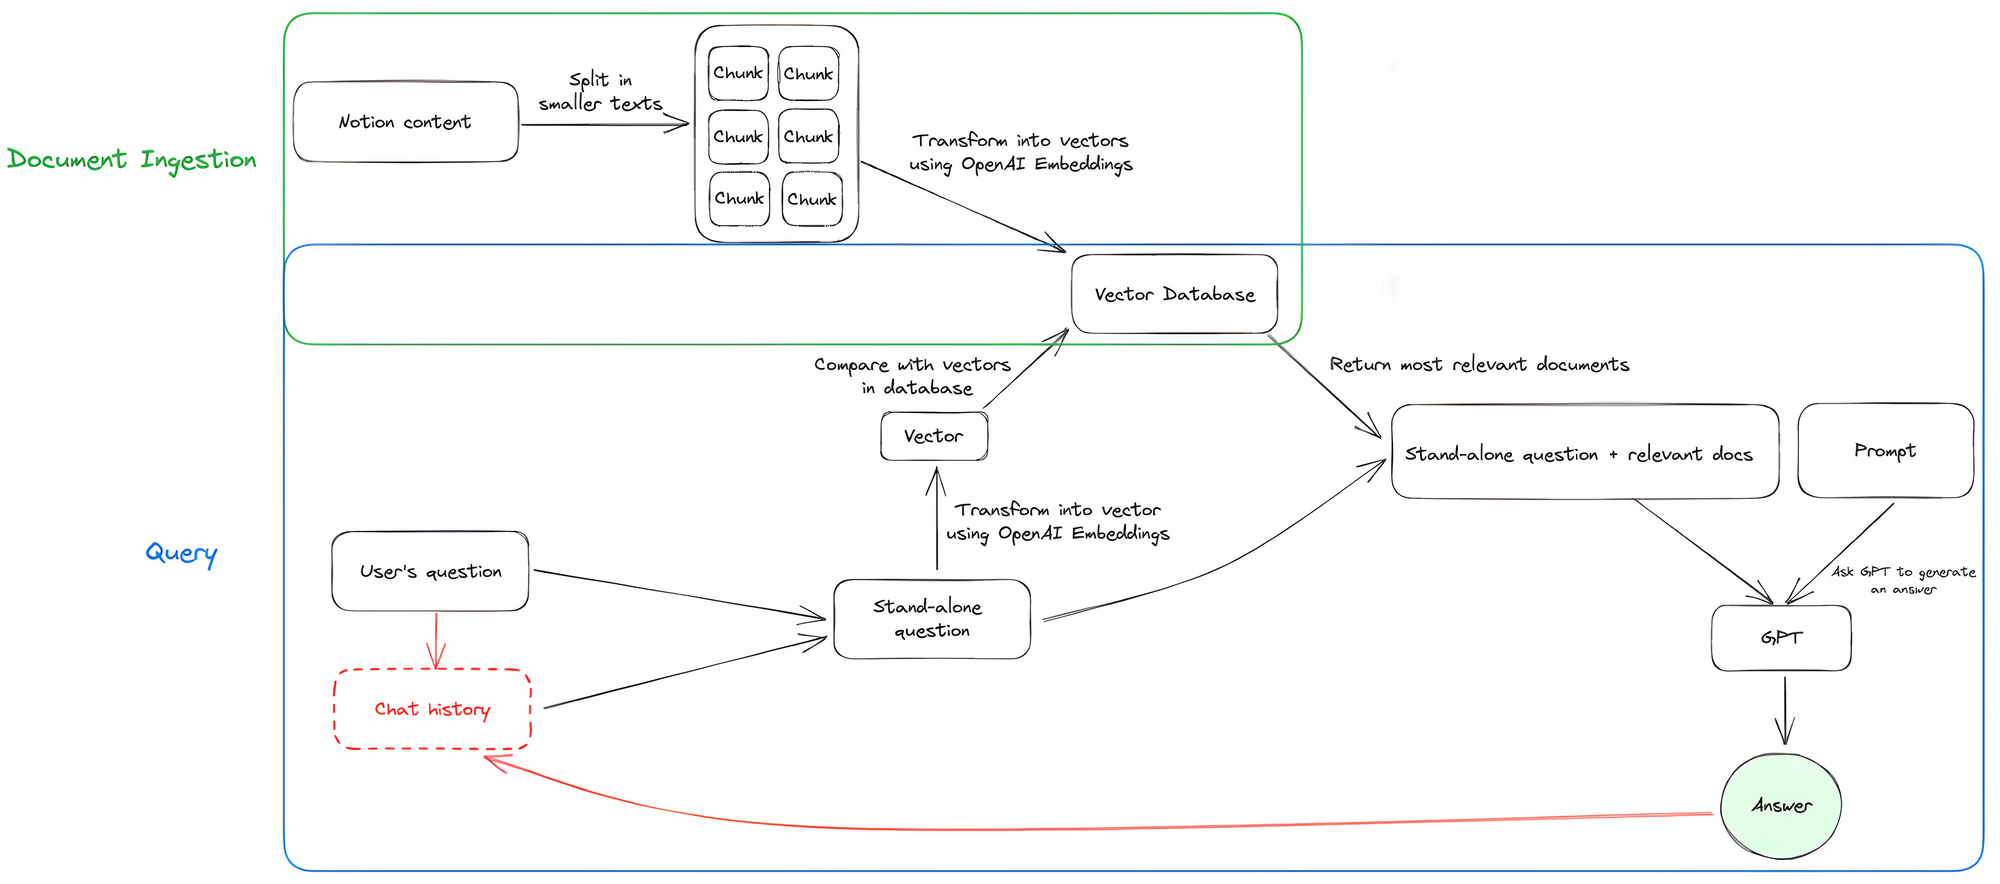
An overview of the app
Step-by-step tutorial
1. Project structure and initialization
Let's start by examining the project structure and installing the necessary dependencies. And don’t forget to get your OpenAI API key and duplicate a public Notion page (to use as a foundation).
1.1 Project structure
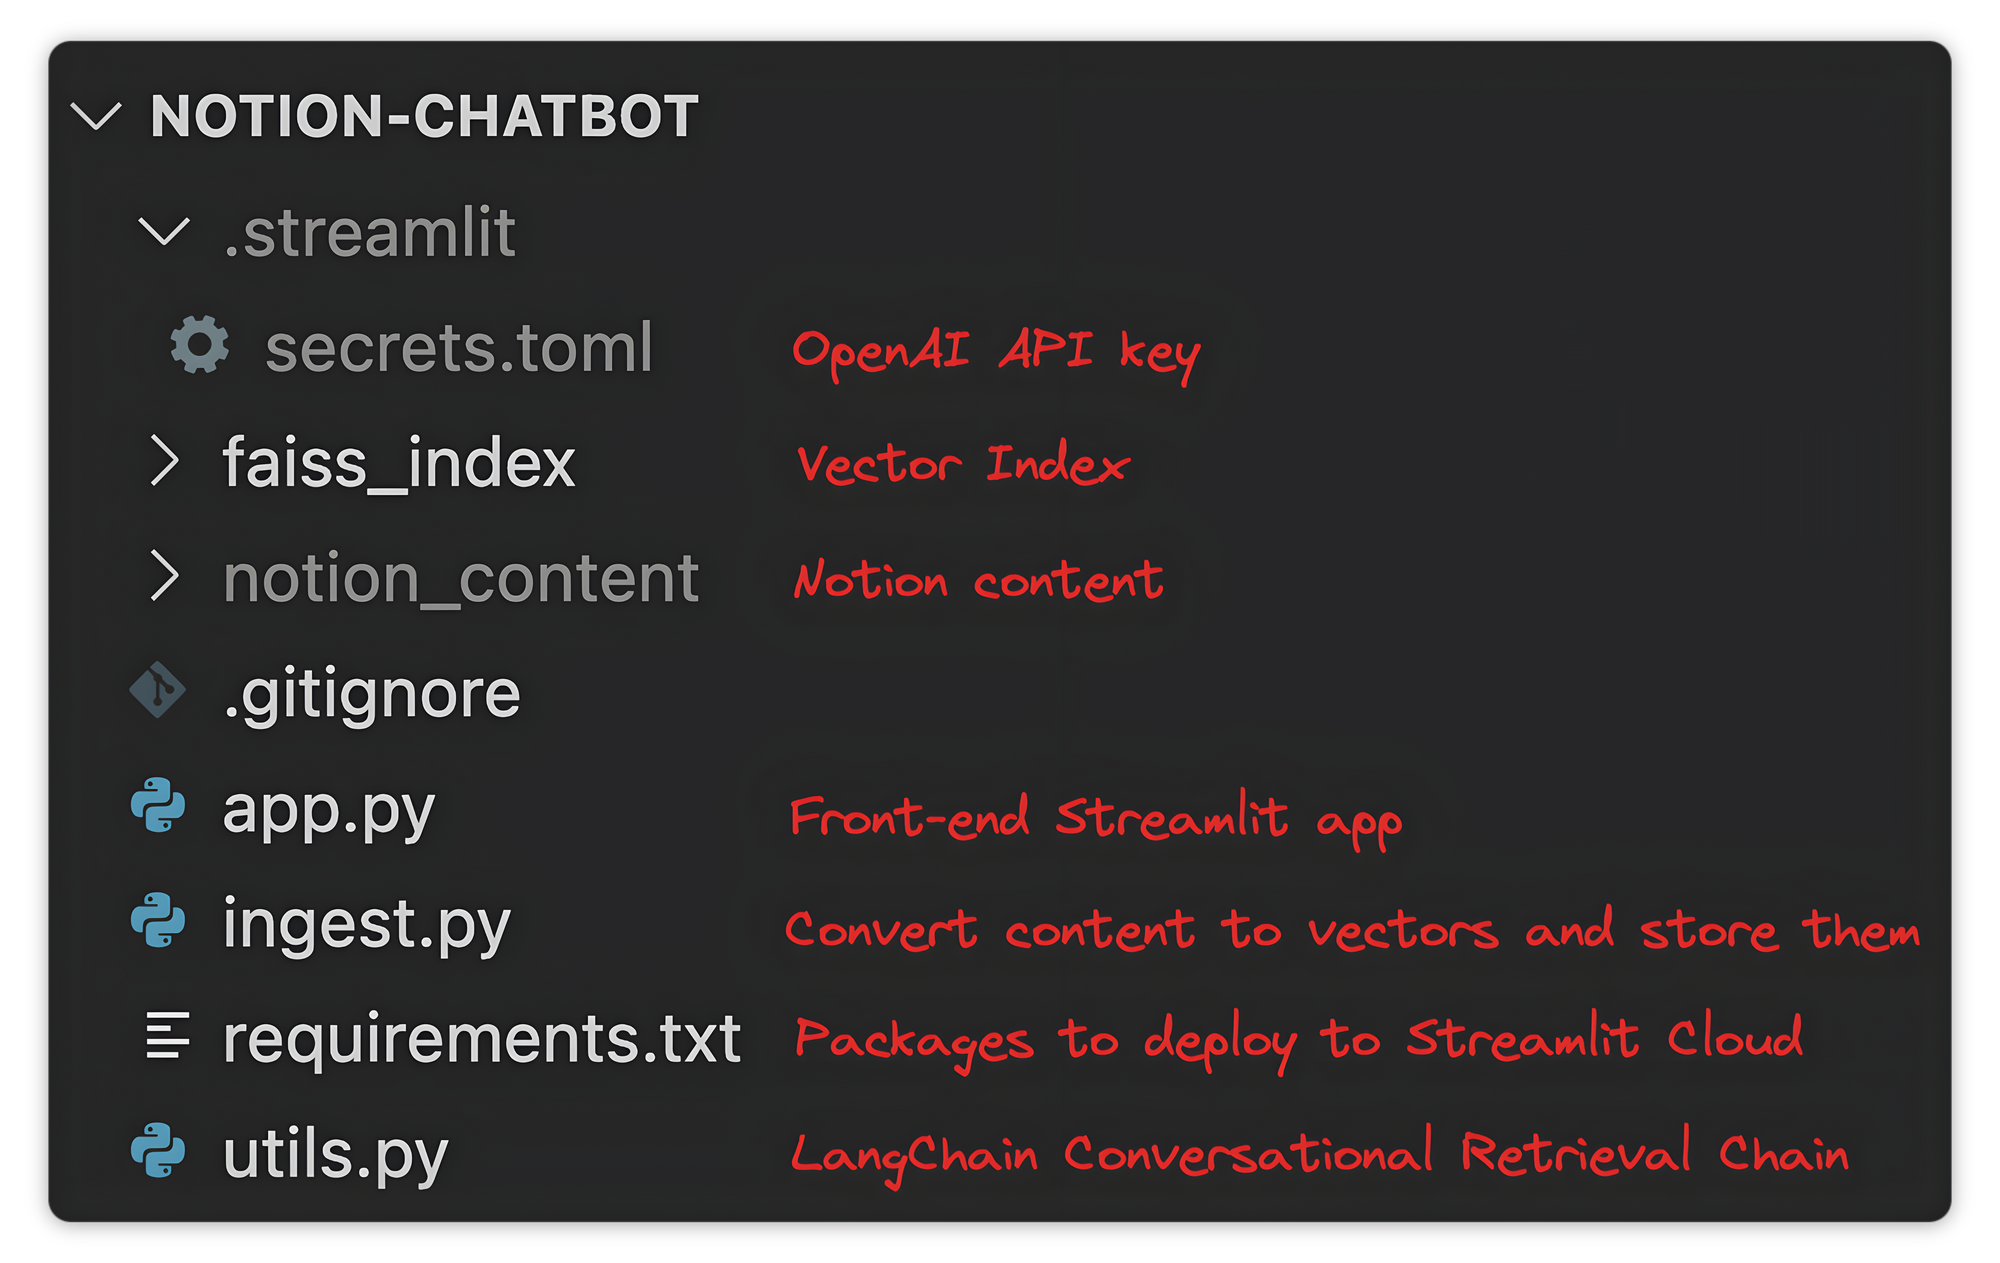
The project structure of notion-chatbot consists of the following:
.streamlit/secrets.toml: stores your OpenAI API key.faiss_index: a FAISS index (vector database) that stores all the vectors.notion_content: a folder containing the Notion content in markdown files..gitignore: ignores your OpenAI API key and Notion content.app.py: the script for the Streamlit chat application.ingest.py: the script used to convert Notion content to vectors and store them in a vector index.utils.py: the script used to create a Conversation Retrieval Chain.requirements.txt: a file containing the necessary packages to deploy to Streamlit Community Cloud.
You’ll create each file step-by-step, so there is no need to create them all at once.
Now, let's initialize the project!
1.2 Project initialization
- Start by creating a project folder
notion-chatbot - Create a new environment and install the required dependencies
pip install streamlit langchain openai tiktoken faiss-cpu
- Create the
.gitignorefile to specify which files not to track
# .gitignore

notion_content/
.streamlit/
- Go to OpenAI and get your API key
- Create the folder
.streamlit - In
.streamlit, create the filesecrets.tomlto store your OpenAI API key as follows
>>> secrets.toml

OPENAI_API_KEY = 'sk-A1B2C3D4E5F6G7H8I9J'
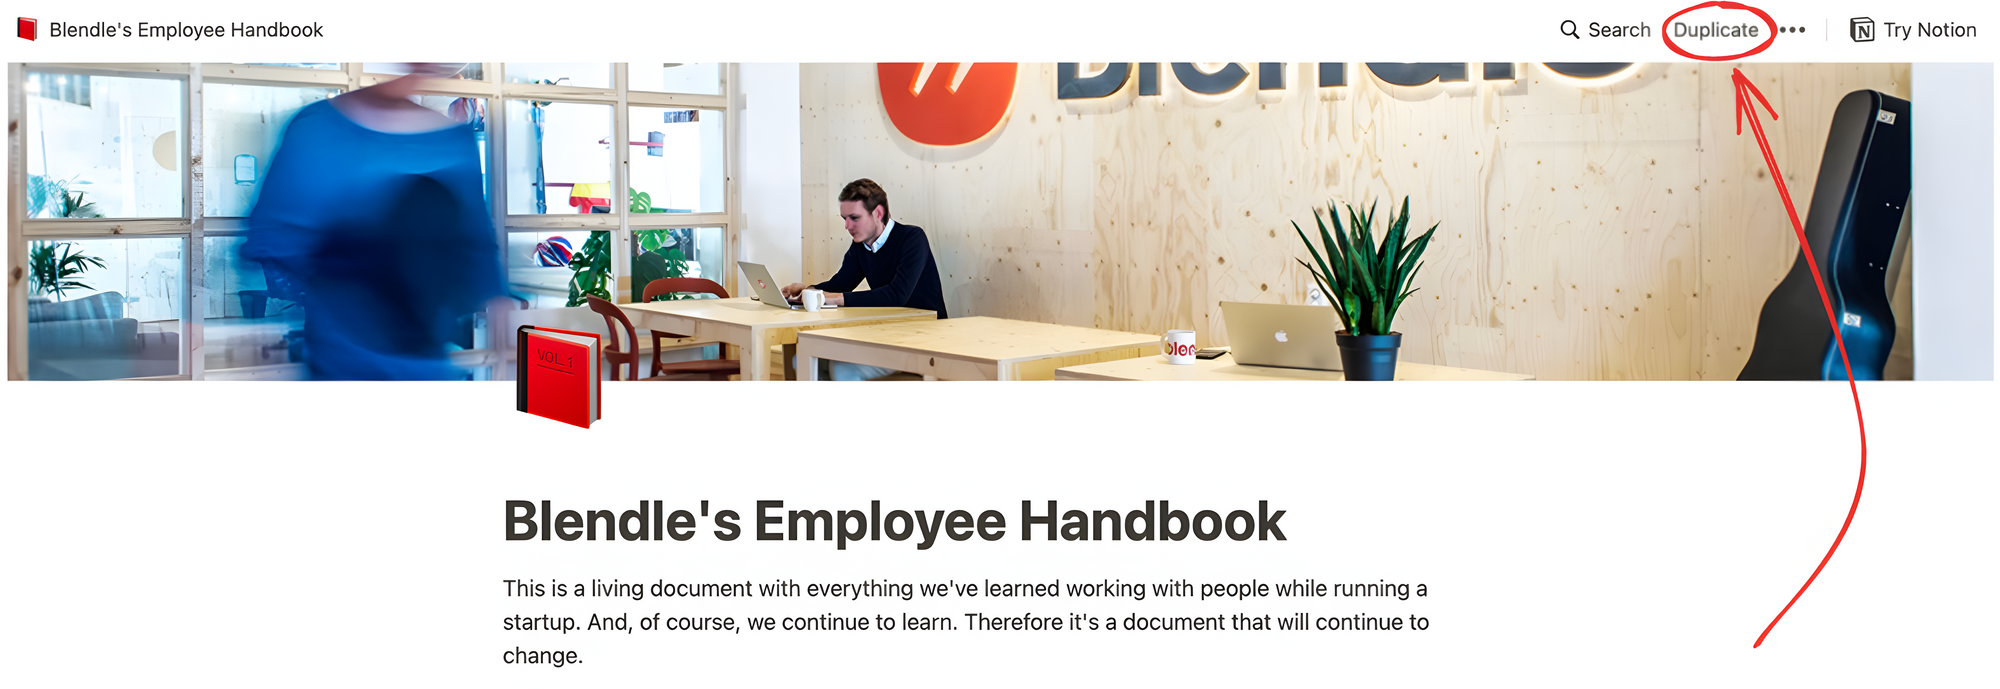
- Use Blendle Employee Handbook as your knowledge base
If you don’t have a Notion account, create it here. It’s free!
Select Duplicate on the top-right corner to duplicate it into your Notion
2. Document ingestion
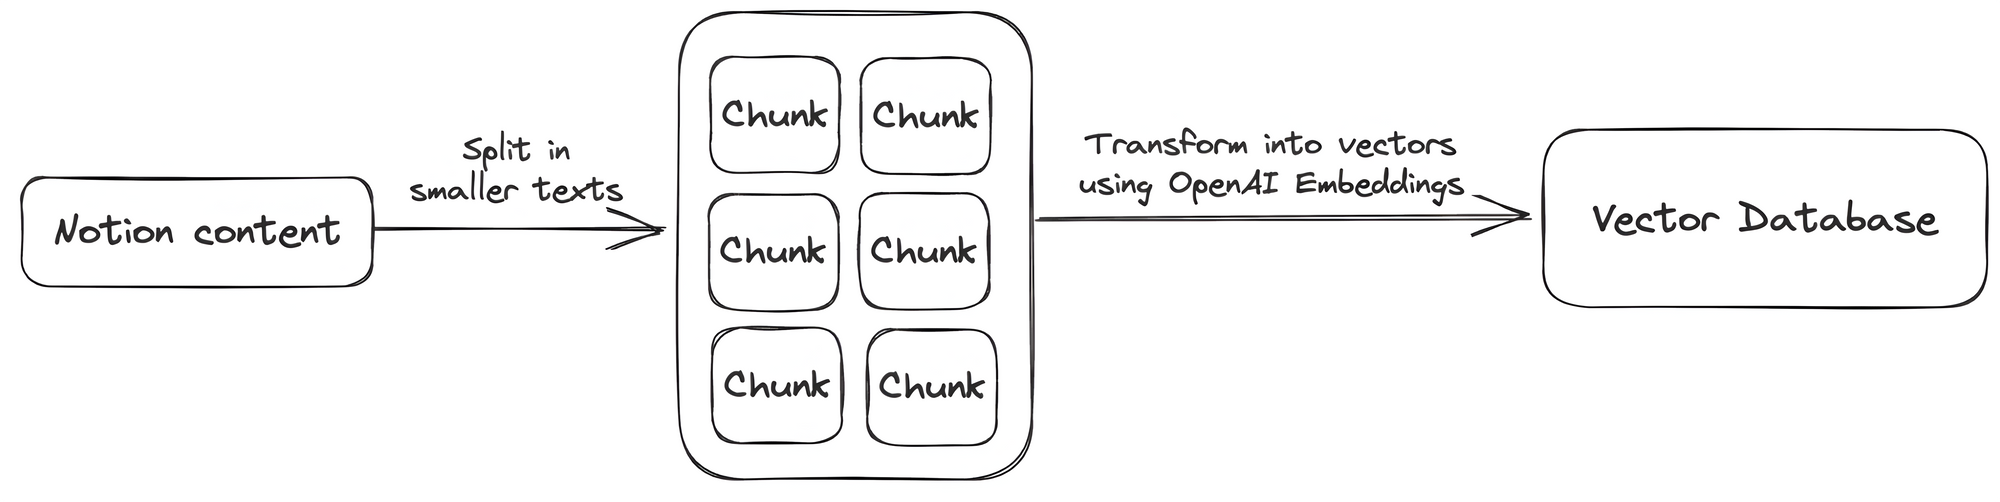
To convert all content from your Notion pages into numerical representations (vectors), use LangChain to split the text into smaller chunks that can be processed by OpenAI's embedding model. The model will convert the text chunks into vectors, which you’ll then store in a vector database.
2.1 Export your Notion content
- Go to the main Notion page of the Blendle Employee Handbook.
- In the top right corner, click on the three dots.
- Choose
Export - Select
Markdown and CSVfor the Export Format - Select
Include subpages - Save the file as
notion_content.zip - Unzip the folder
- Place the
notion_contentfolder into yournotion-chatbotproject folder
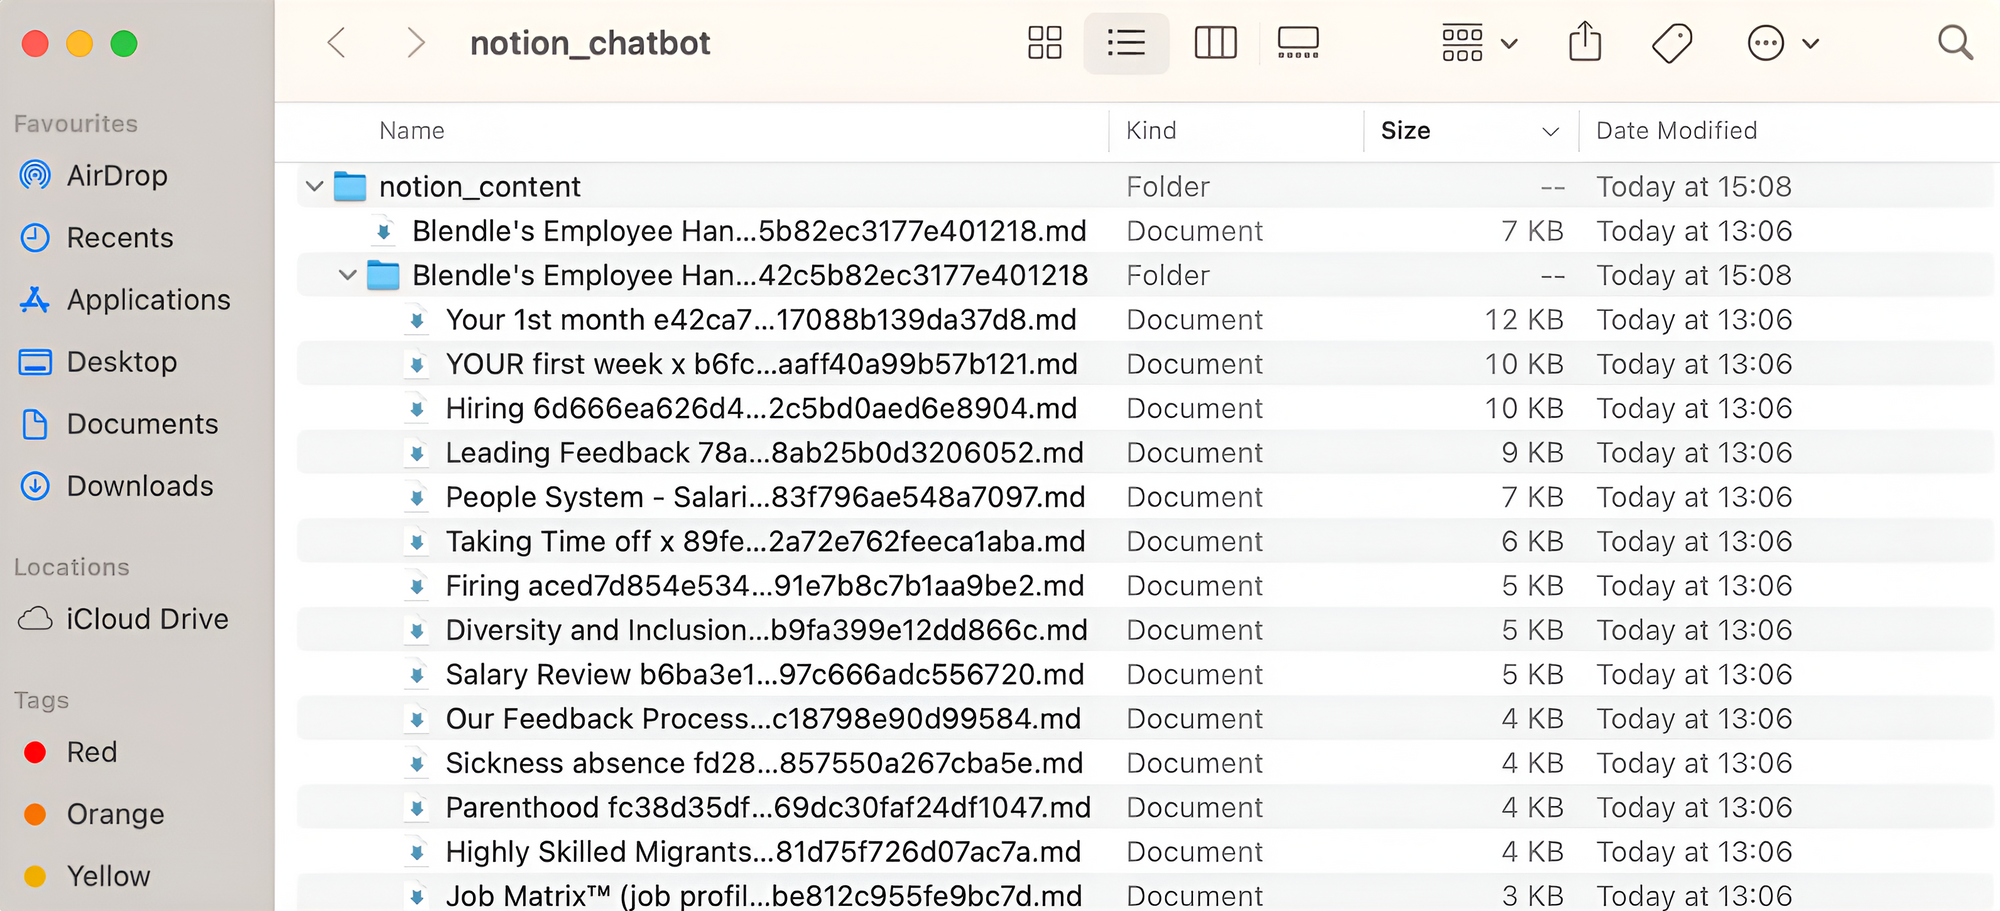
Great! You should now have all the Notion content as .md files in the notion_content folder within your notion-chatbot project folder.
2.1 Convert Notion content to vectors
To use the content of your Notion page as the knowledge base of your chatbot, convert all the content into vectors and store them. To do this, use LangChain, an OpenAI embedding model, and FAISS.
Open your project folder in your favorite IDE and create a new file called ingest.py:
#ingest.py

import streamlit as st
import openai
from langchain.document_loaders import NotionDirectoryLoader
from langchain.text_splitter import RecursiveCharacterTextSplitter
from langchain.embeddings import OpenAIEmbeddings
from langchain.vectorstores import FAISS

# Load OpenAI API key
openai.api_key = st.secrets["OPENAI_API_KEY"]

# Load the Notion content located in the folder 'notion_content'
loader = NotionDirectoryLoader("notion_content")
documents = loader.load()

# Split the Notion content into smaller chunks
markdown_splitter = RecursiveCharacterTextSplitter(
    separators=["#","##", "###", "\\n\\n","\\n","."],
    chunk_size=1500,
    chunk_overlap=100)
docs = markdown_splitter.split_documents(documents)

# Initialize OpenAI embedding model
embeddings = OpenAIEmbeddings()

# Convert all chunks into vectors embeddings using OpenAI embedding model
# Store all vectors in FAISS index and save to local folder 'faiss_index'
db = FAISS.from_documents(docs, embeddings)
db.save_local("faiss_index")

print('Local FAISS index has been successfully saved.')
Let's go over the code:
- Load the OpenAI API key stored in
.streamlit/secrets.toml. - Load the Notion content located in the
notion_contentfolder usingNotionDirectoryLoader. - Split the content into smaller text chunks using
RecursiveCharacterTextSplitter.
There are different ways to split text.
Your Notion content consists of markdown files with headings (# for H1, ## for H2, ### for H3), so split on those specific characters. This ensures that you split the content at the best place between paragraphs, and not between the sentences of the same paragraph. If the split can't be done on headings, it’ll try to split on the characters \\n\\n, \\n, . that separate sentences. RecursiveCharacterTextSplitter follows the order of the list of characters you provide, meaning it’ll use the next character in the list until the chunks are small enough.
Use a chunk size of 1500 with an overlap of 100 (feel free to experiment with different values):
- Convert each text chunk into a vector using the OpenAI embedding model.
- Store all the vectors in a FAISS index.
With your Notion content now converted to vectors and stored in a vector database, let's explore how you can interact with them!
3. Query
To find an answer to the user's question, convert it into a vector using the same embedding model as before. This vector is then matched with similar vectors in the vector database created earlier. Pass the relevant text content along with the user's question to OpenAI GPT to create an answer.
To improve the chat experience, add memory to your chatbot by storing previous messages in a chat history. This allows the chatbot to access the chat history during the conversation.
3.1 Flow

- A chat history is created at the start. As the user asks questions or the chatbot provides answers, these messages are stored in the chat history. The chatbot keeps track of previous messages as the conversation progresses, which serves as its memory.
- As the user writes a question, it’s saved in the chat history.
- The question and the chat history combine into a standalone question.
- The standalone question converts into a vector using the same embedding model as in the Document Ingestion phase.
- The vector passes to the vector database and performs a similarity search (or vector search).
In short, you need to find the most similar items to the user's question given a set of vectors (in red) and the query vector (the user's question in blue). In the example below, you can see the k-nearest neighbor search (k-NN), which looks for the three closest vectors to the query vector:

- With the most similar vectors found, link the corresponding Notion content to a stand-alone question for GPT.
- GPT formulates an answer based on the guidelines of a system prompt.
- The chatbot responds to the user with the answer from GPT.
- Add the chatbot's answer to the chat history.
- Repeat this process.
Make sense? Nice! Let's start coding.
3.2 Query
First, create a LangChain Conversational Retrieval Chain to serve as the brain of your app. To do so, create a utils.py file containing the load_chain() function, which returns a Conversational Retrieval Chain.
# **utils.py**

import streamlit as st
import openai
from langchain.chains import ConversationalRetrievalChain
from langchain.memory import ConversationBufferWindowMemory
from langchain.chat_models import ChatOpenAI
from langchain.vectorstores import FAISS
from langchain.embeddings import OpenAIEmbeddings
from langchain.prompts import PromptTemplate
from langchain.prompts.chat import SystemMessagePromptTemplate

openai.api_key = st.secrets["OPENAI_API_KEY"]

@st.cache_resource
def load_chain():
		"""
    The `load_chain()` function initializes and configures a conversational retrieval chain for
    answering user questions.
    :return: The `load_chain()` function returns a ConversationalRetrievalChain object.
    """

		# Load OpenAI embedding model
		embeddings = OpenAIEmbeddings()

		# Load OpenAI chat model
		llm = ChatOpenAI(temperature=0)

		# Load our local FAISS index as a retriever
		vector_store = FAISS.load_local("faiss_index", embeddings)
		retriever = vector_store.as_retriever(search_kwargs={"k": 3})

		# Create memory 'chat_history'
		memory = ConversationBufferWindowMemory(k=3,memory_key="chat_history")

		# Create system prompt
		template = """
    You are an AI assistant for answering questions about the Blendle Employee Handbook.
    You are given the following extracted parts of a long document and a question. Provide a conversational answer.
    If you don't know the answer, just say 'Sorry, I don't know ... 😔.
    Don't try to make up an answer.
    If the question is not about the Blendle Employee Handbook, politely inform them that you are tuned to only answer questions about the Blendle Employee Handbook.

    {context}
    Question: {question}
    Helpful Answer:"""

		# Create the Conversational Chain
		chain = ConversationalRetrievalChain.from_llm(llm=llm,
				                                          retriever=retriever,
				                                          memory=memory,
				                                          get_chat_history=lambda h : h,
				                                          verbose=True)

		# Add systemp prompt to chain
		# Can only add it at the end for ConversationalRetrievalChain
		QA_CHAIN_PROMPT = PromptTemplate(input_variables=["context", "question"],template=template)
		chain.combine_docs_chain.llm_chain.prompt.messages[0] = SystemMessagePromptTemplate(prompt=QA_CHAIN_PROMPT)

		return chain
Let's review the code:
- Load the OpenAI API key stored in
.streamlit/secrets.toml. - Create the
load_chain()function that returns aConversational Retrieval Chain object. We usest.cache_resourceto make your app more efficient. By using this, you only run theload_chain()function once at the very beginning and store the result in a local cache. Later, it’ll skip its execution as no changes have been made. Very convenient! - Load the OpenAI embedding model, which converts the user's queries into vectors.
- Load the OpenAI chat model that generates the answers. To do so, it uses the stand-alone question (combining the user's question and chat history) and relevant documents. Specify a temperature of 0, meaning that the model will always select the highest probability word. A higher temperature means that the model might select a word with a slightly lower probability, leading to more variation, randomness, and creativity. Play with it to see what works best for you.
- Load your local FAISS index as a retriever, which the chain uses to search for relevant information. Define
k=3—look for the three most relevant documents in the vector database. - Create the memory of your chatbot using
ConversationBufferWindowMemory. Definek=3, meaning the chatbot will look at the last three interactions when creating the stand-alone question. This is useful for keeping a sliding window of the most recent interactions so that the buffer does not get too large. - Create the system prompt, which acts as the guidelines for our chatbot. Specify how the chatbot should behave and what it should do when it can’t find an answer or when the user's question is pit of its scope.
- Create the chain using
ConversationalRetrievalChain, linking all the previous elements together. Setverbose=Trueto see what's happening under the hood when running the chain. This makes it easier to see what information the chatbot uses to answer user's questions. - Add the system prompt to the chain. Currently, it seems that you can only add it after defining the chain when using
ConversationalRetrievalChain.from_llm.
4. Chatbot application
Use Streamlit to create the chatbot interface—a visually appealing chat app that can be deployed online—and embed the app in your Notion page.
4.1 Streamlit application
Now that you built the brain of your chatbot, let’s put it all in a Streamlit application!
# **app.py**

import time
import streamlit as st
from utils import load_chain

# Custom image for the app icon and the assistant's avatar
company_logo = 'https://www.app.nl/wp-content/uploads/2019/01/Blendle.png'

# Configure Streamlit page
st.set_page_config(
    page_title="Your Notion Chatbot",
    page_icon=company_logo
)

# Initialize LLM chain
chain = load_chain()

# Initialize chat history
if 'messages' not in st.session_state:
    # Start with first message from assistant
    st.session_state['messages'] = [{"role": "assistant",
                                  "content": "Hi human! I am Blendle's smart AI. How can I help you today?"}]

# Display chat messages from history on app rerun
# Custom avatar for the assistant, default avatar for user
for message in st.session_state.messages:
    if message["role"] == 'assistant':
        with st.chat_message(message["role"], avatar=company_logo):
            st.markdown(message["content"])
    else:
        with st.chat_message(message["role"]):
            st.markdown(message["content"])

# Chat logic
if query := st.chat_input("Ask me anything"):
    # Add user message to chat history
    st.session_state.messages.append({"role": "user", "content": query})
    # Display user message in chat message container
    with st.chat_message("user"):
        st.markdown(query)

    with st.chat_message("assistant", avatar=company_logo):
        message_placeholder = st.empty()
        # Send user's question to our chain
        result = chain({"question": query})
        response = result['answer']
        full_response = ""

        # Simulate stream of response with milliseconds delay
        for chunk in response.split():
            full_response += chunk + " "
            time.sleep(0.05)
            # Add a blinking cursor to simulate typing
            message_placeholder.markdown(full_response + "▌")
        message_placeholder.markdown(full_response)

    # Add assistant message to chat history
    st.session_state.messages.append({"role": "assistant", "content": response})
Let's review the code:
- Import
load_chain()fromutils.pyto load the Conversational Retrieval Chain we created earlier. - Load an image from a URL to use as your app's page icon and assistant's avatar in the chat app.
- Initialize your chain in the session state.
- Initialize the chat history in the session state with a first message from the assistant welcoming the user.
- Display all the messages of the chat history, specifying a custom avatar for the assistant and the default one for the user.
- Create the chat logic to:
- Receive the user's query and store it in the chat history
- Display the user's query in the chat
- Pass the user's query to your chain using
st.session_state['chain']({"question": query}) - Get a response back
- Display the response in the chat, simulating a human typing speed by slowing down the display of the response
- Store the response in the chat history
4.2 Deployment on Streamlit Community Cloud
Once you’ve tested your chatbot and are happy with it, it's time to go live!
To deploy it on Streamlit Community Cloud:
Create a requirements.txt file to store the required dependencies
# ****************requirements.txt****************

openai
langchain
faiss-cpu
tiktoken
Deploy the app and click on Advanced settings. From there, specify your Python version and your OpenAI API key (they should match the information in your local secrets.toml file).
4.3 Embed your Streamlit app in Notion

- Once your app is deployed, copy its URL.
- Go to your Notion page.
- Embed your app by selecting
Embedin the block options. - Paste your app’s URL and click on
Embed link. - Voilà! Have fun interacting with your content using your new Notion chatbot!
Congratulations! 🥳
In this tutorial, you’ve learned how to:
- Convert your Notion content to vectors using the OpenAI embedding model and store them in a FAISS index
- Build a Conversation Retrieval Chain using LangChain, with a custom prompt and memory
- Build and deploy a Streamlit chat application using its latest chat features
- Embed a Streamlit chat application in your Notion page
If you have any questions, please post them in the comments below. And if you want to learn more about AI and LLMs, let's connect on LinkedIn.
Happy Streamlit-ing! 🎈


Comments
Continue the conversation in our forums →