Hey, Streamlit community! 👋
My name is Michael, and I lead Developer Relations and Labs at Neo4j, an open-source graph database company. In 2017, we began building a scalable graph algorithms library with capabilities like Graph Neural Networks (GNNs), graph embeddings, and k-nearest neighbor (kNN) similarity graphs.
Since ChatGPT became available last year, I've spent a lot of time tinkering with large language models (LLMs) and exploring their impact on the database space. I've also been using them as a daily tool for ideation, writing, summarization, and coding. With GPT-4, this has become even better.
Simon Willison, a prolific blogger, coder, and author of Datasette, stated that "With ChatGPT support, I'm not afraid to start side-projects that would have taken me several days, because now I can finish them in a few hours." Inspired by his words, a couple of weeks ago, I started a series of live streams appropriately called "Michael and Bot - Livecoding with ChatGPT." The goal was to explore new territories and create something useful within a two-hour window. So far, we've created:
- A Chrome extension that sends selected text to OpenAI's API to extract entities and relationships and stores them in Neo4j.
- A basic network graph layout algorithm built from scratch in JavaScript.
- A Streamlit app for exploratory data analysis (EDA) with predictions using scikit-learn.
I first got excited about Streamlit by the awesome videos my friend Mark Needham made. Today, I'm excited to dive into the adventure of creating the Streamlit app with you.
Creating the "Hello, World!" version of our EDA app
I started with this question.
Michael
We want to code together today. We're going to build a streamlit app for EDA. Can you give me the files I need to start with the "Hello, World!" set of visual components?
ChatGPT
Of course! To create a simple Streamlit app for EDA with a "Hello, World!" set of visual components, you'll need the following files:
requirements.txt: This file lists the required Python packages for your project.app.py: This file contains the main Streamlit app code.
First, create a new directory for your project and navigate to it using the terminal.
Next, create a requirements.txt file in your project directory and include the following packages:
streamlit==0.88.0
pandas==1.3.2
numpy==1.21.2
matplotlib==3.4.3
seaborn==0.11.2
Now, create an app.py file in your project directory with the following content:
import streamlit as st
import pandas as pd
import numpy as np
import matplotlib.pyplot as plt
import seaborn as sns

def main():
    st.title("Hello, World! EDA Streamlit App")

    st.header("Upload your CSV data file")
    data_file = st.file_uploader("Upload CSV", type=["csv"])

    if data_file is not None:
        data = pd.read_csv(data_file)
        st.write("Data overview:")
        st.write(data.head())

        st.sidebar.header("Visualizations")
        plot_options = ["Bar plot", "Scatter plot", "Histogram", "Box plot"]
        selected_plot = st.sidebar.selectbox("Choose a plot type", plot_options)

        if selected_plot == "Bar plot":
            x_axis = st.sidebar.selectbox("Select x-axis", data.columns)
            y_axis = st.sidebar.selectbox("Select y-axis", data.columns)
            st.write("Bar plot:")
            fig, ax = plt.subplots()
            sns.barplot(x=data[x_axis], y=data[y_axis], ax=ax)
            st.pyplot(fig)

        elif selected_plot == "Scatter plot":
            x_axis = st.sidebar.selectbox("Select x-axis", data.columns)
            y_axis = st.sidebar.selectbox("Select y-axis", data.columns)
            st.write("Scatter plot:")
            fig, ax = plt.subplots()
            sns.scatterplot(x=data[x_axis], y=data[y_axis], ax=ax)
            st.pyplot(fig)

        elif selected_plot == "Histogram":
            column = st.sidebar.selectbox("Select a column", data.columns)
            bins = st.sidebar.slider("Number of bins", 5, 100, 20)
            st.write("Histogram:")
            fig, ax = plt.subplots()
            sns.histplot(data[column], bins=bins, ax=ax)
            st.pyplot(fig)

        elif selected_plot == "Box plot":
            column = st.sidebar.selectbox("Select a column", data.columns)
            st.write("Box plot:")
            fig, ax = plt.subplots()
            sns.boxplot(data[column], ax=ax)
            st.pyplot(fig)

if __name__ == "__main__":
    main()
To run the app, make sure you have the required packages installed by running:
pip install -r requirements.txt
Finally, start the Streamlit app with the following command:
streamlit run app.py
Your app will open in your default web browser, and you can start uploading your CSV file and exploring different visualizations. Enjoy coding together!
Getting the initial app up and running
I created the necessary files and updated the dependencies using PyPI. The training cutoff for ChatGPT was in September 2021; that's why the versions were a bit dated. Fortunately, all of the APIs still worked. As a result, I was able to run my app successfully:
streamlit==1.21.0
pandas==1.5.3
numpy==1.24.2
matplotlib==3.7.1
seaborn==0.12.2
python-dotenv==1.0.0
neo4j==5.7.0
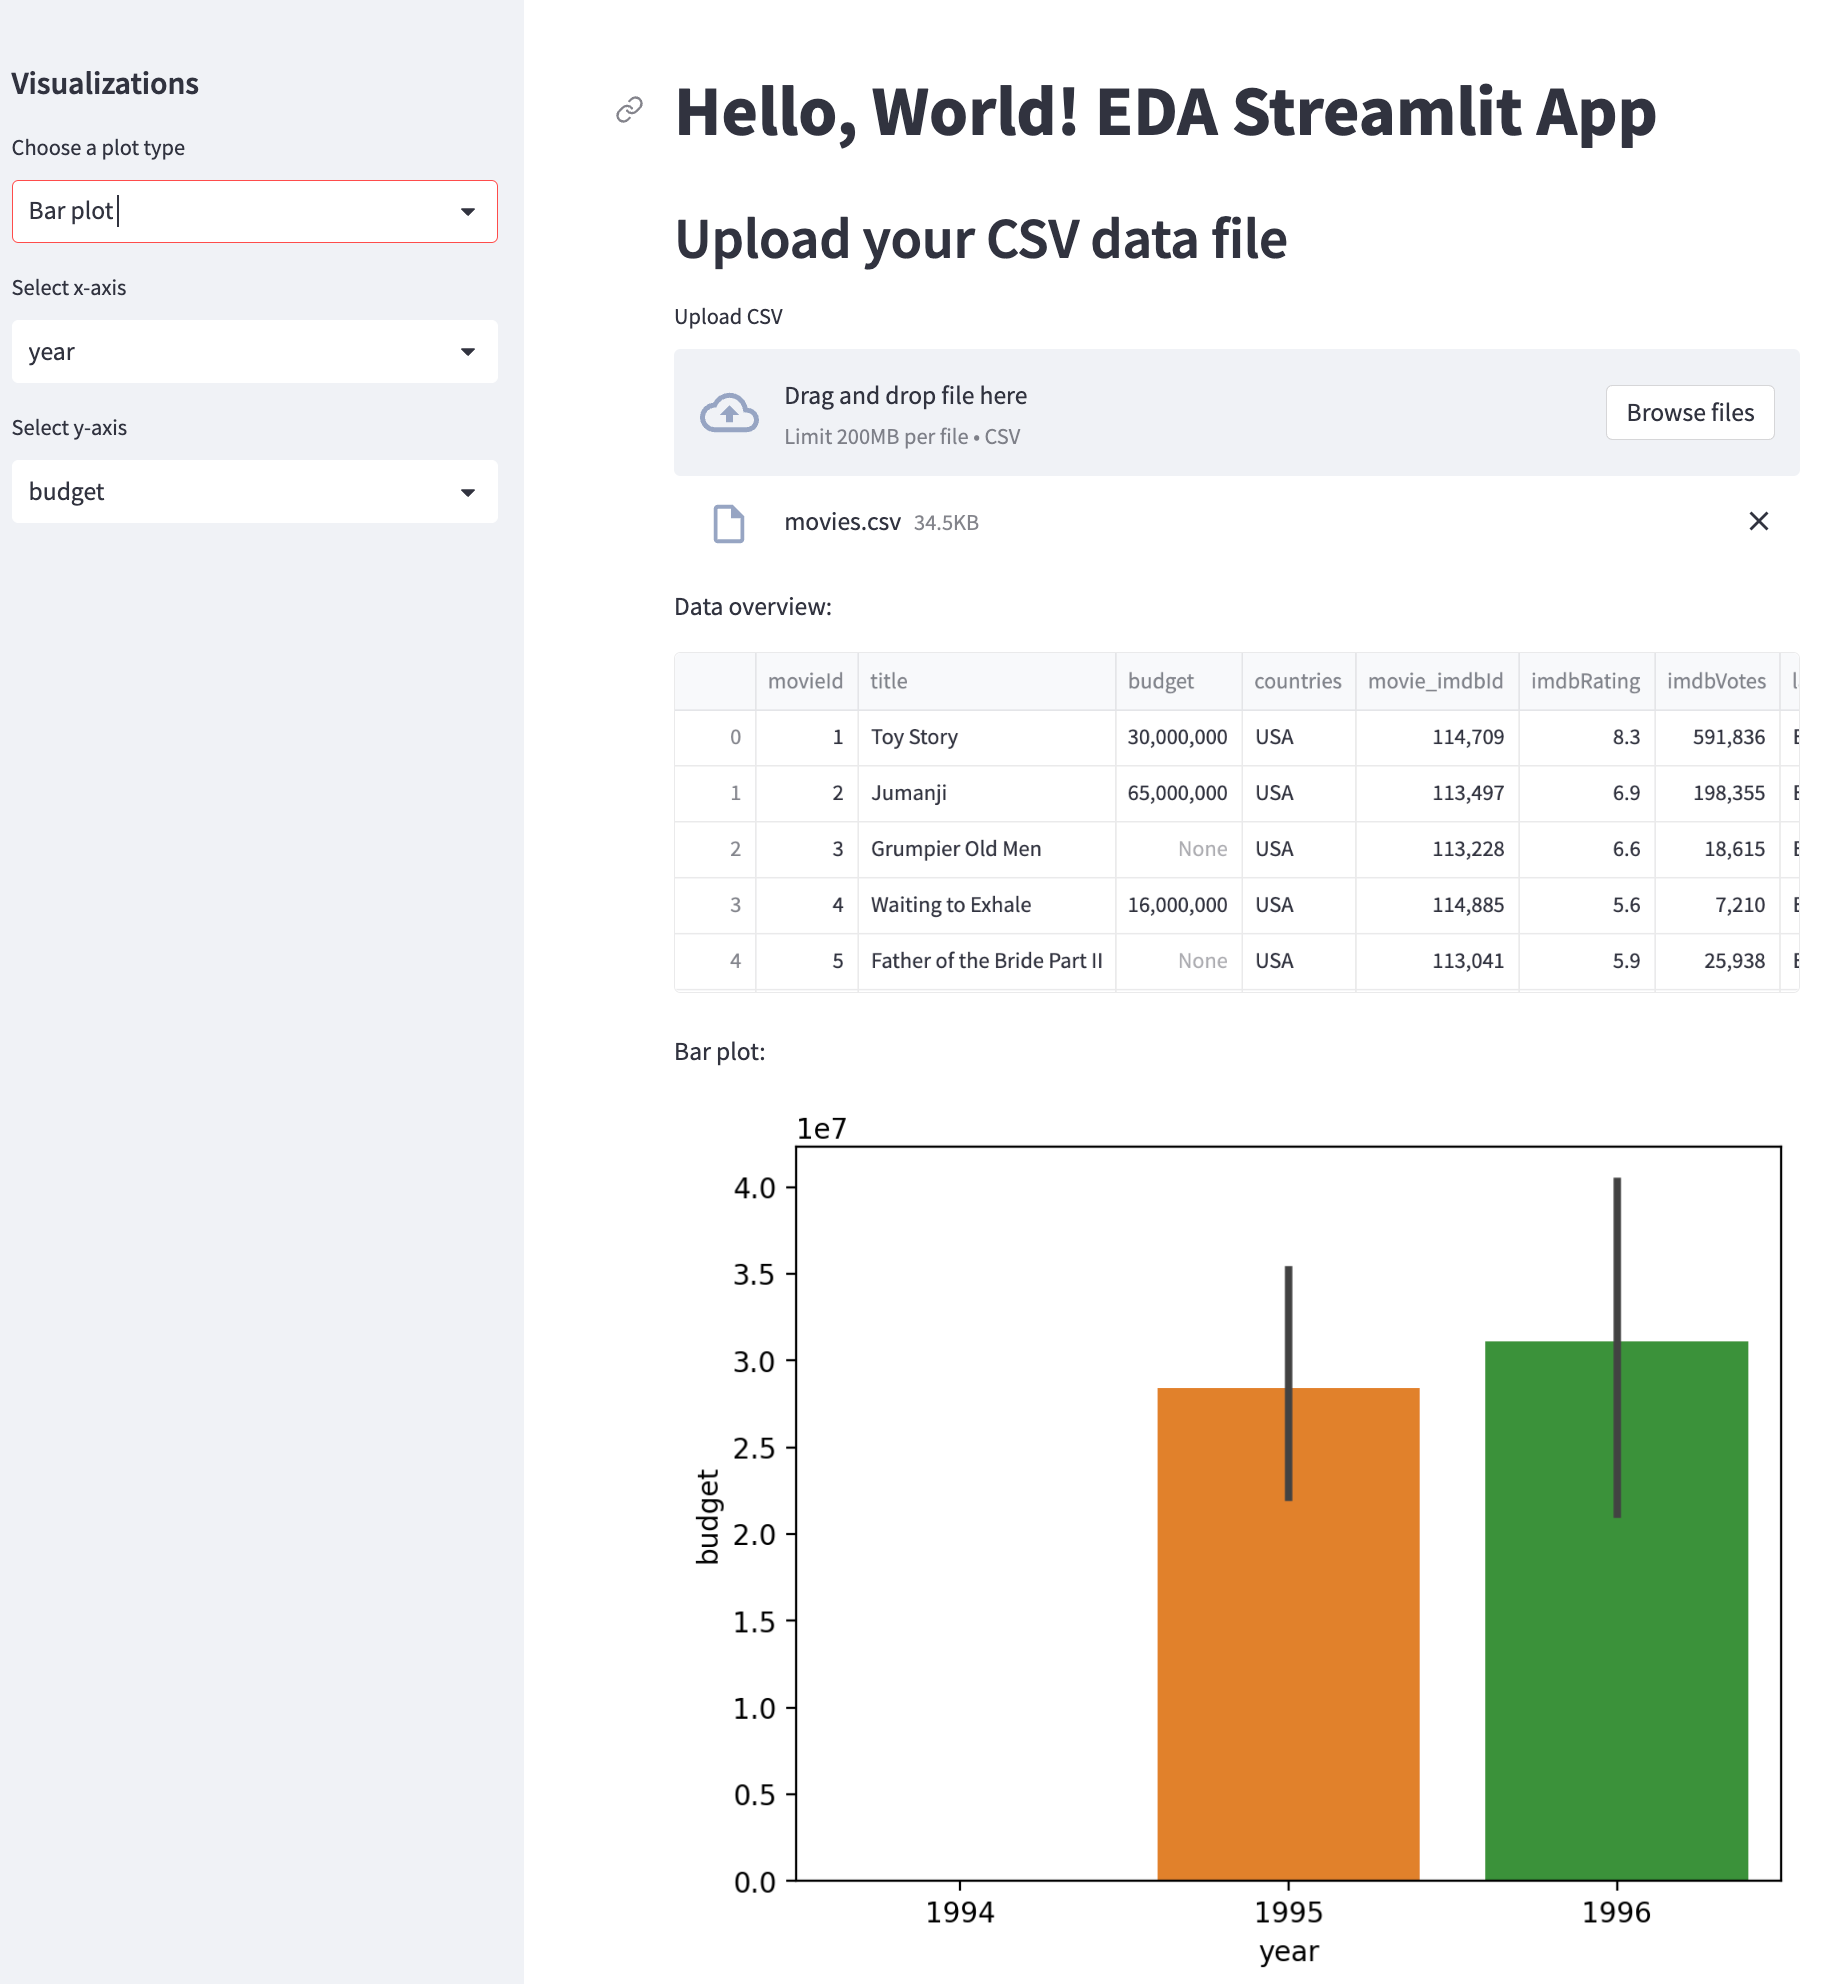
I tested the app by using a CSV file that contained movie data, including titles, genres, popularity, revenue, and more. It worked perfectly! How cool!
Understanding the initial app
There was a lot of code with many API calls. To better understand the Python code, I asked ChatGPT for help.
Michael
Explain the code in the Python file in 6 bullet points.
ChatGPT
- Import required libraries: The code starts by importing necessary libraries such as Streamlit, Pandas, NumPy, Matplotlib, and Seaborn for creating the web app and visualizations.
- Define the main function: The
main()function contains the core logic of the Streamlit app. It is responsible for rendering the user interface, handling file uploads, and creating visualizations. - File uploader: Inside the main function, a file uploader is created using
st.file_uploader, which allows users to upload CSV files. If a valid file is uploaded, the data is read into a Pandas DataFrame. - Sidebar: The app's sidebar is created using
st.sidebar. It contains a header and a select box for users to choose the type of plot they want to generate. Additional options for each plot type are also provided in the sidebar. - Plot generation: Depending on the selected plot type, the appropriate Seaborn plotting function is called (e.g.
sns.barplot,sns.scatterplot,sns.histplot, orsns.boxplot). The user-selected options are passed as arguments to the plotting functions. - Display visualizations: After generating the plots using Matplotlib and Seaborn, they are displayed in the main part of the Streamlit app using
st.pyplot(), which takes the Matplotlib figure as an argument.
Okay, cool, that explains it.
Fixing the ugly legend
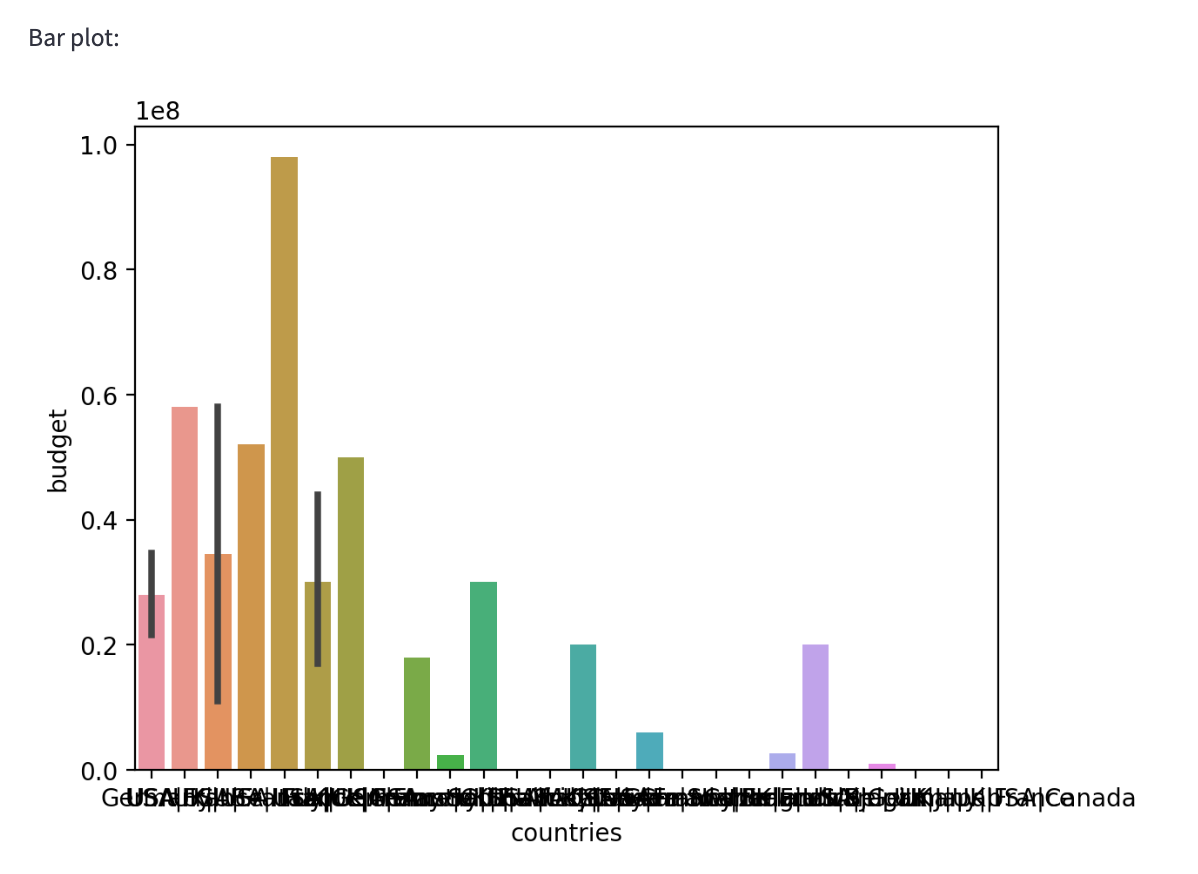
While playing around with the charts, I noticed the legend labels overlapping. I asked our coding friend to either slant them or make them vertical.
Michael
The labels on the x-axis are overlapping. Can we render them at an angle or vertically to improve readability?
ChatGPT
You can render the x-axis labels slanted or vertically to improve readability. To achieve this, you can modify the app.py code to adjust the x-axis label rotation using the set_xticklabels() function with the rotation parameter. Here's how you can do it for each plot type:
For the Bar plot:
# ...
if selected_plot == "Bar plot":
    x_axis = st.sidebar.selectbox("Select x-axis", data.columns)
    y_axis = st.sidebar.selectbox("Select y-axis", data.columns)
    st.write("Bar plot:")
    fig, ax = plt.subplots()
    sns.barplot(x=data[x_axis], y=data[y_axis], ax=ax)
		# Add this line
    ax.set_xticklabels(ax.get_xticklabels(), rotation=45, ha="right")
    st.pyplot(fig)
# ...
In the above code snippets, the rotation parameter is set to 45 degrees for slanted labels. You can set it to 90 degrees for vertical labels. The ha parameter (horizontal alignment) is set to "right" to improve the appearance of the rotated labels. Update the corresponding sections in your app.py file to apply these changes to your app.
It was really nice that it remembered the context of the previous code and only showed me the necessary changes. It also highlighted the changes that I should make to other charts. For brevity, I haven't included them here.
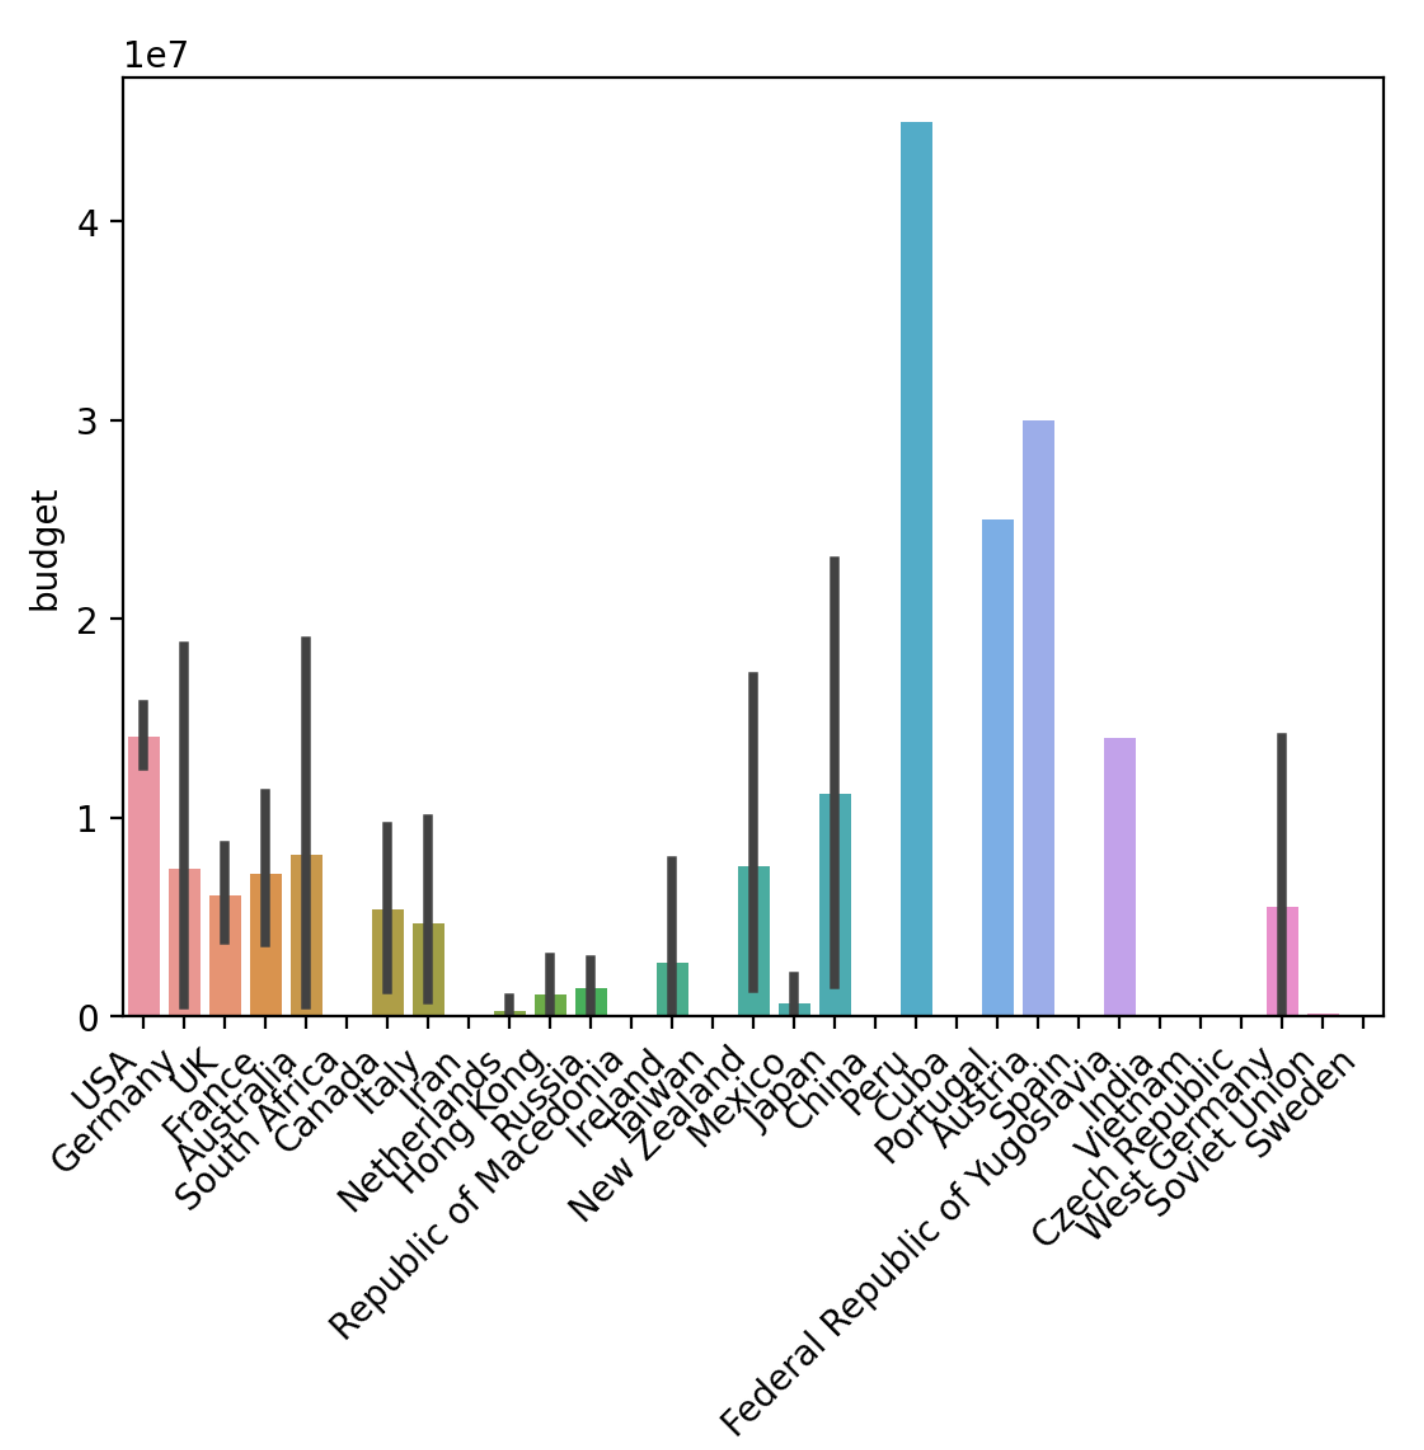
I noticed too many ticks on the x-axis, so I asked ChatGPT to fix it.
Michael
Can we also reduce the number of ticks on the x-axis too?
ChatGPT
Yes, you can reduce the number of ticks on the x-axis. One way to do this is by using the MaxNLocator function from the matplotlib.ticker library. The MaxNLocator function helps in setting the maximum number of intervals on the x-axis. You'll need to import the ticker library first and then adjust the code for each plot type accordingly.
First, add the following import statement at the beginning of your app.py file:
import matplotlib.ticker as ticker
Now, update each plot type in the app.py file to set the number of ticks on the x-axis:
For the Bar plot:
# ...
if selected_plot == "Bar plot":
    x_axis = st.sidebar.selectbox("Select x-axis", data.columns)
    y_axis = st.sidebar.selectbox("Select y-axis", data.columns)
    st.write("Bar plot:")
    fig, ax = plt.subplots()
    sns.barplot(x=data[x_axis], y=data[y_axis], ax=ax)

	  # Add this line
    ax.xaxis.set_major_locator(ticker.MaxNLocator(integer=True, nbins=10))
    ax.set_xticklabels(ax.get_xticklabels(), rotation=45, ha="right")
    st.pyplot(fig)
# ...
In the above code snippets, ax.xaxis.set_major_locator(ticker.MaxNLocator(integer=True, nbins=10)) sets the maximum number of intervals on the x-axis to 10. You can change the nbins parameter to adjust the number of ticks as needed. Update the corresponding sections in your app.py file to apply these changes to your app.
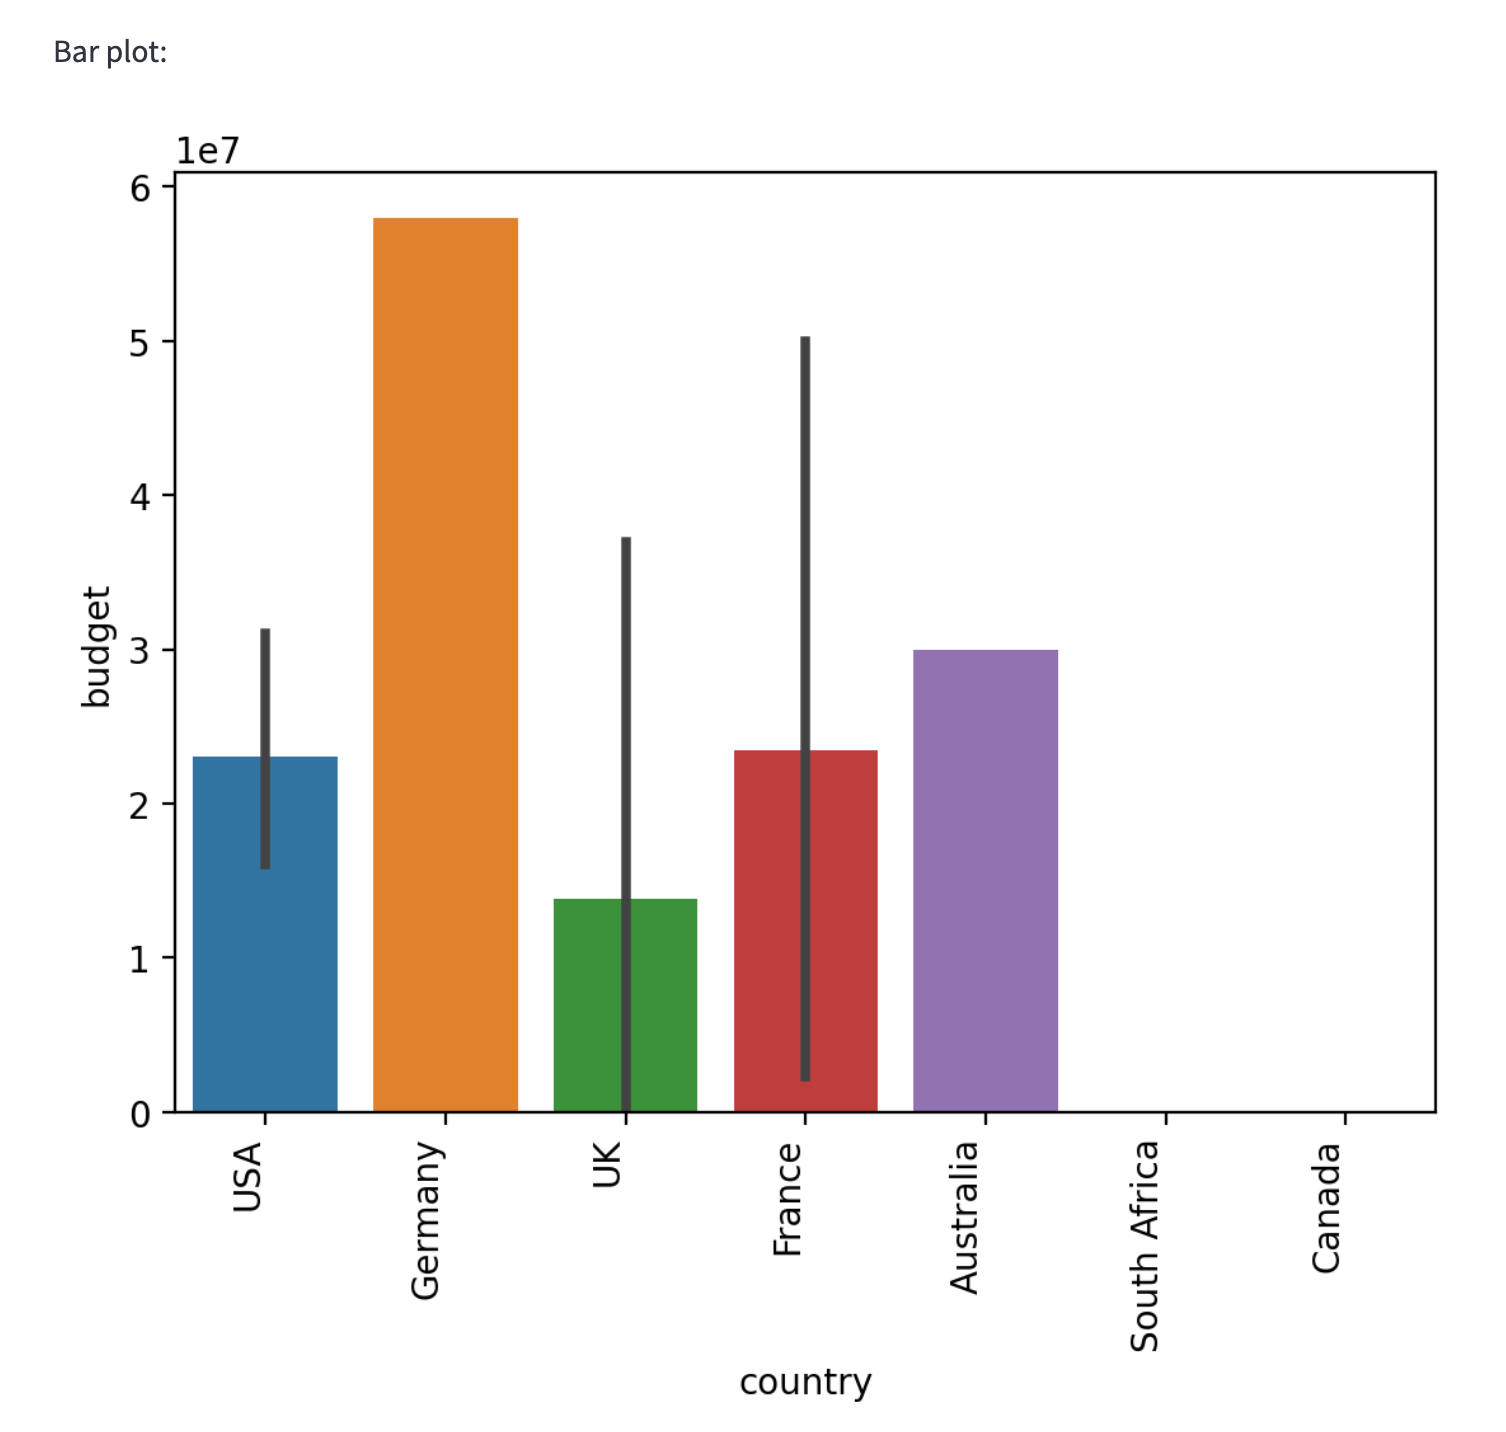
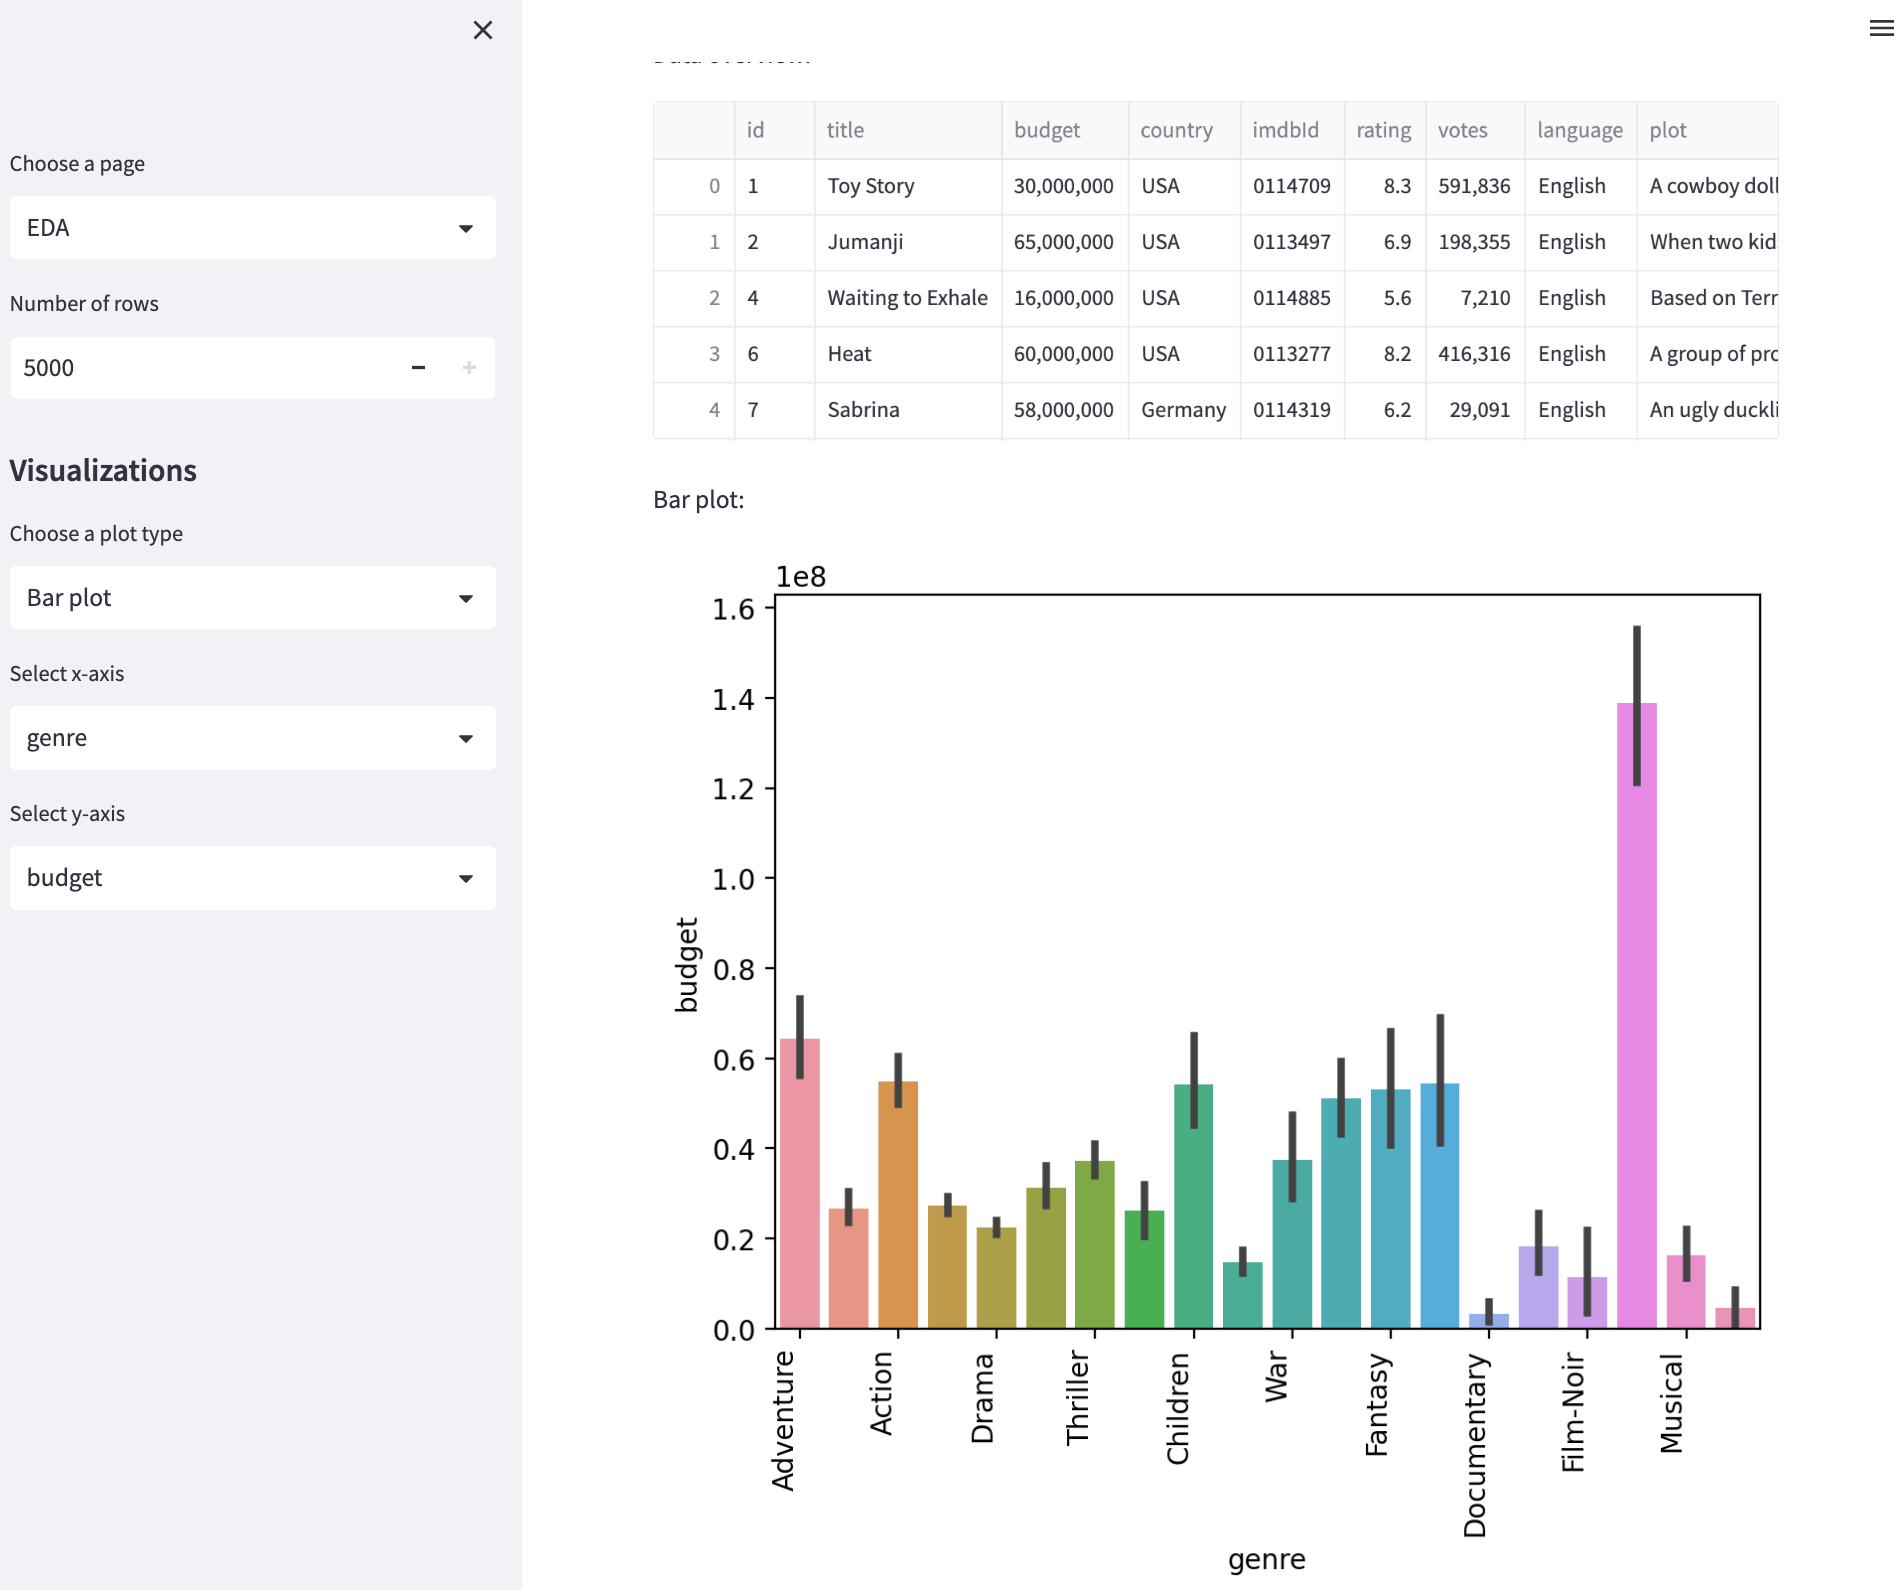
In the end, I changed it to a 90-degree slant as the angled labels were still cut off a bit. You can see the results in the screenshot below.
Hardcoding the CSV file to ease the app development
That was much better. However, it was frustrating to have to re-upload the file each time I made a change. To streamline the process, I asked GPT-4 to hardcode the file.
Michael
Can we default the file-upload result to a fixed filename while testing?
ChatGPT
You can default the file-upload result to a fixed filename while testing. You'll need to load the data from the fixed file path when the file upload returns None. This way, you can quickly test your app without having to upload the file every time.
Here's how to modify the app.py code to default to a fixed file path when no file is uploaded:
# ...

def main():
    st.title("Hello, World! EDA Streamlit App")

    st.header("Upload your CSV data file")
    data_file = st.file_uploader("Upload CSV", type=["csv"])

    if data_file is not None:
        data = pd.read_csv(data_file)
    else:  # Add this block
				# Replace with your fixed file path
        fixed_file_path = "your_fixed_file_path.csv"
        data = pd.read_csv(fixed_file_path)

    st.write("Data overview:")
    st.write(data.head())

    # ...
Replace your_fixed_file_path.csv with the actual path to the fixed CSV file, you want to use for testing. With this modification, when no file is uploaded, the app will load data from the fixed file path, allowing you to test your app without uploading a file every time.
Loading data from the database
Instead of uploading a file, you can load the data directly from a database. To do this, you can add a function to load the movie data from your recommendation graph in Neo4j Aura.
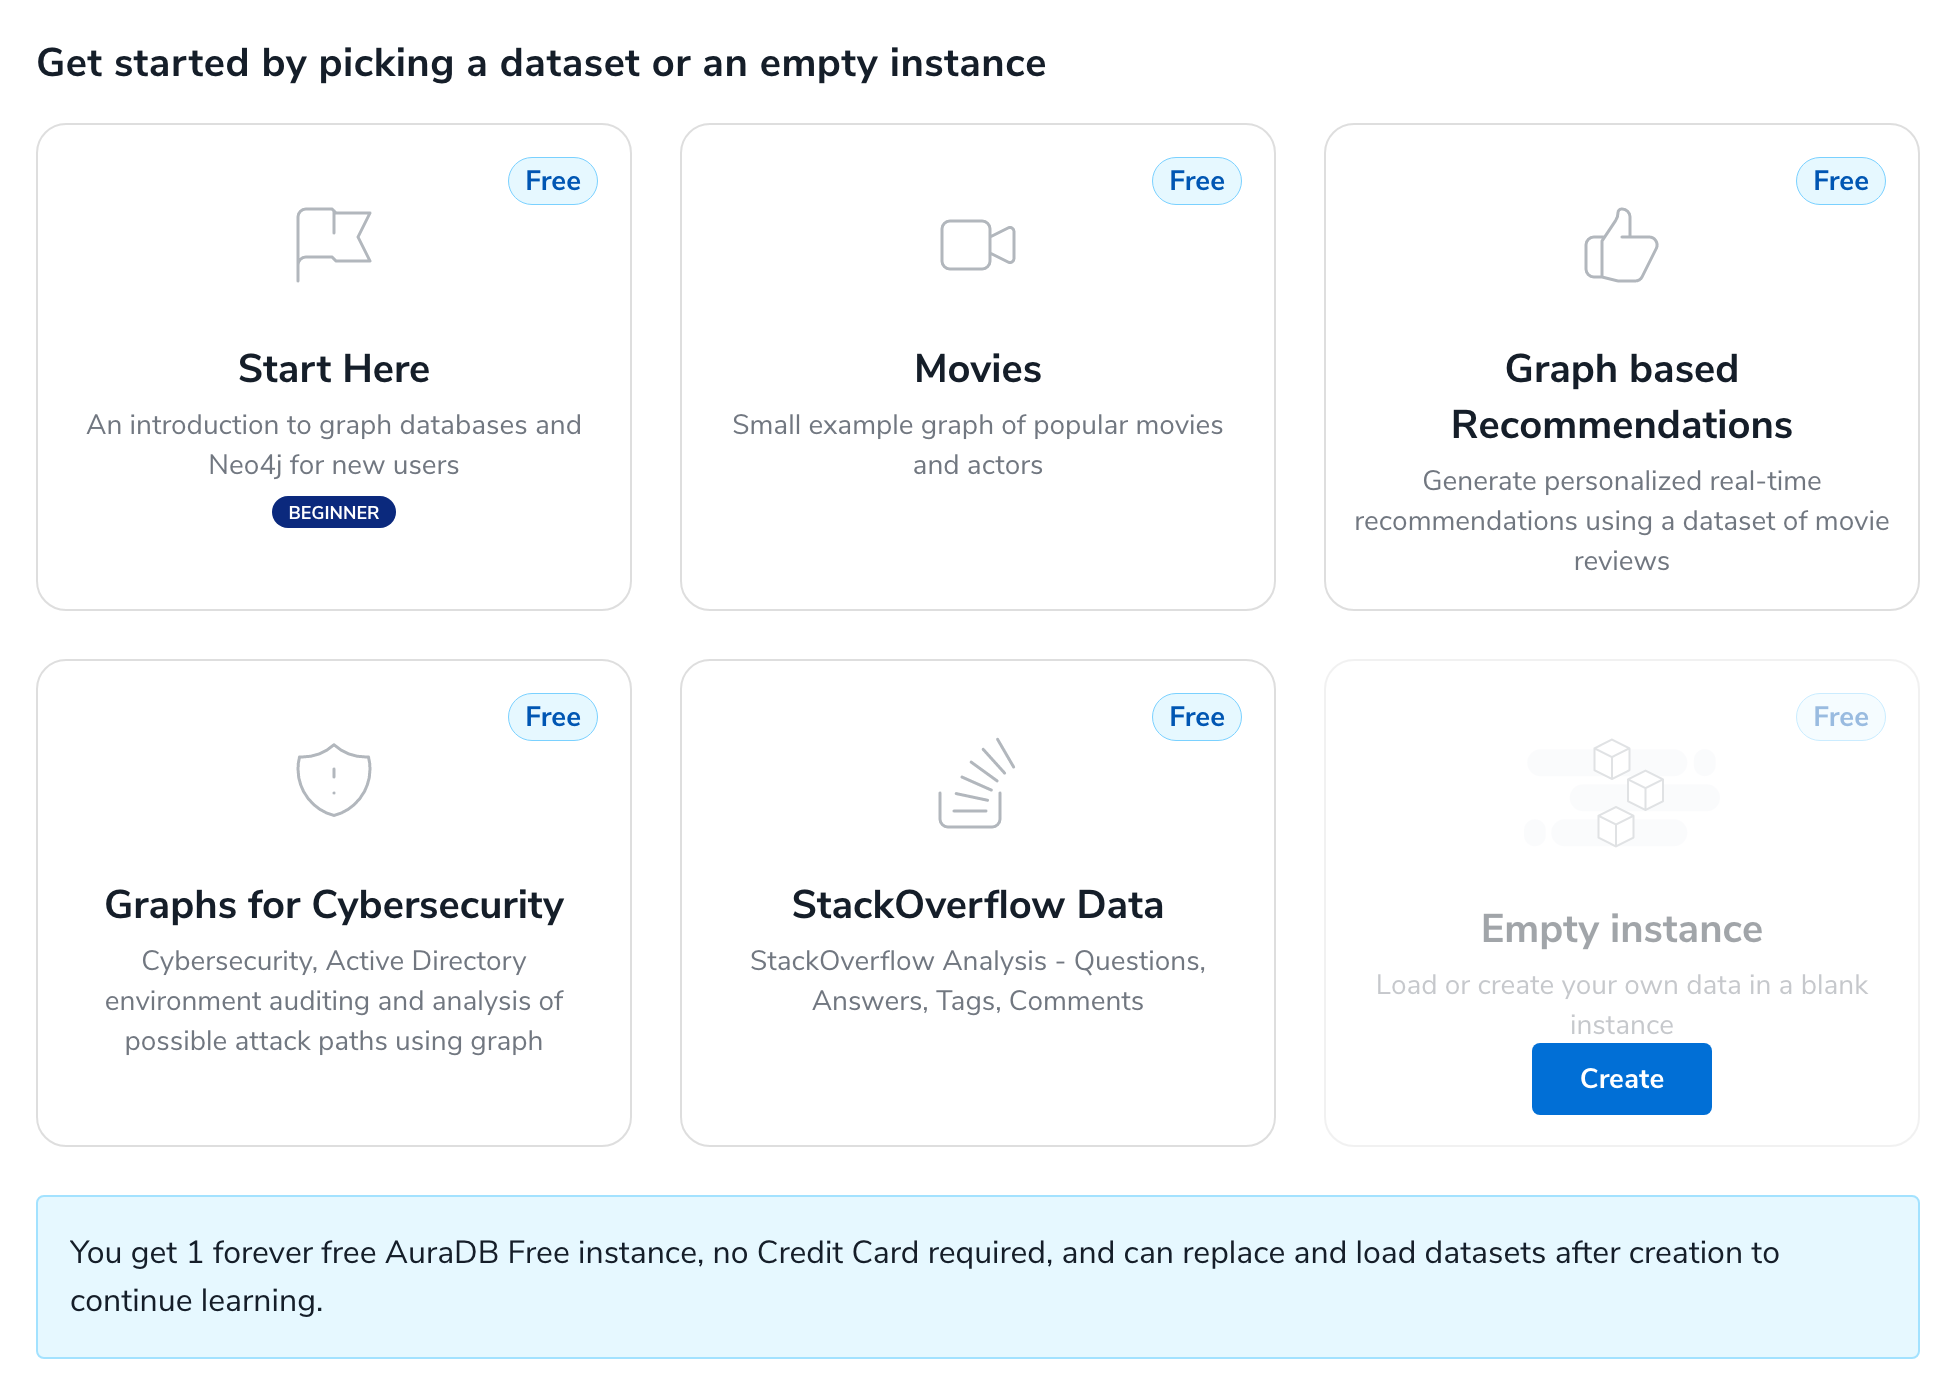
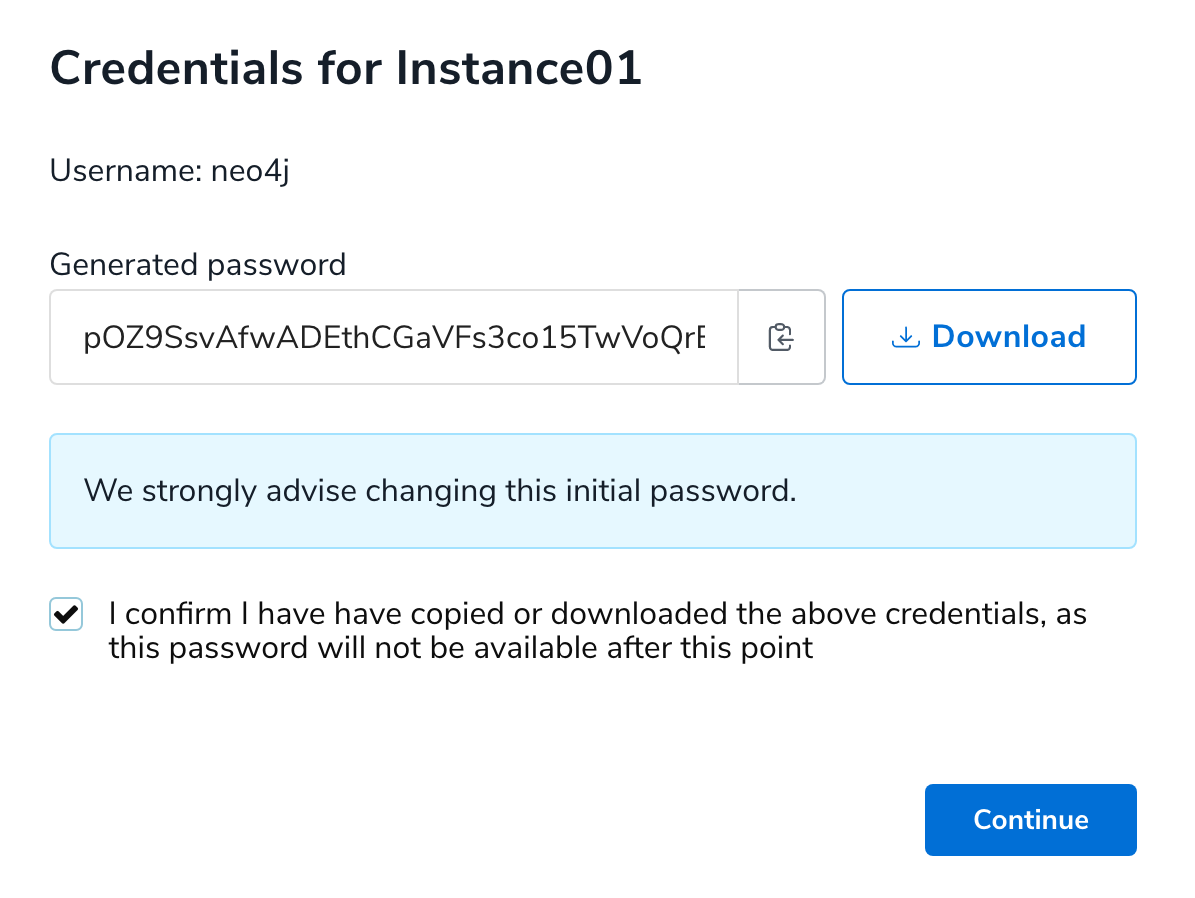
To use the database credentials in my application, I downloaded them as a config file and added them as environment variables. I used the variables in the .env file using dotenv.
All I needed at that point was the driver and a query. The results from the dict were then converted into a Pandas dataframe:
import neo4j
import os
from dotenv import load_dotenv

load_dotenv()

URI = os.getenv('NEO4J_URI')
AUTH = (os.getenv('NEO4J_USERNAME'), os.getenv('NEO4J_PASSWORD'))
QUERY = """
        MATCH (m:Movie)
        RETURN m.movieId as id,m.title as title,m.budget as budget, m.countries[0] as country,
        m.imdbId as imdbId,m.imdbRating as rating,m.imdbVotes as votes,
        m.languages[0] as language,m.plot as plot,m.poster as poster,
				m.released as released,m.revenue as revenue,
        m.runtime as runtime,m.tmdbId as tmdbId,
        m.url as url,m.year as year,[(m)-[:IN_GENRE]->(g) | g.name][0] as genre
        LIMIT $rows
        """

def read_data(query, rows=1):
    with neo4j.GraphDatabase.driver(URI, auth=AUTH) as driver:
        records, summary, keys = driver.execute_query(query, {"rows":rows})
        return pd.DataFrame(records, columns=keys)
Next, I wanted to control the number of rows to load with an st.number_input field, but oddly, it was allowing fractional numbers. Nothing I couldn't fix, right? 🙂
Michael
How can I make a st.number_input take integer values only?
ChatGPT
st.number_input in Streamlit allows you to create an input widget for numbers. By default, it supports both integer and float values. To make the st.number_input accept integer values only, you need to set the step parameter to 1. This ensures that the input increments/decrements by an integer value.
Here's an example of a st.number_input that accepts only integer values:
import streamlit as st

# Using st.number_input with step=1 for integer values only
integer_input = st.number_input("Enter an integer:", min_value=0, max_value=100, value=50, step=1)

st.write("You entered:", integer_input)
In this example, the st.number_input is set to accept integer values ranging from 0 to 100, with a default value of 50. The step parameter is set to 1, ensuring that the input field only accepts integer values.
Cool, I could work with that. Now my data was coming from my database, neat.
Implementing caching to reduce data reloads
But I didn't want the data to reload on every refresh. I remembered seeing something about caching with Streamlit on Google. So, I asked ChatGPT about it.
Michael
Can you explain how to use st.cached on a database query function?
ChatGPT
st.cache is a Streamlit decorator that caches the results of a function, which can be helpful when you have expensive computations or database queries. When the function is called again with the same input arguments, the cached result is returned instead of recomputing the function. This can significantly speed up your Streamlit app.
To use st.cache with a database query function, you need to decorate the function with @st.cache. Here's an example:
First, let's assume you have a function to query data from a database.
Now, add the @st.cache decorator to the function:
import sqlite3
import pandas as pd
import streamlit as st

@st.cache  # Add the decorator here
def query_data_from_db(query: str, db_path: str) -> pd.DataFrame:
    conn = sqlite3.connect(db_path)
    df = pd.read_sql_query(query, conn)
    conn.close()
    return df
By adding the @st.cache decorator, Streamlit will cache the result of the query_data_from_db() function, so subsequent calls with the same query and db_path arguments will return the cached result instead of querying the database again.
Keep in mind that st.cache works best with functions that have deterministic outputs (i.e., the output only depends on the input arguments). If your database contents change frequently or your query results may vary for other reasons, you may need to use the ttl (time-to-live) parameter to specify an expiration time for the cache.
For example, if you want the cache to expire after 300 seconds (5 minutes), you can modify the decorator like this:
@st.cache(ttl=300)  # Cache results for 300 seconds
def query_data_from_db(query: str, db_path: str) -> pd.DataFrame:
    # ...
With the ttl parameter, the cached result will be used for 300 seconds. After this time, the next call to the function will recompute the result and update the cache.
Learning about updated APIs from a documentation drop
Okay, that didn't work. Streamlit complained about st.cache. It was another case of the model training cutoff date. (Remember that this session was before the web-browsing extension was available.) So, I found the relevant doc and pasted it for ChatGPT to re-evaluate its advice.
Michael
st.cache is deprecated. Here are the new docs on how our example would change.
Advanced usage Controlling cache size and duration If your app runs for a long time and constantly caches functions, you might run into two problems:
The app runs out of memory because the cache is too large. Objects in the cache become stale, e.g., because you cached old data from a database. You can combat these problems with the TTL and max_entries parameters, available for both caching decorators.
The TTL (time-to-live) parameter
ttl sets a time to live on a cached function. If that time is up and you call the function again, the app will discard any old, cached values, and the function will be rerun. The newly computed value will then be stored in the cache. This behavior is useful for preventing stale data (problem 2) and the cache from growing too large (problem 1). Especially when pulling data from a database or API, you should always set a ttl so you are not using old data. Here's an example:
@st.cache_data(ttl=3600) # 👈 Cache data for 1 hour (=3600 seconds)
def get_api_data():
data = API.get(...)
return data
Copy
star
Tip
You can also set TTL values using timedelta, e.g. ttl=datetime.timedelta(hours=1).
ChatGPT
Based on the new documentation, you can replace st.cache with st.cache_data and use the ttl and max_entries parameters for controlling cache size and duration. Here's how your example would change:
import sqlite3
import pandas as pd
import streamlit as st

@st.cache_data(ttl=300, max_entries=100)  # 👈 Updated decorator with ttl and max_entries parameters
def query_data_from_db(query: str, db_path: str) -> pd.DataFrame:
    conn = sqlite3.connect(db_path)
    df = pd.read_sql_query(query, conn)
    conn.close()
    return df
In this example, the @st.cache_data decorator replaces the deprecated @st.cache decorator. The ttl parameter is set to 300 seconds (5 minutes) to specify the cache's expiration time and max_entries is set to 100 to limit the maximum number of entries in the cache.
Adding "real" data science—predictions with scikit-learn
In the second part of the live stream, I wanted to integrate scikit-learn to predict one feature of my movies dataset.
Michael
Now we want to try a prediction with scikit learn. How can I predict the movie budget from genre, year, and IMDb rating? What model should I use, how to do train/test split, and use the model for some sample predictions? Give me the minimal code with an explanation in the comments for a standalone Python file.
ChatGPT
To predict the movie budget from genre, year, and IMDB rating, you can use a regression model from scikit-learn. In this example, I'll use the RandomForestRegressor. The random forest is an ensemble learning method for classification and regression tasks that operate by constructing multiple decision trees at training time and outputting the mean prediction of the individual trees.
Here's a minimal standalone Python script that demonstrates how to train a RandomForestRegressor model split the dataset into training and testing sets, and make sample predictions:
import pandas as pd
from sklearn.model_selection import train_test_split
from sklearn.preprocessing import OneHotEncoder
from sklearn.ensemble import RandomForestRegressor
from sklearn.metrics import mean_squared_error

# Assuming you have a dataset in a CSV file named 'movies_data.csv'
data = pd.read_csv("movies_data.csv")

# Preprocess the 'genre' column using one-hot encoding
encoder = OneHotEncoder()
genres_encoded = encoder.fit_transform(data[["genre"]]).toarray()

# Create a DataFrame from the one-hot encoded genres and set column names
genres_encoded_df = pd.DataFrame(genres_encoded, columns=encoder.get_feature_names(["genre"]))

# Merge the one-hot encoded genres back into the original DataFrame
data = data.join(genres_encoded_df).drop("genre", axis=1)

# Define the features (X) and target (y)
X = data.drop("budget", axis=1)
y = data["budget"]

# Split the data into train and test sets (80% train, 20% test)
X_train, X_test, y_train, y_test = train_test_split(X, y, test_size=0.2, random_state=42)

# Initialize the RandomForestRegressor model
model = RandomForestRegressor(n_estimators=100, random_state=42)

# Train the model using the training data
model.fit(X_train, y_train)

# Predict the movie budgets for the test set
y_pred = model.predict(X_test)

# Calculate the mean squared error
mse = mean_squared_error(y_test, y_pred)
print("Mean squared error:", mse)

# Make sample predictions
sample_data = [
    {"year": 2022, "imdb_rating": 7.5, "genre": "Action"},
    {"year": 1995, "imdb_rating": 8.2, "genre": "Drama"},
]
sample_df = pd.DataFrame(sample_data)

# Preprocess the sample data (one-hot encoding for genre)
sample_genres_encoded = encoder.transform(sample_df[["genre"]]).toarray()
sample_genres_encoded_df = pd.DataFrame(sample_genres_encoded, columns=encoder.get_feature_names(["genre"]))
sample_df = sample_df.join(sample_genres_encoded_df).drop("genre", axis=1)

# Predict the movie budgets for the sample data
sample_predictions = model.predict(sample_df)
print("Sample predictions:", sample_predictions)
In this script:
- The dataset is loaded from a CSV file named
movies_data.csv. - The 'genre' column is preprocessed using one-hot encoding, which is necessary because scikit-learn models require numerical input.
- The features (X) and target (y) are defined. In this case, the features are the genre, year, and IMDB rating columns; the target is the budget column.
- The dataset is split into training (80%), and testing (20%) sets using
train_test_split. - A
RandomForestRegressormodel is initialized and trained using the training data. - The model is used to predict the movie budgets for the test set, and the mean squared error (MSE) is calculated to evaluate the model's performance.
Resolving scikit-learn errors
That was a comprehensive explanation, especially with the inline comments. I was confident that I understood most of it. However, when I tried it out, I got an error message. 😱
Michael
How can we fix this?
File "/Users/mh/d/chatgpt-coding/streamlit-eda-ml/test.py", line 45, in <module>
genres_encoded_df = pd.DataFrame(genres_encoded, columns=encoder.get_feature_names(["genre"]))
ChatGPT
Apologies for the confusion. In scikit-learn version 0.22 and later, the method to retrieve feature names has changed from get_feature_names to get_feature_names_out. If you are using scikit-learn 0.22 or later, please update the line as follows:
genres_encoded_df = pd.DataFrame(genres_encoded, columns=encoder.get_feature_names_out(["genre"]))
This should resolve the issue. If you are still encountering errors, please let me know.
If our input data has many more genres than our prediction test, the one hot encoder generates fewer columns and complains that the feature names should match those passed during the fit.
I did not like that the proposal created multiple encoders for both the training and testing data. I wanted to simplify the code.
Michael
How can we reuse the genre encoder from the training data?
ChatGPT
To reuse the genre encoder from the training data, you should first fit the encoder on the training data only. After fitting the encoder on the training data, you can transform both the training and test data (or any new data) using the same encoder instance. This will ensure that the one-hot encoded columns generated for the test data (or new data) are consistent with the training data.
Here's an example of how to do this:
import pandas as pd
from sklearn.model_selection import train_test_split
from sklearn.preprocessing import OneHotEncoder
from sklearn.ensemble import RandomForestRegressor
from sklearn.metrics import mean_squared_error

# Assuming you have a dataset in a CSV file named 'movies_data.csv'
data = pd.read_csv("movies_data.csv")

# Define the features (X) and target (y)
X = data.drop("budget", axis=1)
y = data["budget"]

# Split the data into train and test sets (80% train, 20% test)
X_train, X_test, y_train, y_test = train_test_split(X, y, test_size=0.2, random_state=42)

# Preprocess the 'genre' column using one-hot encoding
encoder = OneHotEncoder()
encoder.fit(X_train[["genre"]])  # Fit the encoder on the training data

# Transform the 'genre' column for both training and test data
X_train_genres_encoded = encoder.transform(X_train[["genre"]]).toarray()
X_test_genres_encoded = encoder.transform(X_test[["genre"]]).toarray()

# Create DataFrames from the one-hot encoded genres and set column names
X_train_genres_encoded_df = pd.DataFrame(X_train_genres_encoded, columns=encoder.get_feature_names_out(["genre"]))
X_test_genres_encoded_df = pd.DataFrame(X_test_genres_encoded, columns=encoder.get_feature_names_out(["genre"]))

# Merge the one-hot encoded genres back into the original DataFrames
X_train = X_train.join(X_train_genres_encoded_df).drop("genre", axis=1)
X_test = X_test.join(X_test_genres_encoded_df).drop("genre", axis=1)

# Initialize the RandomForestRegressor model
model = RandomForestRegressor(n_estimators=100, random_state=42)

# Train the model using the training data
model.fit(X_train, y_train)

# Predict the movie budgets for the test set
y_pred = model.predict(X_test)

# Calculate the mean squared error
mse = mean_squared_error(y_test, y_pred)
print("Mean squared error:", mse)
In this example, the OneHotEncoder is fit on the training data (X_train) only. Then, it is used to transform both the training and test data (X_train and X_test). This ensures that the one-hot encoded columns generated for the test data are consistent with the training data, and you won't run into issues with mismatched feature names.
Addressing column order consistency
I ran into an issue when I tried to reuse the code. The column order in the test/train and prediction data frames didn't match. Oddly, ChatGPT didn't care about column names, which should've been sufficient to map the different column orders.
Michael
Is the order of columns important for the RandomForestRegressor?
ChatGPT
Yes, the order of columns is important for the RandomForestRegressor and, in general, for all scikit-learn models. When you train the model, it learns the relationship between the input features (columns) and the target variable. The trained model expects the same order of columns in the input data when making predictions as it saw during training.
If the order of columns in the input data is changed when making predictions, the model's predictions may be incorrect or completely off. So, it's crucial to maintain the same order of columns when making predictions as during the training process.
In the examples I provided earlier, the order of columns is maintained consistently for both training and test data. When using the OneHotEncoder, the column order is preserved by fitting the encoder on the training data only and then transforming both the training and test data using the same encoder instance.
Michael
Doesn't it use the column headers?
ChatGPT
Scikit-learn models do not use column headers (i.e., DataFrame column names) when fitting or making predictions. Instead, they operate on the underlying NumPy arrays or other data structures that store the actual data. This is why the order of columns is important when training and making predictions using scikit-learn models. The models don't "know" the column names; they only work with the positions of the features in the input data.
To ensure that the input data has the same order of columns when training and making predictions, you should preprocess your data consistently and maintain the same order of columns throughout your analysis. Using the same OneHotEncoder instance to transform both the training and test data, as shown in the previous examples, ensures that the columns are in the same order.
Fixing the billion squared error 😦
Upon testing, something was off. The fix resulted in a GIGANTIC mean square error (MSE). 🚨
Michael
Isn't this a bit high? Mean squared error: 505365615111096.06
ChatGPT
Yes, the mean squared error (MSE) you mentioned is indeed quite high. It could be due to several reasons, such as:
- Insufficient or noisy data: The dataset might not have enough data points or might contain a lot of noise, which could make it challenging to learn the underlying relationship between the features and the target variable.
- Model complexity: The
RandomForestRegressormight not be the best model for this problem, or its hyperparameters might not be optimal. You could try different models, such as linear regression, support vector regression, or gradient boosting regression, or experiment with tuning the hyperparameters of the random forest model. - Feature engineering: The features used for prediction might not be sufficient or might require additional preprocessing or transformation. You could try adding more relevant features or apply different feature engineering techniques, such as feature scaling or transformation, to improve the model's performance.
- Outliers: The dataset might contain extreme values or outliers that could negatively impact the model's performance. You could try removing or transforming outliers before training the model.
To improve the model's performance, you can try the following:
- Investigate the data distribution and perform exploratory data analysis (EDA) to identify any data issues or patterns that might help in feature engineering or selecting a better model.
- Try different models and compare their performances using cross-validation. This will help you select a model that generalizes well to unseen data.
- Perform hyperparameter tuning for the selected model to find the best combination of hyperparameters that minimize the MSE.
- Experiment with different feature engineering techniques to improve the model's performance.
Remember that every dataset and problem is different, and finding the best approach often involves trial and error.
My assumption that the Genre would be a good predictor of the budget was incorrect. As I discovered while using the EDA app to plot the budget against years and genres (reference the 1:30:00 mark on the video recording), the year was a far more reliable predictor.
Incorporating predictions into the app
Next, it was time to integrate this awesome prediction engine into the Streamlit app. Although I wasn't sure how it's typically done, I trusted that ChatGPT would make a sensible suggestion. It didn't matter where…as long as it worked. 😂🤷♂️
Michael
Can I add multiple screens or tabs to the Streamlit app?
ChatGPT
Yes, you can add multiple screens or tabs to a Streamlit app using the st.sidebar.selectbox or st.sidebar.radio widget. This allows users to switch between different views or functionalities within the same app.
Here's an example of how to create a multi-page Streamlit app using st.sidebar.selectbox:
import streamlit as st

# Define the pages in your app
pages = {
    "Page 1": page1,
    "Page 2": page2,
    "Page 3": page3,
}

# Function definitions for each page
def page1():
    st.title("Page 1")
    st.write("This is Page 1 of the multi-page app.")

def page2():
    st.title("Page 2")
    st.write("This is Page 2 of the multi-page app.")

def page3():
    st.title("Page 3")
    st.write("This is Page 3 of the multi-page app.")

# Create a sidebar with a selectbox to choose the page
selected_page = st.sidebar.selectbox("Choose a page", options=list(pages.keys()))

# Call the corresponding function to display the selected page
pages[selected_page]()
The user can select a page using the widget in the sidebar, and the corresponding function will be called to display the content of the selected page. You can add more pages by defining new functions and adding them to the pages dictionary.
🤦♂️ Something went wrong after I reincorporated the database data into my revamped Streamlit app! Seems I made a mistake.
Michael
data = data["rating","year","budget"]
What's wrong here?
KeyError: ('rating', 'year', 'budget')
Traceback:
File "/opt/homebrew/lib/python3.11/site-packages/streamlit/runtime/scriptrunner/script_runner.py", line 565, in _run_script
    exec(code, module.__dict__)
File "/Users/mh/d/chatgpt-coding/streamlit-eda-ml/app.py", line 160, in <module>
    main()
File "/Users/mh/d/chatgpt-coding/streamlit-eda-ml/app.py", line 157, in main
    pages[selected_page](data)
File "/Users/mh/d/chatgpt-coding/streamlit-eda-ml/app.py", line 52, in predict
    data = data["rating","year","budget"]
           ~~~~^^^^^^^^^^^^^^^^^^^^^^^^^^
File "/opt/homebrew/lib/python3.11/site-packages/pandas/core/frame.py", line 3807, in __getitem__
    indexer = self.columns.get_loc(key)
              ^^^^^^^^^^^^^^^^^^^^^^^^^
File "/opt/homebrew/lib/python3.11/site-packages/pandas/core/indexes/base.py", line 3804, in get_loc
    raise KeyError(key) from err
ChatGPT
The issue is with the way you're trying to select multiple columns from the DataFrame. Instead of using data["rating", "year", "budget"], you should use double brackets ([[]]) to select multiple columns.
Here's the correct way to do it:
data = data[["rating", "year", "budget"]]
By using double brackets, you're creating a new DataFrame with just the specified columns. The single brackets would try to access a single column with the given tuple as a key, which doesn't exist in the DataFrame, resulting in the KeyError.
It turned out I wasn't just a Streamlit noob, I was also one regarding DataFrame. That's the point of this live stream, right? 😂
Adding selection by name
Next, I wanted to preselect a logical value in the select boxes in the sidebar, but I couldn't seem to do it by column name. ChatGPT to the rescue! Again!
Michael
How can I set a default value for st.selectbox?
ChatGPT
To set a default value for st.selectbox in Streamlit, you can use the index parameter. The index parameter sets the default selected option based on its position (0-indexed) in the provided list of options.
Here's an example:
import streamlit as st

options = ["Option A", "Option B", "Option C"]
default_index = options.index("Option B")

selected_option = st.selectbox("Choose an option", options=options, index=default_index)

st.write(f"You selected {selected_option}")
In this example, the st.selectbox widget will have "Option B" as its default value. The index parameter is set to the position of "Option B" in the options list using the options.index("Option B") method.
Hmm, so I needed an index. What's the column index of a named column in a DataFrame?
Michael
How can I get the index of a value out of a pandas Index type?
ChatGPT
You can use the get_loc() method of the pandas Index object to find the index of a value. Here's an example:
import pandas as pd

# Create a sample DataFrame
data = {'A': [1, 2, 3], 'B': [4, 5, 6], 'C': [7, 8, 9]}
df = pd.DataFrame(data)

# Get the column index object
column_index = df.columns

# Find the index of a value in the Index object
value_to_find = 'B'
index_of_value = column_index.get_loc(value_to_find)

print(f"Index of '{value_to_find}': {index_of_value}")
In this example, we create a sample DataFrame df and get its column index object column_index. We then use the get_loc() method to find the index of the value 'B' in the column index. The output will be:
Index of 'B': 1
Implementing dataframe filters
Finally, I needed to sub-select data from the DataFrame for predictions. I knew I had to filter the data but didn't know the exact syntax.
Michael
How do I select rows of a DataFrame with certain values in certain columns?
ChatGPT
You can select rows of a DataFrame with certain values in specific columns by using boolean indexing. This allows you to filter the DataFrame based on conditions you specify for one or multiple columns.
Here's an example:
import pandas as pd

# Create a sample DataFrame
data = {
    "Name": ["Alice", "Bob", "Carol", "David"],
    "Age": [25, 30, 35, 40],
    "City": ["New York", "Los Angeles", "San Francisco", "New York"],
}
df = pd.DataFrame(data)

# Filter the DataFrame based on conditions
filtered_df = df[(df["Age"] >= 30) & (df["City"] == "New York")]

print(filtered_df)
In this example, we create a sample DataFrame df and filter it based on the conditions that the "Age" column should be greater than or equal to 30 and the "City" column should be "New York". The filtered DataFrame will contain only the rows that meet both conditions:
    Name  Age      City
3  David   40  New York
You can combine multiple conditions using the & (and) or | (or) operators, and use parentheses to group conditions as needed. Note that you should use the bitwise operators & and | instead of the logical operators and and or.
With that, the two-hour session came to an end. I was quite pleased with what I had learned and accomplished.

I started with no knowledge of Streamlit or scikit-learn. Within two hours, I had a functional app that pulled and displayed my own data and made basic predictions based on the columns I selected.
Wrapping up
That's a wrap on this coding adventure! Here's the finished code. I must say, I prefer coding with ChatGPT over GitHub CoPilot. It's more conversational and offers detailed explanations. What about you?
You can find me on Mastodon, BlueSky, Twitter, and Medium. I'd love to hear about your own pair programming experiences with LLMs.
Oh, and if you're building cool Streamlit (or other) apps with Neo4j, make sure to submit a talk or join us for our online developer conference "NODES" on October 26th. CfP is open till June 30th!
Happy Streamlit-ing! 🎈


Comments
Continue the conversation in our forums →