
Hey, everyone! 📣
I'm Paula, an AI researcher and data scientist in New Zealand. Many great research projects are born out of our universities, and I’ve been privileged to be involved with some of them. But what really drives me is bringing my research to life.
The release of ChatGPT in late 2022 inspired me to research how large language models (LLMs) could generate data visualisations using natural language text. Nothing is more frustrating than hunting through menu items trying to find a command to change some plot element. Wouldn’t it be nice to use everyday language to graph what you want to see?
So I decided to build Chat2VIS, to bring my research to you.
In this post, I’ll cover:
- What is Chat2VIS?
- How to use Chat2VIS
- How to build Chat2VIS
What is Chat2VIS?
Chat2VIS is an app that generates data visualisations via natural language using GPT-3, ChatGPT-3.5, and GPT-4 LLMs. You can ask it to visualise anything from movies to cars to clothes, to even energy production.
Let me show how it works by using a fun example.
Have you heard of speedcubing? In speedcubing competitions, competitors race to solve the Rubik’s Cube puzzle and beat their own personal best times. There are events for solving 3x3, 4x4, 5x5, 6x6, and 7x7 Rubik’s Cubes—sometimes even solving them blindfolded!
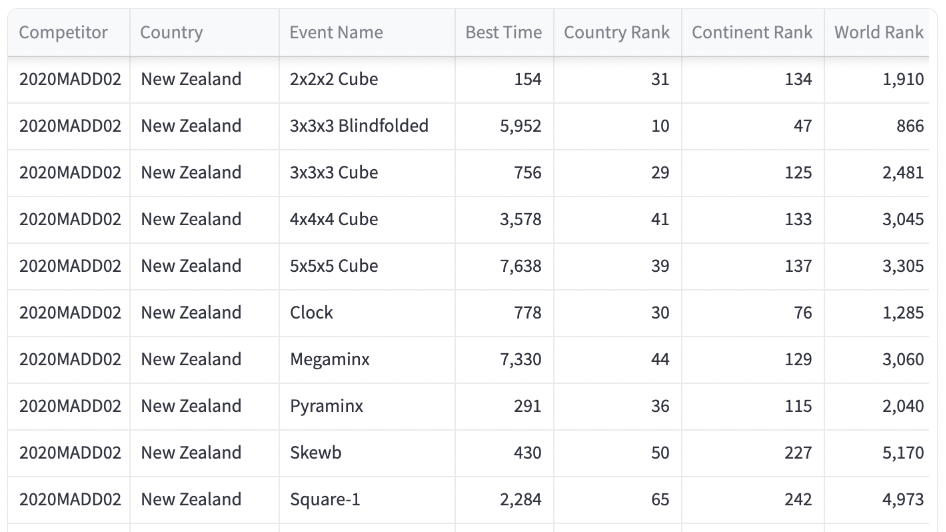
The competition results database is publicly available,* so I created a subset of it with results up to 23 June 2023. I took each competitor’s fastest best-solve time (as opposed to average-solve time) and I used the results from 2x2, 3x3, 4x4, 5x5, Clock, Megaminx, Pyraminx, Skewb, Square-1, and 3x3 blindfolded events. That’s 195,980 competitors total—a dataset of 585,154 rows. Each row listed the competitor’s WCA ID, event name, best-solve time (in centiseconds), country, country ranking, continent ranking, and world ranking.
Here is what it looked like:
App overview
Let's see how the app works:
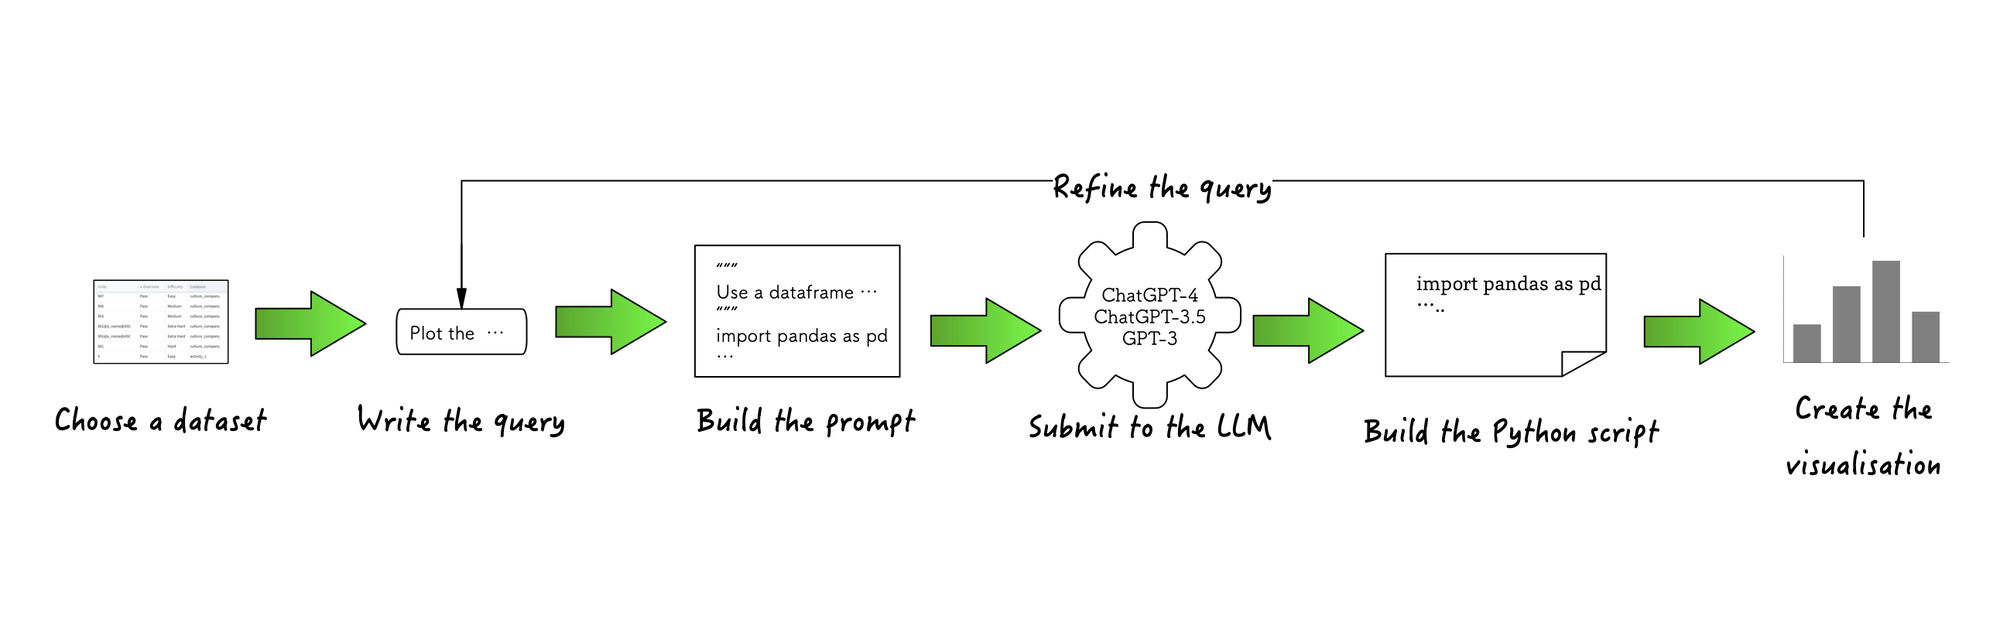
- Choose a pre-loaded dataset or upload one of your own.
- Write the query in the language of your preference (no worries about spelling or grammar!)
- Chat2VIS builds a unique prompt tailored to your dataset (the prompt template is generic enough so that each LLM understands the requirements without the customization).
- Submit the prompt—the beginnings of your Python script—to each LLM and get a continuation of your script (read more about it here).
- Build the Python script by amalgamating the beginnings of the script from your initial prompt and the continuation script from the LLM.
- Create the visualisation—render the script on the Streamlit interface. If you get no plot or a plot of something unexpected, it means the code has syntax errors (kind of like the code from the human programmers!). Just change your wording a bit and resubmit the request.
How to use Chat2VIS
To begin, follow these steps:
- Load the dataset.
- Enter your OpenAI API key (if you don't have one, get it here and add some credit).
- Enter your Hugging Face API key if using Code Llama (if you don’t have a token, get it here, no credit required )
Now you’re ready!
Example 1
Let's start with a simple example.
Type in this query: “Show the number of competitors who have competed in the 3x3 event by country for the top 10 countries.”
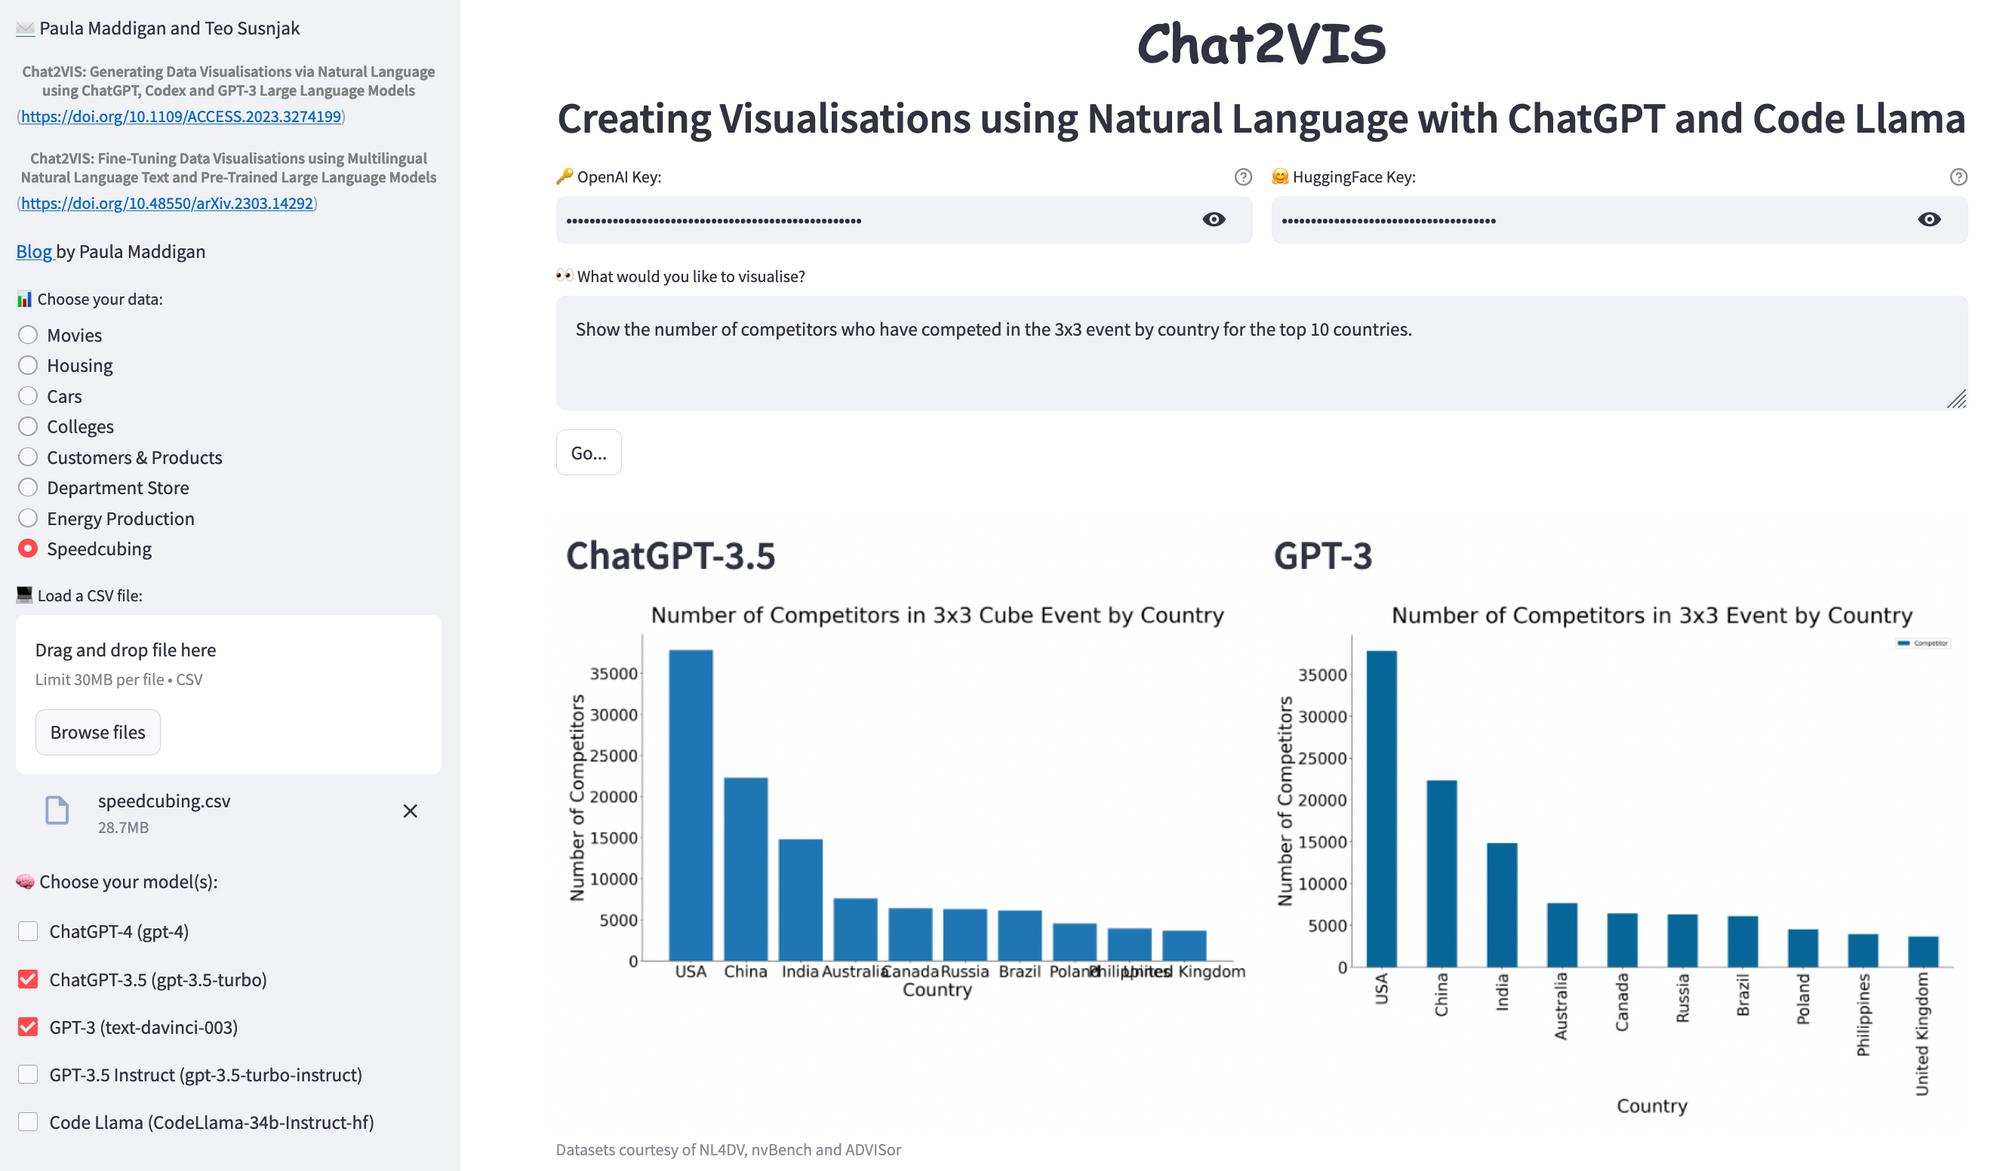
Both GPT-3 and ChatGPT-3.5 performed well in understanding the query text and displaying the results, complete with axis labels and a title. They even correctly identified the "3x3 event" as the "3x3x3 Cube" value in the "Event Name" column. The USA had the highest number of speedcubers at approximately 38,000. However, ChatGPT could improve readability by changing the orientation of the x-axis bar labels. You can let the model know the preferred label orientation.
Example 2
Let's try a more challenging example.
Type in this query: “For each event, show the fastest best single time and put the value above the bar line. The results are in centiseconds. Please convert them to seconds.”
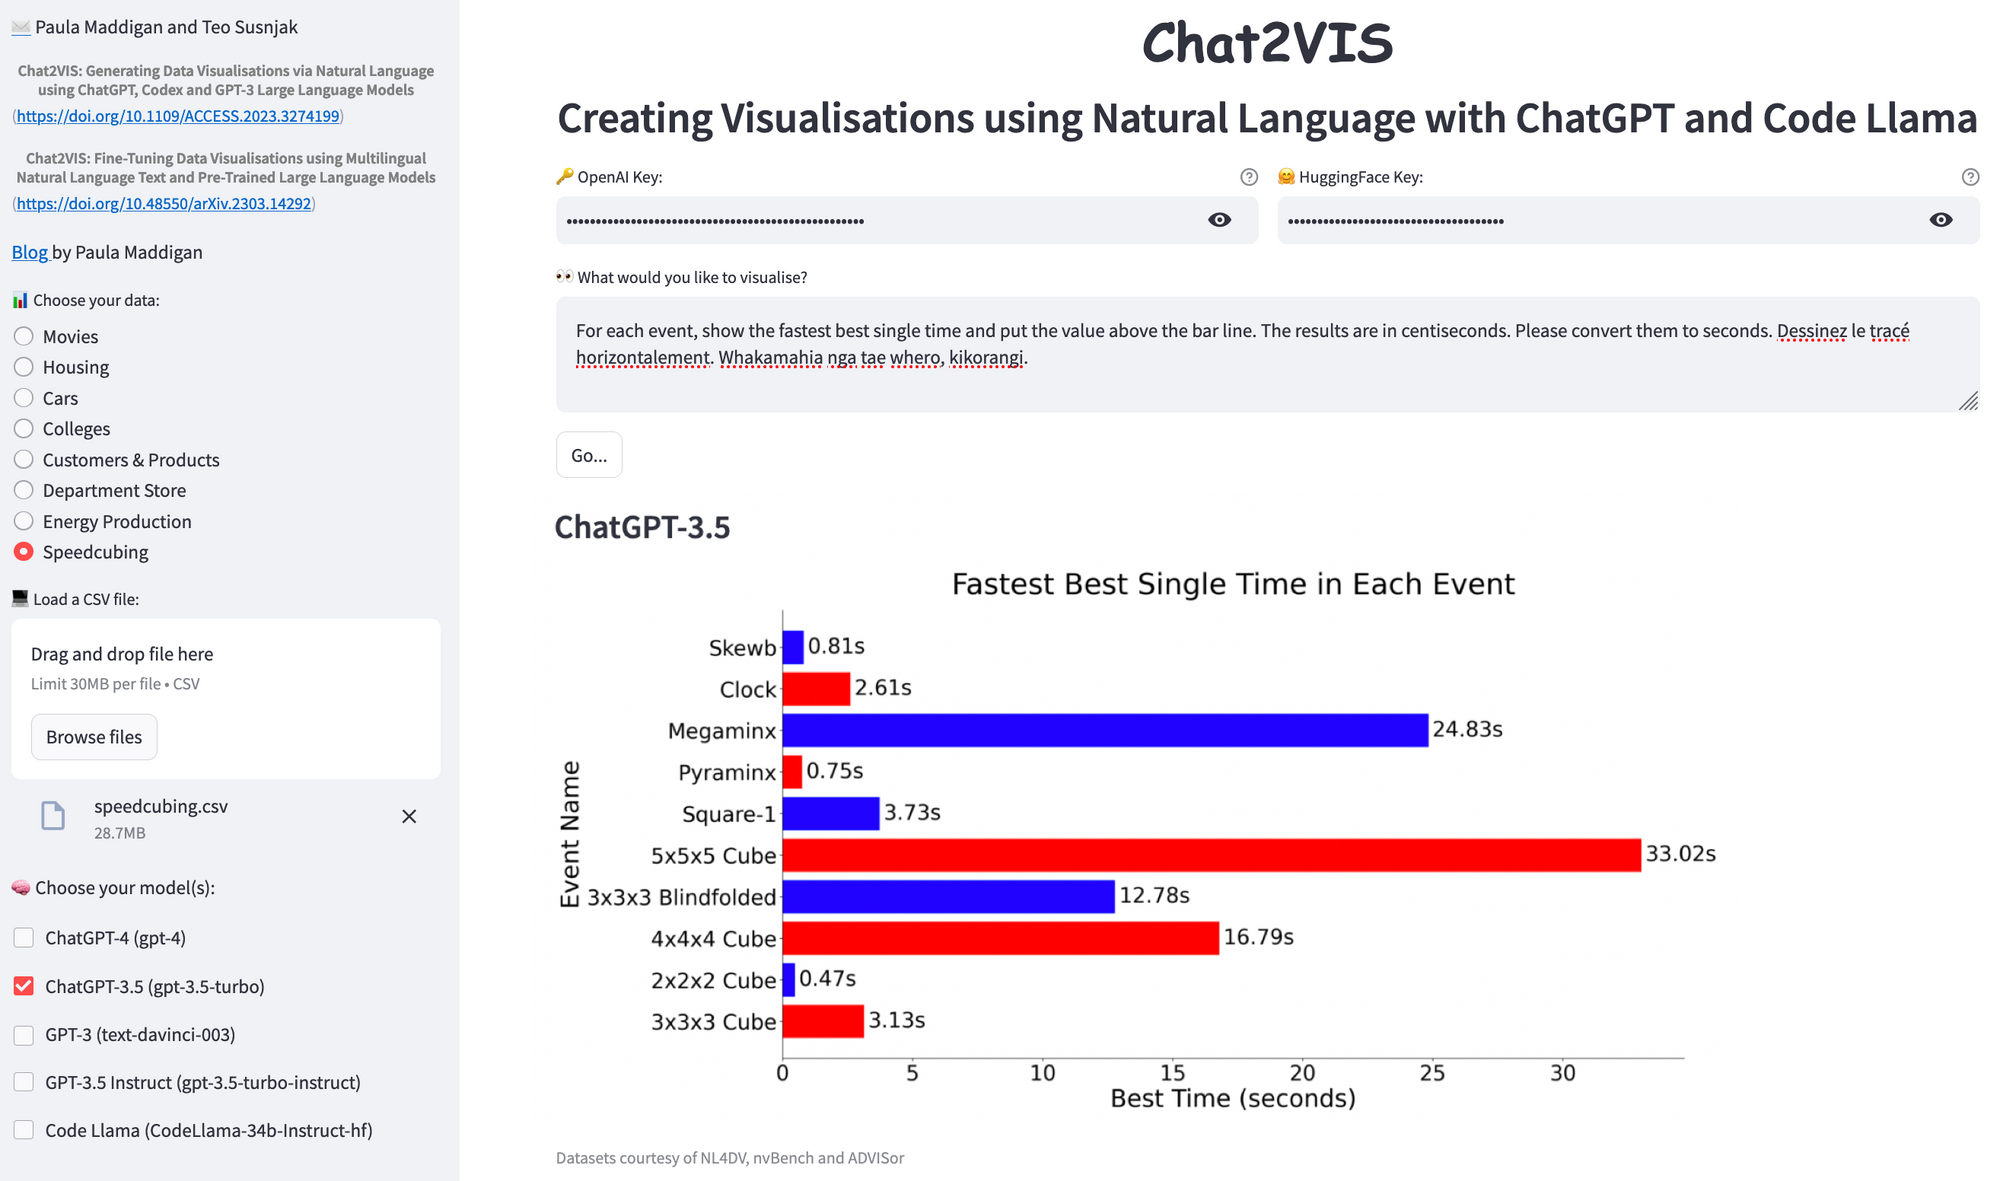
The LLMs are primarily trained in the English language but have knowledge of other languages as well.
Let's add some multilingual text:
- "Dessinez le tracé horizontalement" ("Draw the plot horizontal" in French)
- "Whakamahia nga tae whero, kikorangi" (”Use red and blue for the plot” in te reo Māori, one of New Zealand's official languages)
How did Chat2VIS do? Pretty good. The values are above the bar lines, the results are converted to seconds, the plot is turned horizontal, and the colours are red and blue. It even got the axis labels and the title right. Just look at that 3x3 time … 3.13 seconds! 👏
How to build Chat2VIS
Here is how to set up the front end:
- To use the OpenAI models, and Code LLama on Hugging Face with LangChain, first install the packages
openai,langchainandhuggingface_hubinto your environment. - Import the libraries and functions:
import openai
from langchain import HuggingFaceHub, LLMChain,PromptTemplate
- To centre the titles and change the font, use
st.markdown:
st.markdown("<h1 style='text-align: center; font-weight:bold; font-family:comic sans ms; padding-top: 0rem;'> Chat2VIS</h1>", unsafe_allow_html=True)
st.markdown("<h2 style='text-align: center;padding-top: 0rem;'>Creating Visualisations using Natural Language with ChatGPT and Code Llama</h2>", unsafe_allow_html=True)
- Create a sidebar and load the available datasets into a dictionary. Storing them in the
session_stateobject avoids unnecessary reloading. Use radio buttons to select the chosen dataset, but also include any manually uploaded datasets in the list. To do this, add an empty container to reserve the spot on the sidebar, add a file uploader, and add the uploaded file to the dictionary. Finally, add the dataset list of radio buttons to the empty container (I like to use emoji shortcodes on the labels!). If a dataset has been manually uploaded, ensure that the radio button is selected:
if "datasets" not in st.session_state:
    datasets = {}
    # Preload datasets
    datasets["Movies"] = pd.read_csv("movies.csv")
    datasets["Housing"] = pd.read_csv("housing.csv")
    datasets["Cars"] = pd.read_csv("cars.csv")
		...
    st.session_state["datasets"] = datasets
else:
    # use the list already loaded
    datasets = st.session_state["datasets"]

with st.sidebar:
    # First we want to choose the dataset, but we will fill it with choices once we've loaded one
		dataset_container = st.empty()

    # Add facility to upload a dataset
    uploaded_file = st.file_uploader(":computer: Load a CSV file:", type="csv")
		# When we add the radio buttons we want to default the selection to the first
		index_no = 0
    if uploaded_file:
        # Read in the data, add it to the list of available datasets. Give it a nice name.
        file_name = uploaded_file.name[:-4].capitalize()
        datasets[file_name] = pd.read_csv(uploaded_file)
				# We want to default the radio button to the newly added dataset
				index_no = len(datasets)-1

    # Radio buttons for dataset choice
    chosen_dataset = dataset_container.radio(":bar_chart: Choose your data:", datasets.keys(), index=index_no)
- Add checkboxes in the sidebar to choose which LLM to use. The label will display the model name with the model version in brackets. The models and their selected status will be stored in a dictionary:
available_models = {"ChatGPT-4": "gpt-4","ChatGPT-3.5": "gpt-3.5-turbo","GPT-3": "text-davinci-003",
                     "GPT-3.5 Instruct": "gpt-3.5-turbo-instruct","Code Llama":"CodeLlama-34b-Instruct-hf"}
with st.sidebar:
		st.write(":brain: Choose your model(s):")
		# Keep a dictionary of whether models are selected or not
		use_model = {}
		for model_desc,model_name in available_models.items():
        label = f"{model_desc} ({model_name})"
        key = f"key_{model_desc}"
        use_model[model_desc] = st.checkbox(label,value=True,key=key)
- In the main section, add two columns with password
text_inputwidgets — one for the OpenAI key🔑 and one for the HuggingFace key 🤗. Use thehelpargument of the widget to indicate which models require which type of API key. Additionally, a text area for the query 👀 and a "Go" button are included.
key_col1,key_col2 = st.columns(2)
openai_key = key_col1.text_input(label = ":key: OpenAI Key:", help="Required for ChatGPT-4, ChatGPT-3.5, GPT-3, GPT-3.5 Instruct.",type="password")
hf_key = key_col2.text_input(label = ":hugging_face: HuggingFace Key:",help="Required for Code Llama", type="password")
question = st.text_area(":eyes: What would you like to visualise?", height=10)
go_btn = st.button("Go...")
- Finally, display the datasets using a tab widget.
tab_list = st.tabs(df_list.keys())
for dataset_num, tab in enumerate(tab_list):
    with tab:
        dataset_name = list(df_list.keys())[dataset_num]
        st.subheader(dataset_name)
        st.dataframe(df_list[dataset_name], hide_index=True)
To initiate the process, click on “Go…”!
Next, create a list of the models that the user has selected:
# Make a list of the models which have been selected
selected_models = [model_name for model_name, choose_model in use_model.items() if choose_model]
model_count = len(selected_models)
The script will only run if one or more models are selected (model_count > 0). If at least one of the OpenAI models is chosen, check whether the user has entered an OpenAI API key (starting with sk-). If Code Llama is selected, check whether the user has entered a HuggingFace API key (starting with hf_).
Columns will be dynamically created on the interface for the correct number of plots, and the LLM prompt will be prepared for submission to the chosen models (for more details, refer to this code and this article):
# Execute chatbot query
if go_btn and model_count > 0:
    api_keys_entered = True
    # Check API keys are entered.
    if  "ChatGPT-4" in selected_models or "ChatGPT-3.5" in selected_models or "GPT-3" in selected_models or "GPT-3.5 Instruct" in selected_models:
        if not openai_key.startswith('sk-'):
            st.error("Please enter a valid OpenAI API key.")
            api_keys_entered = False
    if "Code Llama" in selected_models:
        if not hf_key.startswith('hf_'):
            st.error("Please enter a valid HuggingFace API key.")
            api_keys_entered = False
    if api_keys_entered:
        # Place for plots depending on how many models
        plots = st.columns(model_count)
        ...
The following run_request function illustrates this process, taking parameters for the prompt (question_to_ask), the model type (gpt-4, gpt-3.5-turbo, text-davinci-003, gpt-3.5-turbo-instruct, or CodeLlama-34b-Instruct-hf), and your OpenAI / Hugging Face API keys (key, alt_key). This function is placed within a try block with except statements to capture any errors returned from the LLMs (read more here). Create the function as follows:
- Add the first
ifstatement to handle ChatGPT 3.5 & 4 models using the ChatCompletion endpoint. GPT-4 tends to be more verbose and includes comments in the script without using the#character. To address this, modify the system's role to only include code in the script and exclude comments. - Add the second
ifstatement to cover the legacy GPT-3 model using the Completion endpoint. Since the new GPT-3.5 Instruct model also uses the same endpoint as GPT-3, include it in thisifstatement. - Add a third
ifstatement to run Code Llama from HuggingFace using basic LangChain commands.
def run_request(question_to_ask, model_type, key, alt_key):
    if model_type == "gpt-4" or model_type == "gpt-3.5-turbo":
        # Run OpenAI ChatCompletion API
        task = "Generate Python Code Script."
        if model_type == "gpt-4":
            # Ensure GPT-4 does not include additional comments
            task = task + " The script should only include code, no comments."
        openai.api_key = key
        response = openai.ChatCompletion.create(model=model_type,
            messages=[{"role":"system","content":task},{"role":"user","content":question_to_ask}])
        llm_response = response["choices"][0]["message"]["content"]
    elif model_type == "text-davinci-003" or model_type == "gpt-3.5-turbo-instruct":
        # Run OpenAI Completion API
        openai.api_key = key
        response = openai.Completion.create(engine=model_type,prompt=question_to_ask,temperature=0,max_tokens=500,
                    top_p=1.0,frequency_penalty=0.0,presence_penalty=0.0,stop=["plt.show()"])
        llm_response = response["choices"][0]["text"]
    else:
        # Hugging Face model
        llm = HuggingFaceHub(huggingfacehub_api_token = alt_key,
              repo_id="codellama/" + model_type, model_kwargs={"temperature":0.1, "max_new_tokens":500})
        llm_prompt = PromptTemplate.from_template(question_to_ask)
        llm_chain = LLMChain(llm=llm,prompt=llm_prompt,verbose=True)
        llm_response = llm_chain.predict()
    return llm_response
HuggingFaceHubprovides access to the models within the HuggingFace Hub platform. Initialise the object using the Hugging Face API token from the Streamlit interface. It requires the full repository namerepo_id=codellama/CodeLlama-34b-Instruct-hf.To ensure limited creativity in the Python code generation, set the temperature to a low value of 0.1. A token limit of 500 should be sufficient to produce the required code.PromptTemplateallows for manipulation of LLM prompts, such as replacing placeholders and keywords within the user's query. I have already dynamically created the prompt (question_to_ask), so it is a simple task to create the prompt template object.LLMChainis a fundamental chain for interacting with LLMs. Construct it from theHuggingFaceHubandPromptTemplateobjects. Set theverbose=Trueoption to observe the prompt's output on the console. Then execute thepredictfunction to submit the prompt to the model and return the resulting response.
The complete script to generate the visualisation for each model is created by amalgamating the code section from the initial prompt with the script returned from the run_request function. Subsequently, each model's script is executed and rendered in a column on the interface using st.pyplot.
Wrapping up
You learned how to create a natural language interface that displays data visualisations using everyday language requests on a set of data. I didn’t cover the details of engineering the prompt for the LLMs, but the referenced articles should give you more guidance. Since the development of Chat2VIS in January 2023, there have been significant advancements leveraging generative AI for visualisations and prompt engineering. There is so much more to explore!
Thank you to Streamlit for helping me build this app and to those of you who have contacted me to show me how you have used it with your own datasets. It's awesome to see! I’d love to answer any questions you have. Please post them in the comments below or connect with me on LinkedIn.
Happy Streamlit-ing! 🎈
*This information is based on competition results owned and maintained by the World Cube Association, published at https://worldcubeassociation.org/export/results as of June 23, 2023.


Comments
Continue the conversation in our forums →