Generative AI has been widely adopted, and the development of new, larger, and improved LLMs is advancing rapidly, making it an exciting time for developers.
You may have heard of the recent release of Llama 2, an open source large language model (LLM) by Meta. This means that you can build on, modify, deploy, and use a local copy of the model, or host it on cloud servers (e.g., Replicate).
While it’s free to download and use, it’s worth noting that self-hosting the Llama 2 model requires a powerful computer with high-end GPUs to perform computations in a timely manner. An alternative is to host the models on a cloud platform like Replicate and use the LLM via API calls. In particular, the three Llama 2 models (llama-7b-v2-chat, llama-13b-v2-chat, and llama-70b-v2-chat) are hosted on Replicate.
In this post, we’ll build a Llama 2 chatbot in Python using Streamlit for the frontend, while the LLM backend is handled through API calls to the Llama 2 model hosted on Replicate. You’ll learn how to:
- Get a Replicate API token
- Set up the coding environment
- Build the app
- Set the API token
- Deploy the app
What is Llama 2?
Meta released the second version of their open-source Llama language model on July 18, 2023. They’re democratizing access to this model by making it free to the community for both research and commercial use. They also prioritize the transparent and responsible use of AI, as evidenced by their Responsible Use Guide.
Here are the five key features of Llama 2:
- Llama 2 outperforms other open-source LLMs in benchmarks for reasoning, coding proficiency, and knowledge tests.
- The model was trained on almost twice the data of version 1, totaling 2 trillion tokens. Additionally, the training included over 1 million new human annotations and fine-tuning for chat completions.
- The model comes in three sizes, each trained with 7, 13, and 70 billion parameters.
- Llama 2 supports longer context lengths, up to 4096 tokens.
- Version 2 has a more permissive license than version 1, allowing for commercial use.
App overview
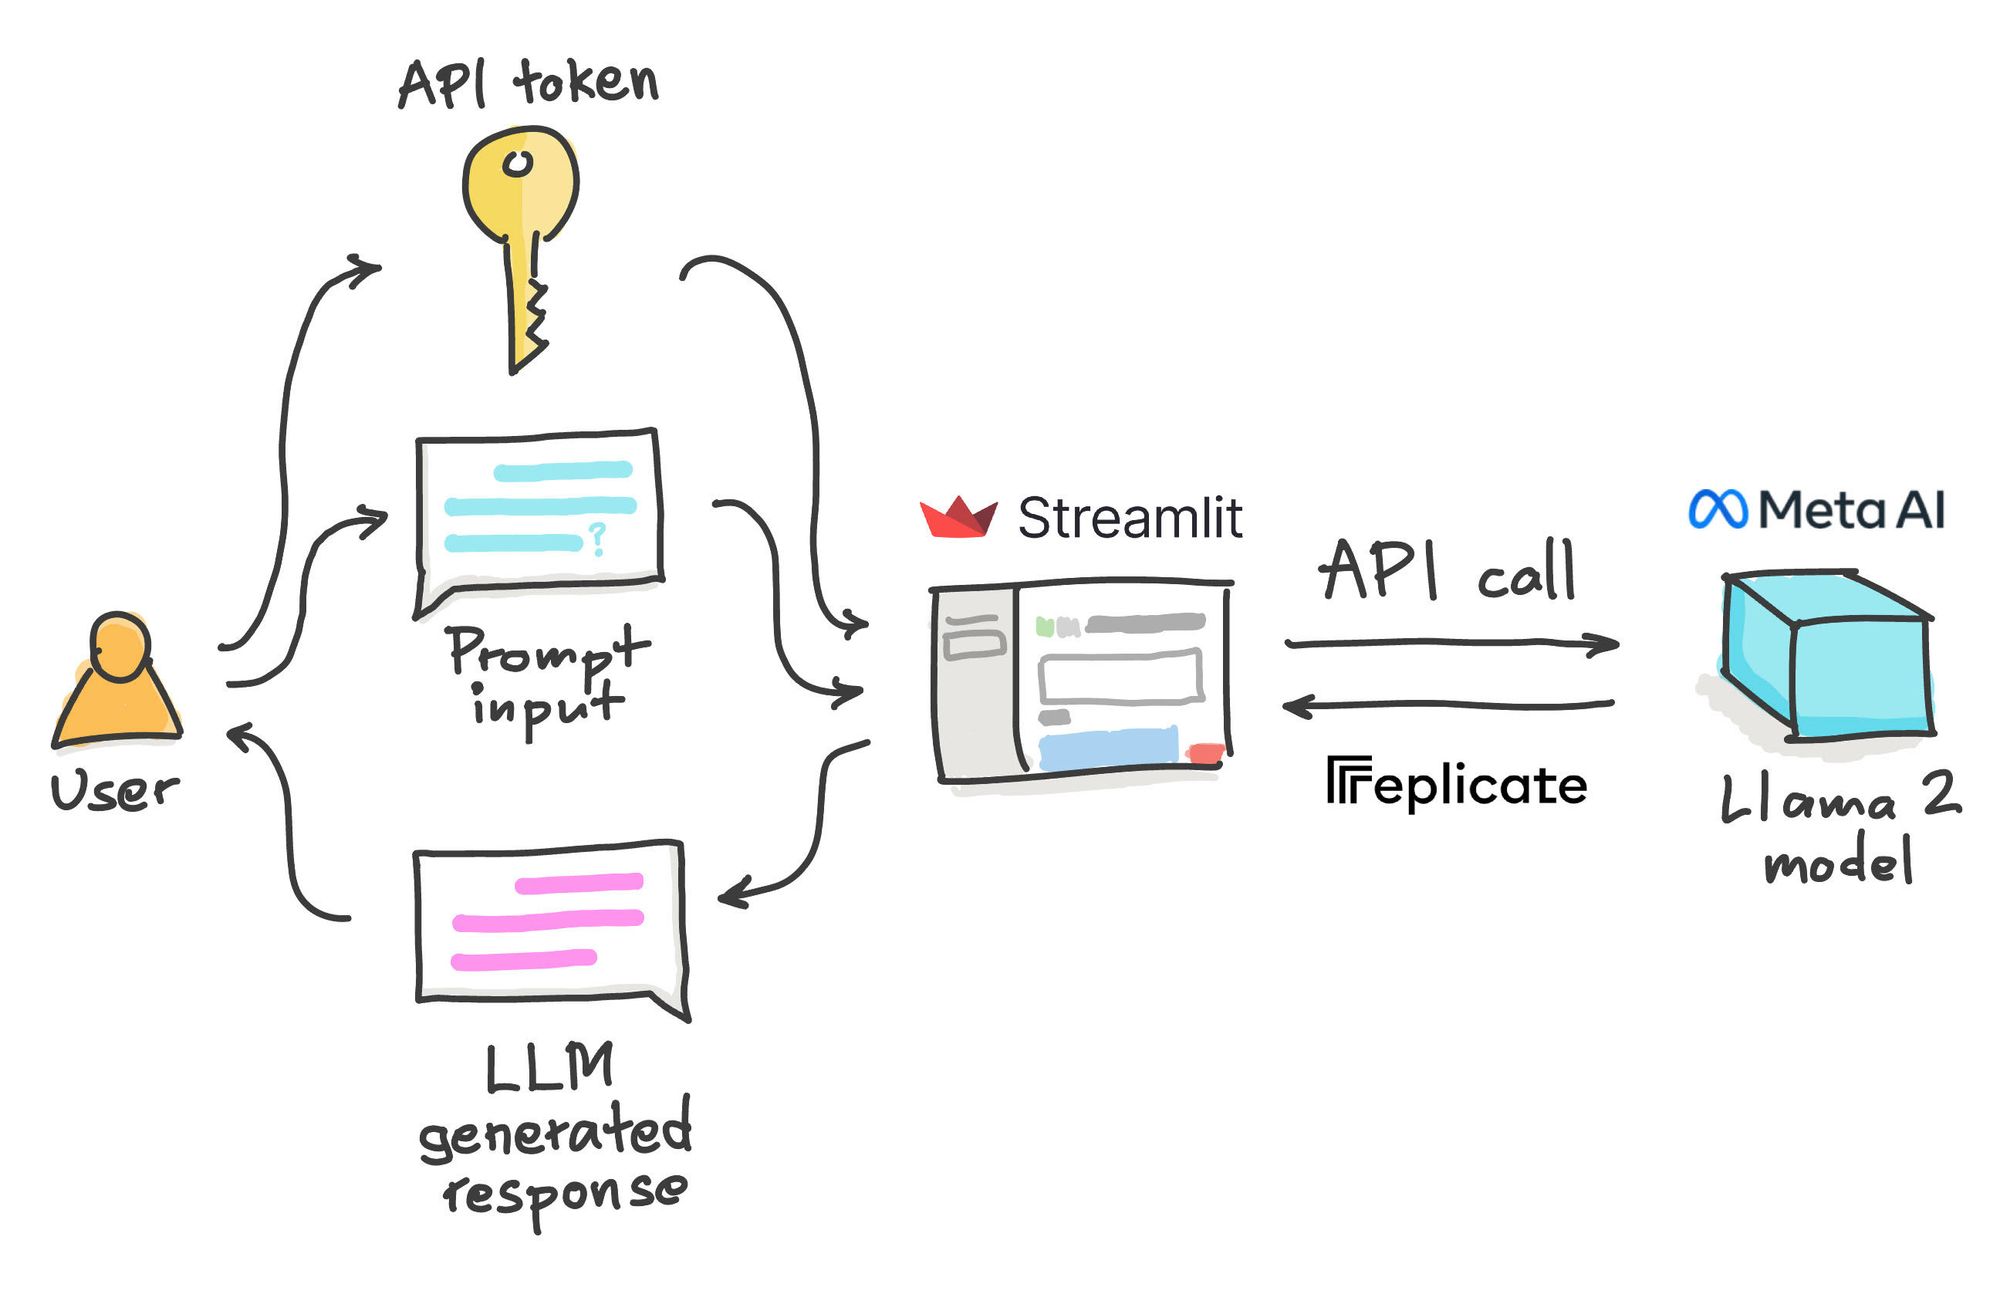
Here is a high-level overview of the Llama2 chatbot app:
- The user provides two inputs: (1) a Replicate API token (if requested) and (2) a prompt input (i.e. ask a question).
- An API call is made to the Replicate server, where the prompt input is submitted and the resulting LLM-generated response is obtained and displayed in the app.
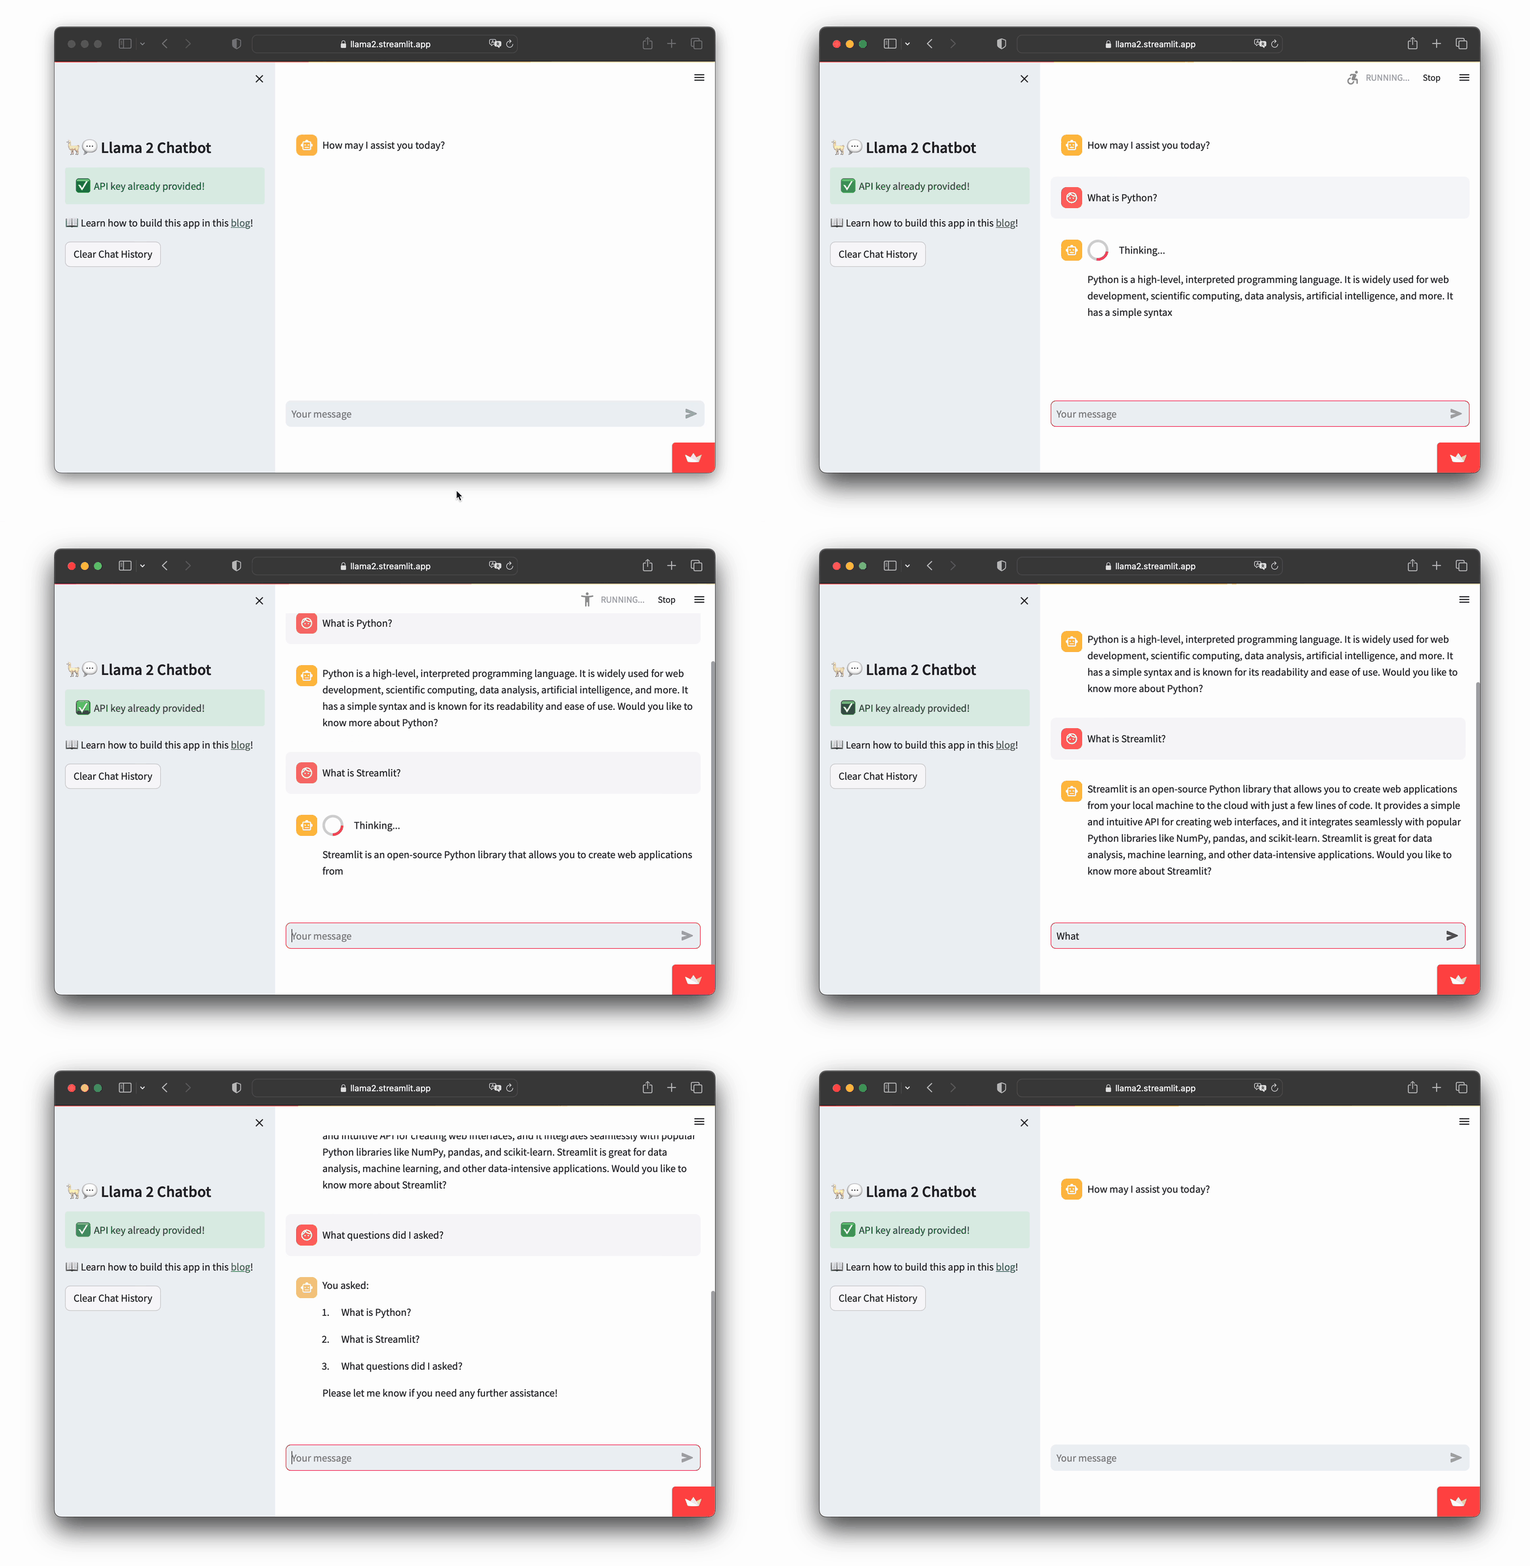
Let's take a look at the app in action:
- Go to https://llama2.streamlit.app/
- Enter your Replicate API token if prompted by the app.
- Enter your message prompt in the chat box, as shown in the screencast below.
1. Get a Replicate API token
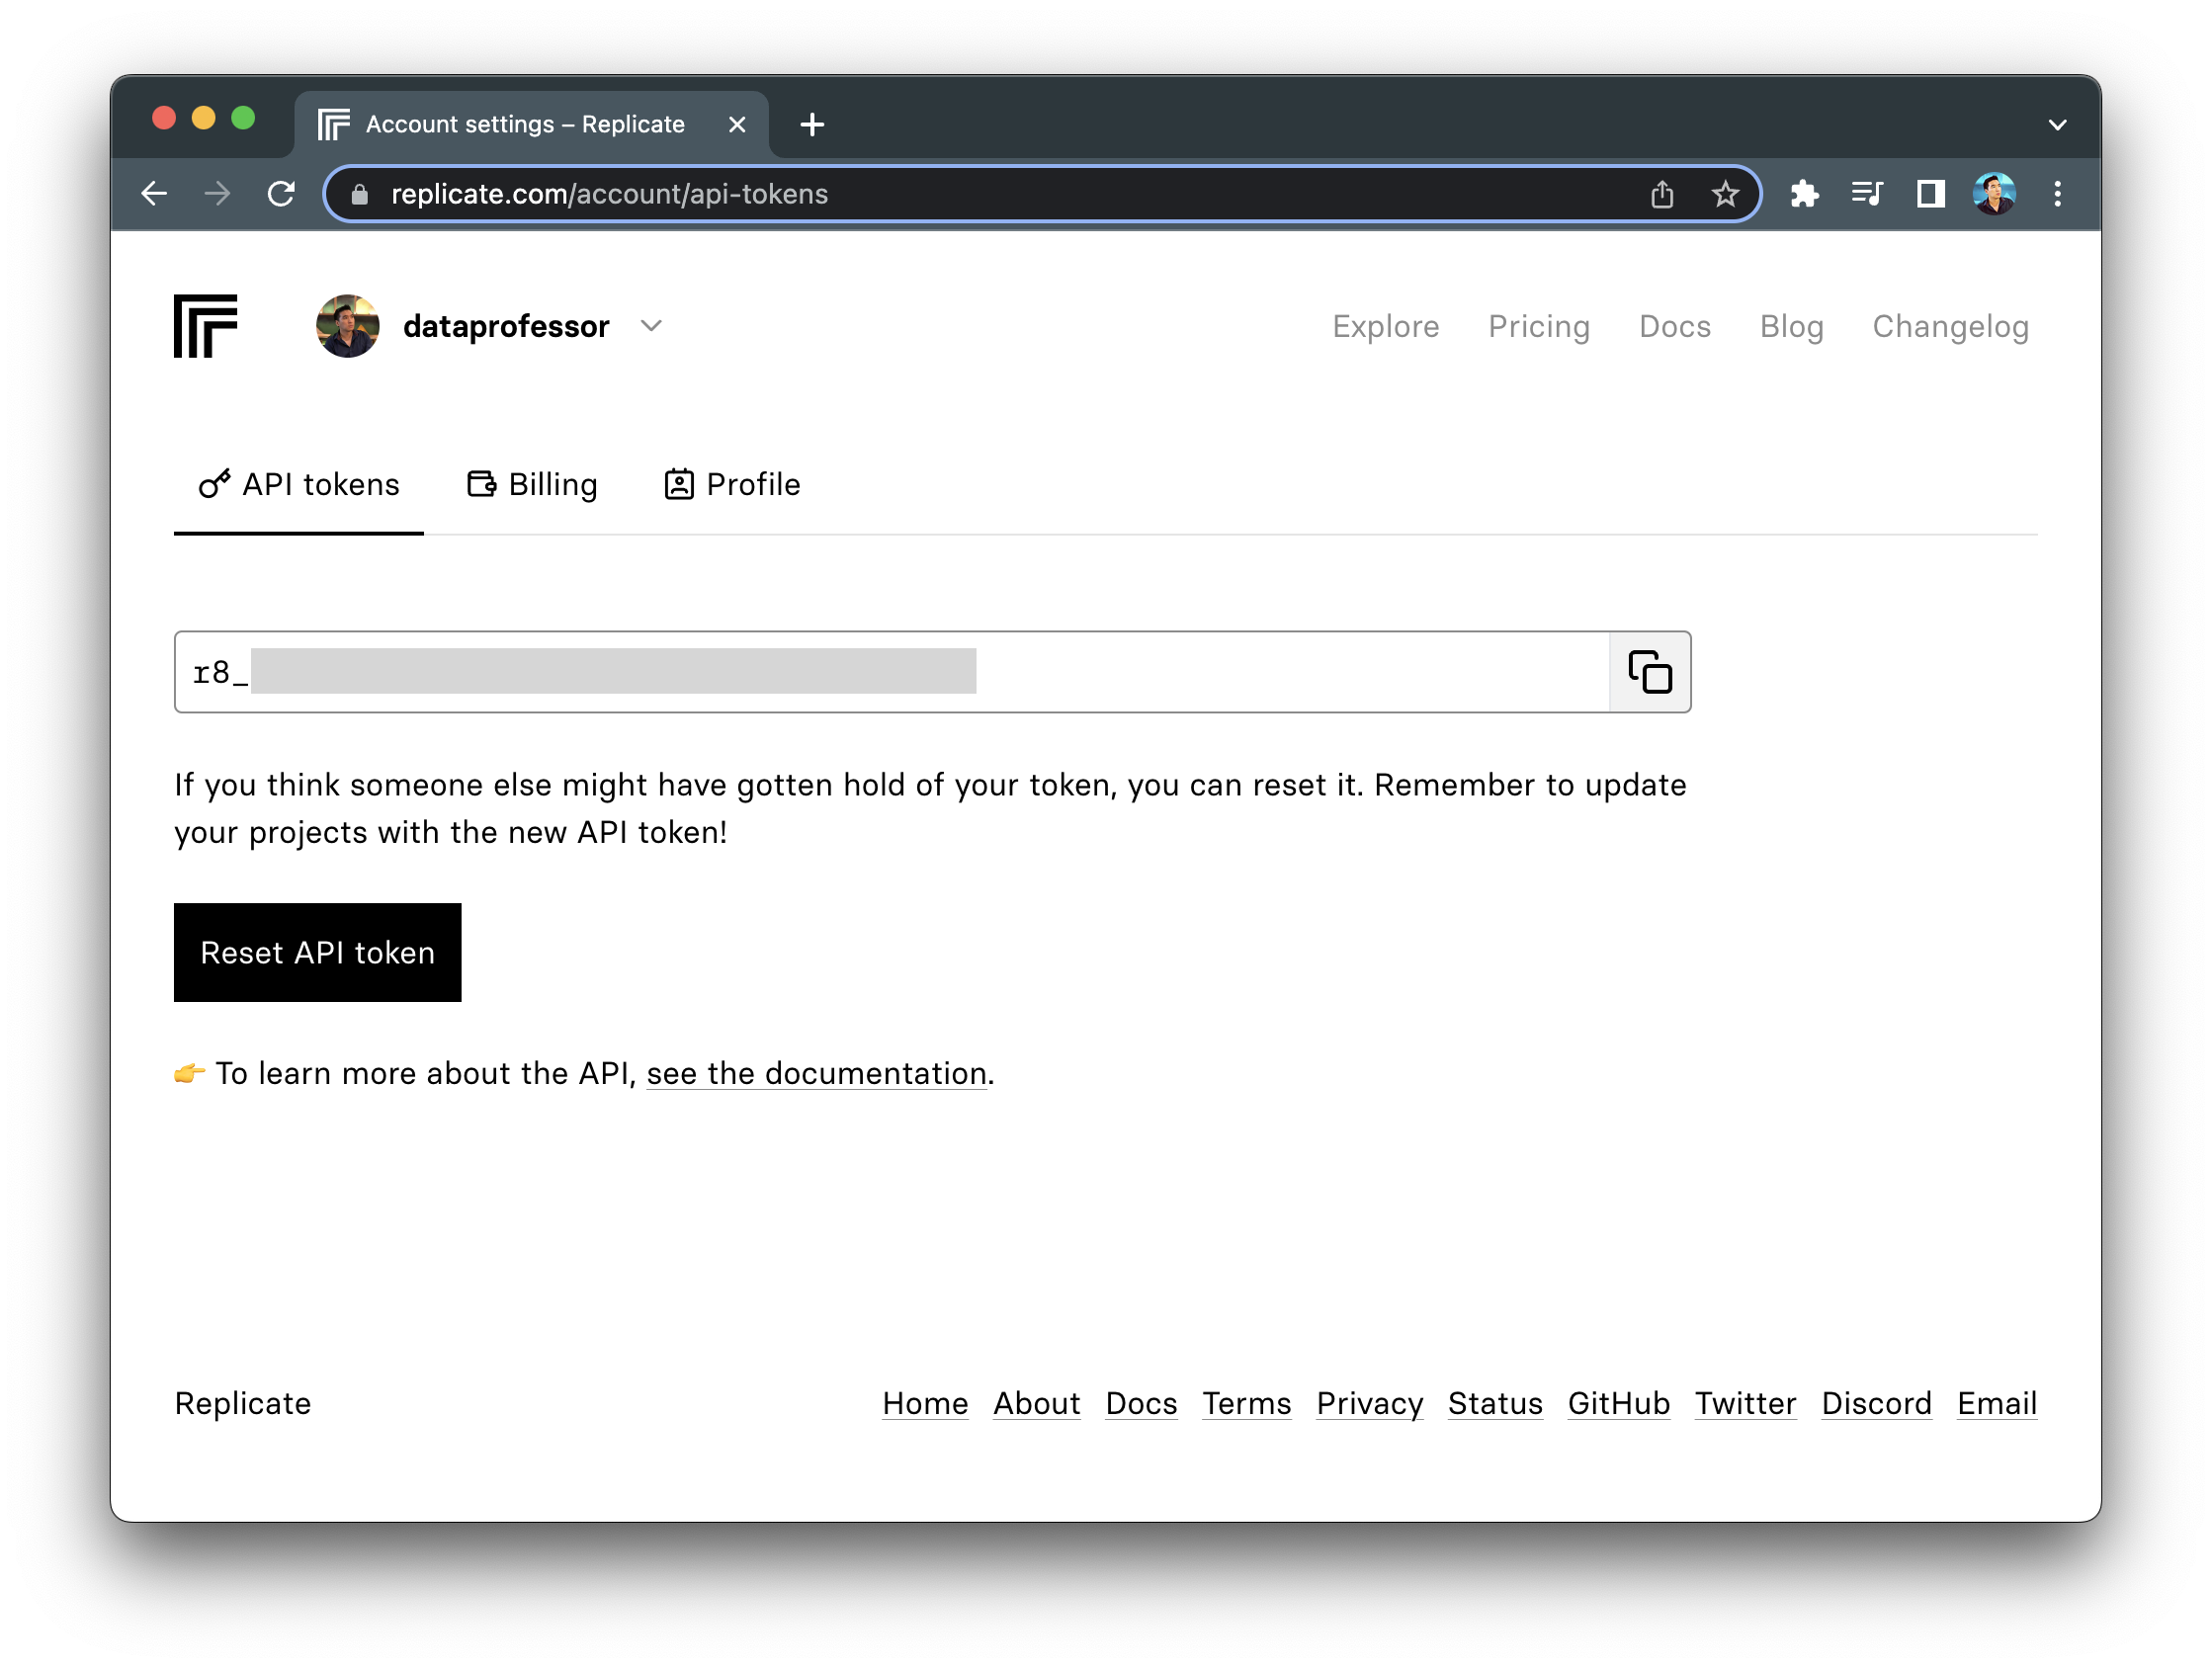
Getting your Replicate API token is a simple 3-step process:
- Go to https://replicate.com/signin/.
- Sign in with your GitHub account.
- Proceed to the API tokens page and copy your API token.
2. Set up the coding environment
Local development
To set up a local coding environment, enter the following command into a command line prompt:
pip install streamlit replicate
Cloud development
To set up a cloud environment, deploy using the Streamlit Community Cloud with the help of the Streamlit app template (read more here).
Add a requirements.txt file to your GitHub repo and include the following prerequisite libraries:
streamlit
replicate
3. Build the app
The Llama 2 chatbot app uses a total of 77 lines of code to build:
import streamlit as st
import replicate
import os

# App title
st.set_page_config(page_title="🦙💬 Llama 2 Chatbot")

# Replicate Credentials
with st.sidebar:
    st.title('🦙💬 Llama 2 Chatbot')
    if 'REPLICATE_API_TOKEN' in st.secrets:
        st.success('API key already provided!', icon='✅')
        replicate_api = st.secrets['REPLICATE_API_TOKEN']
    else:
        replicate_api = st.text_input('Enter Replicate API token:', type='password')
        if not (replicate_api.startswith('r8_') and len(replicate_api)==40):
            st.warning('Please enter your credentials!', icon='⚠️')
        else:
            st.success('Proceed to entering your prompt message!', icon='👉')
    os.environ['REPLICATE_API_TOKEN'] = replicate_api

    st.subheader('Models and parameters')
    selected_model = st.sidebar.selectbox('Choose a Llama2 model', ['Llama2-7B', 'Llama2-13B'], key='selected_model')
    if selected_model == 'Llama2-7B':
        llm = 'a16z-infra/llama7b-v2-chat:4f0a4744c7295c024a1de15e1a63c880d3da035fa1f49bfd344fe076074c8eea'
    elif selected_model == 'Llama2-13B':
        llm = 'a16z-infra/llama13b-v2-chat:df7690f1994d94e96ad9d568eac121aecf50684a0b0963b25a41cc40061269e5'
    temperature = st.sidebar.slider('temperature', min_value=0.01, max_value=5.0, value=0.1, step=0.01)
    top_p = st.sidebar.slider('top_p', min_value=0.01, max_value=1.0, value=0.9, step=0.01)
    max_length = st.sidebar.slider('max_length', min_value=32, max_value=128, value=120, step=8)
    st.markdown('📖 Learn how to build this app in this [blog](https://blog.streamlit.io/how-to-build-a-llama-2-chatbot/)!')

# Store LLM generated responses
if "messages" not in st.session_state.keys():
    st.session_state.messages = [{"role": "assistant", "content": "How may I assist you today?"}]

# Display or clear chat messages
for message in st.session_state.messages:
    with st.chat_message(message["role"]):
        st.write(message["content"])

def clear_chat_history():
    st.session_state.messages = [{"role": "assistant", "content": "How may I assist you today?"}]
st.sidebar.button('Clear Chat History', on_click=clear_chat_history)

# Function for generating LLaMA2 response. Refactored from https://github.com/a16z-infra/llama2-chatbot
def generate_llama2_response(prompt_input):
    string_dialogue = "You are a helpful assistant. You do not respond as 'User' or pretend to be 'User'. You only respond once as 'Assistant'."
    for dict_message in st.session_state.messages:
        if dict_message["role"] == "user":
            string_dialogue += "User: " + dict_message["content"] + "\n\n"
        else:
            string_dialogue += "Assistant: " + dict_message["content"] + "\n\n"
    output = replicate.run('a16z-infra/llama13b-v2-chat:df7690f1994d94e96ad9d568eac121aecf50684a0b0963b25a41cc40061269e5',
                           input={"prompt": f"{string_dialogue} {prompt_input} Assistant: ",
                                  "temperature":temperature, "top_p":top_p, "max_length":max_length, "repetition_penalty":1})
    return output

# User-provided prompt
if prompt := st.chat_input(disabled=not replicate_api):
    st.session_state.messages.append({"role": "user", "content": prompt})
    with st.chat_message("user"):
        st.write(prompt)

# Generate a new response if last message is not from assistant
if st.session_state.messages[-1]["role"] != "assistant":
    with st.chat_message("assistant"):
        with st.spinner("Thinking..."):
            response = generate_llama2_response(prompt)
            placeholder = st.empty()
            full_response = ''
            for item in response:
                full_response += item
                placeholder.markdown(full_response)
            placeholder.markdown(full_response)
    message = {"role": "assistant", "content": full_response}
    st.session_state.messages.append(message)
Import necessary libraries
First, import the necessary libraries:
streamlit- a low-code web framework used for creating the web frontend.replicate- an ML model hosting platform that allows interfacing with the model via an API call.os- the operating system module to load the API key into the environment variable.
import streamlit as st
import replicate
import os
Define the app title
The title of the app displayed on the browser can be specified using the page_title parameter, which is defined in the st.set_page_config() method:
# App title
st.set_page_config(page_title="🦙💬 Llama 2 Chatbot")
Define the web app frontend for accepting the API token
When designing the chatbot app, divide the app elements by placing the app title and text input box for accepting the Replicate API token in the sidebar and the chat input text in the main panel. To do this, place all subsequent statements under with st.sidebar:, followed by the following steps:
1. Define the app title using the st.title() method.
2. Use if-else statements to conditionally display either:
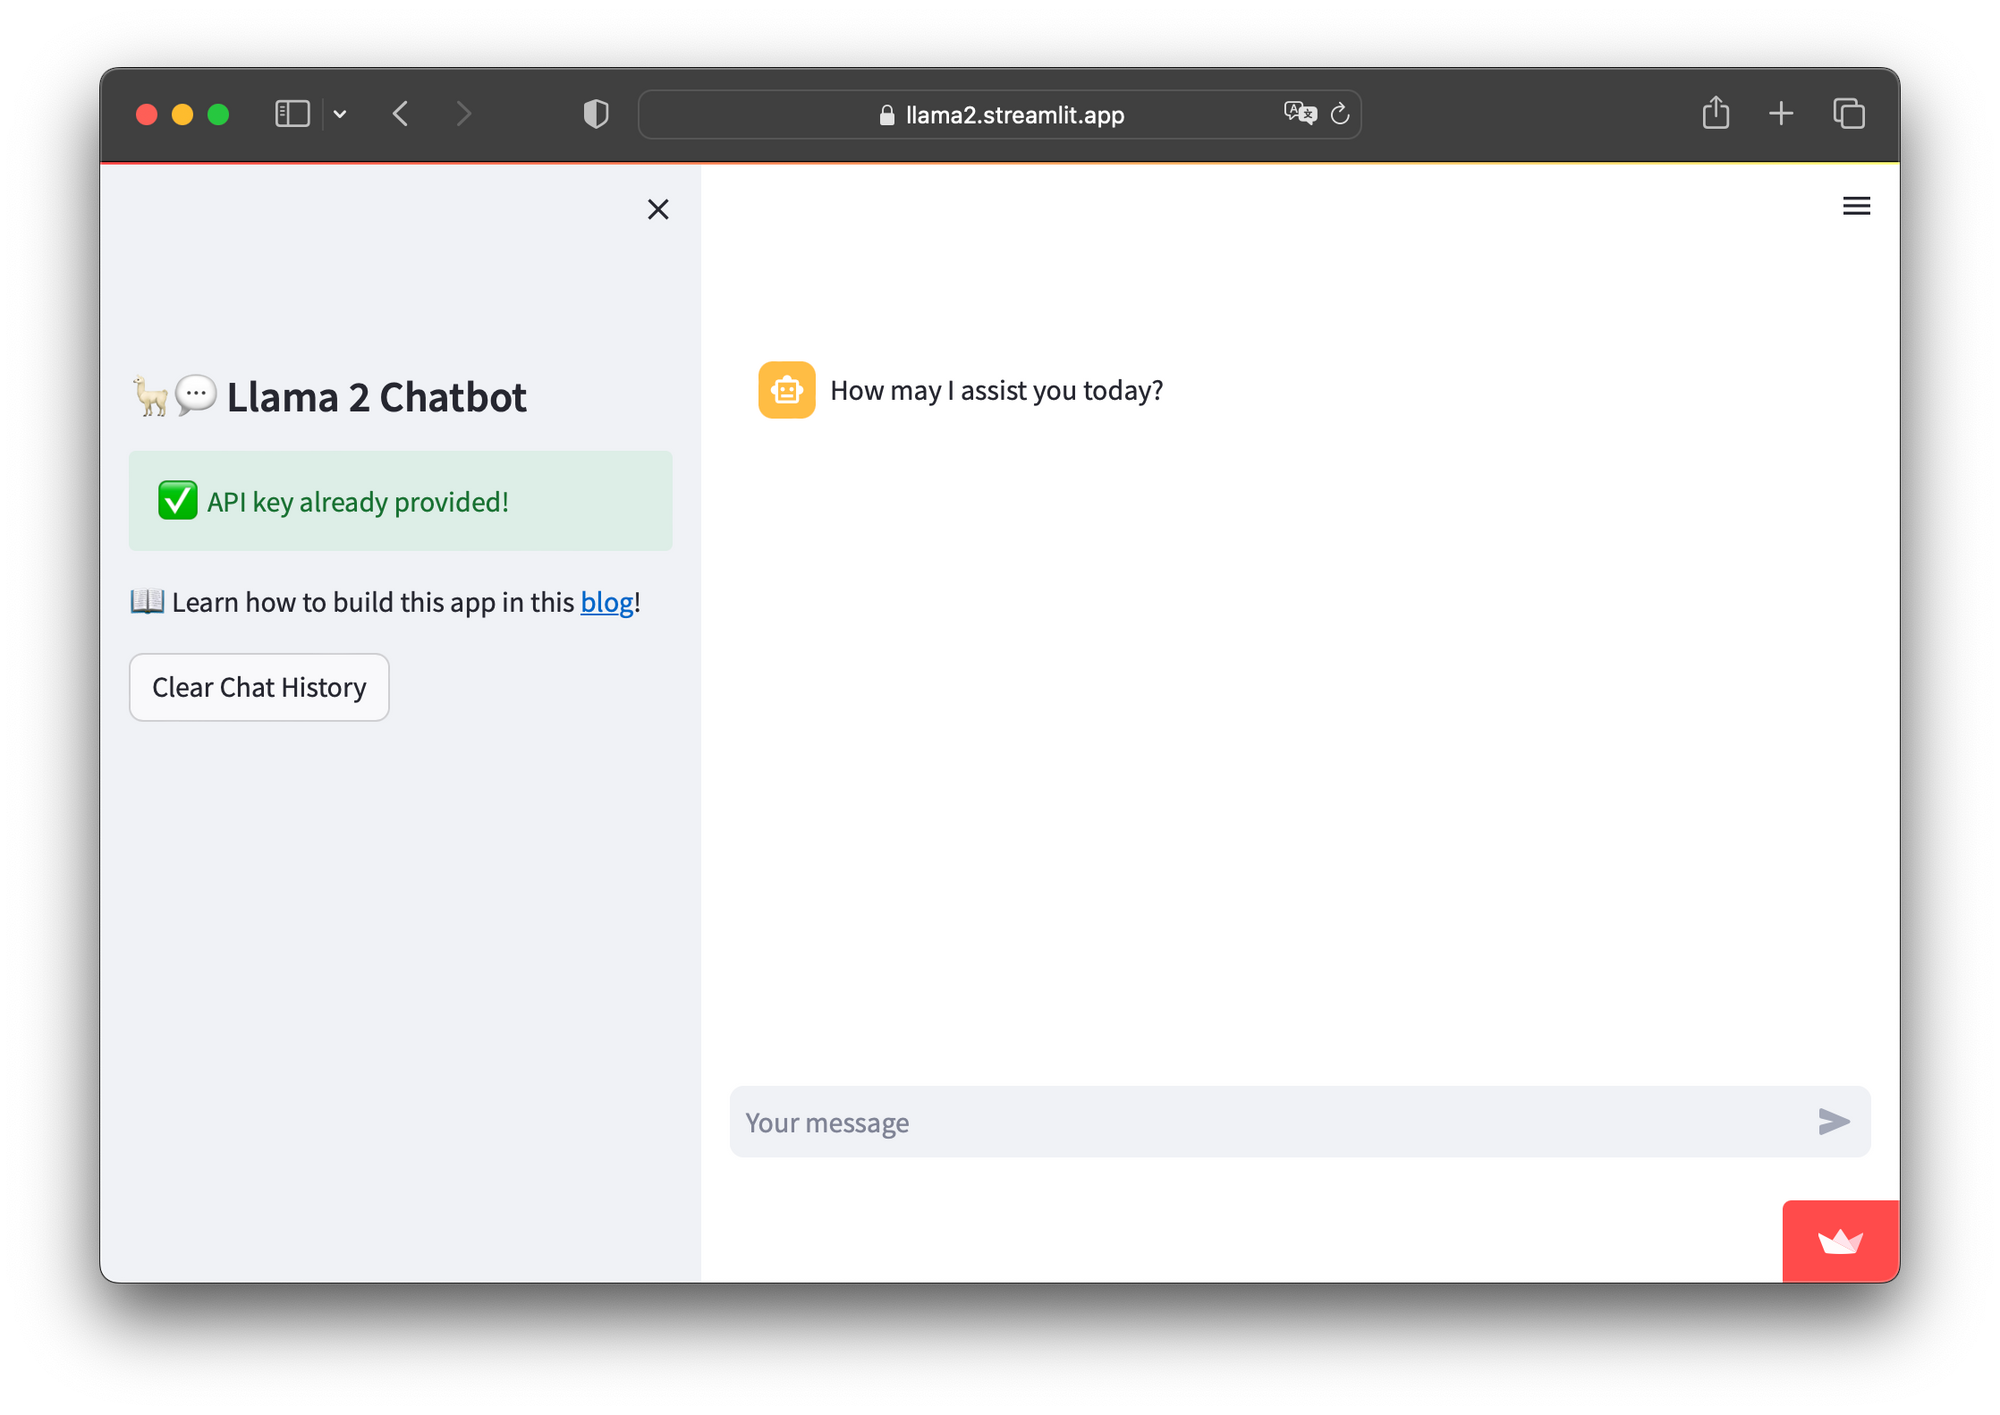
- A success message in a green box that reads
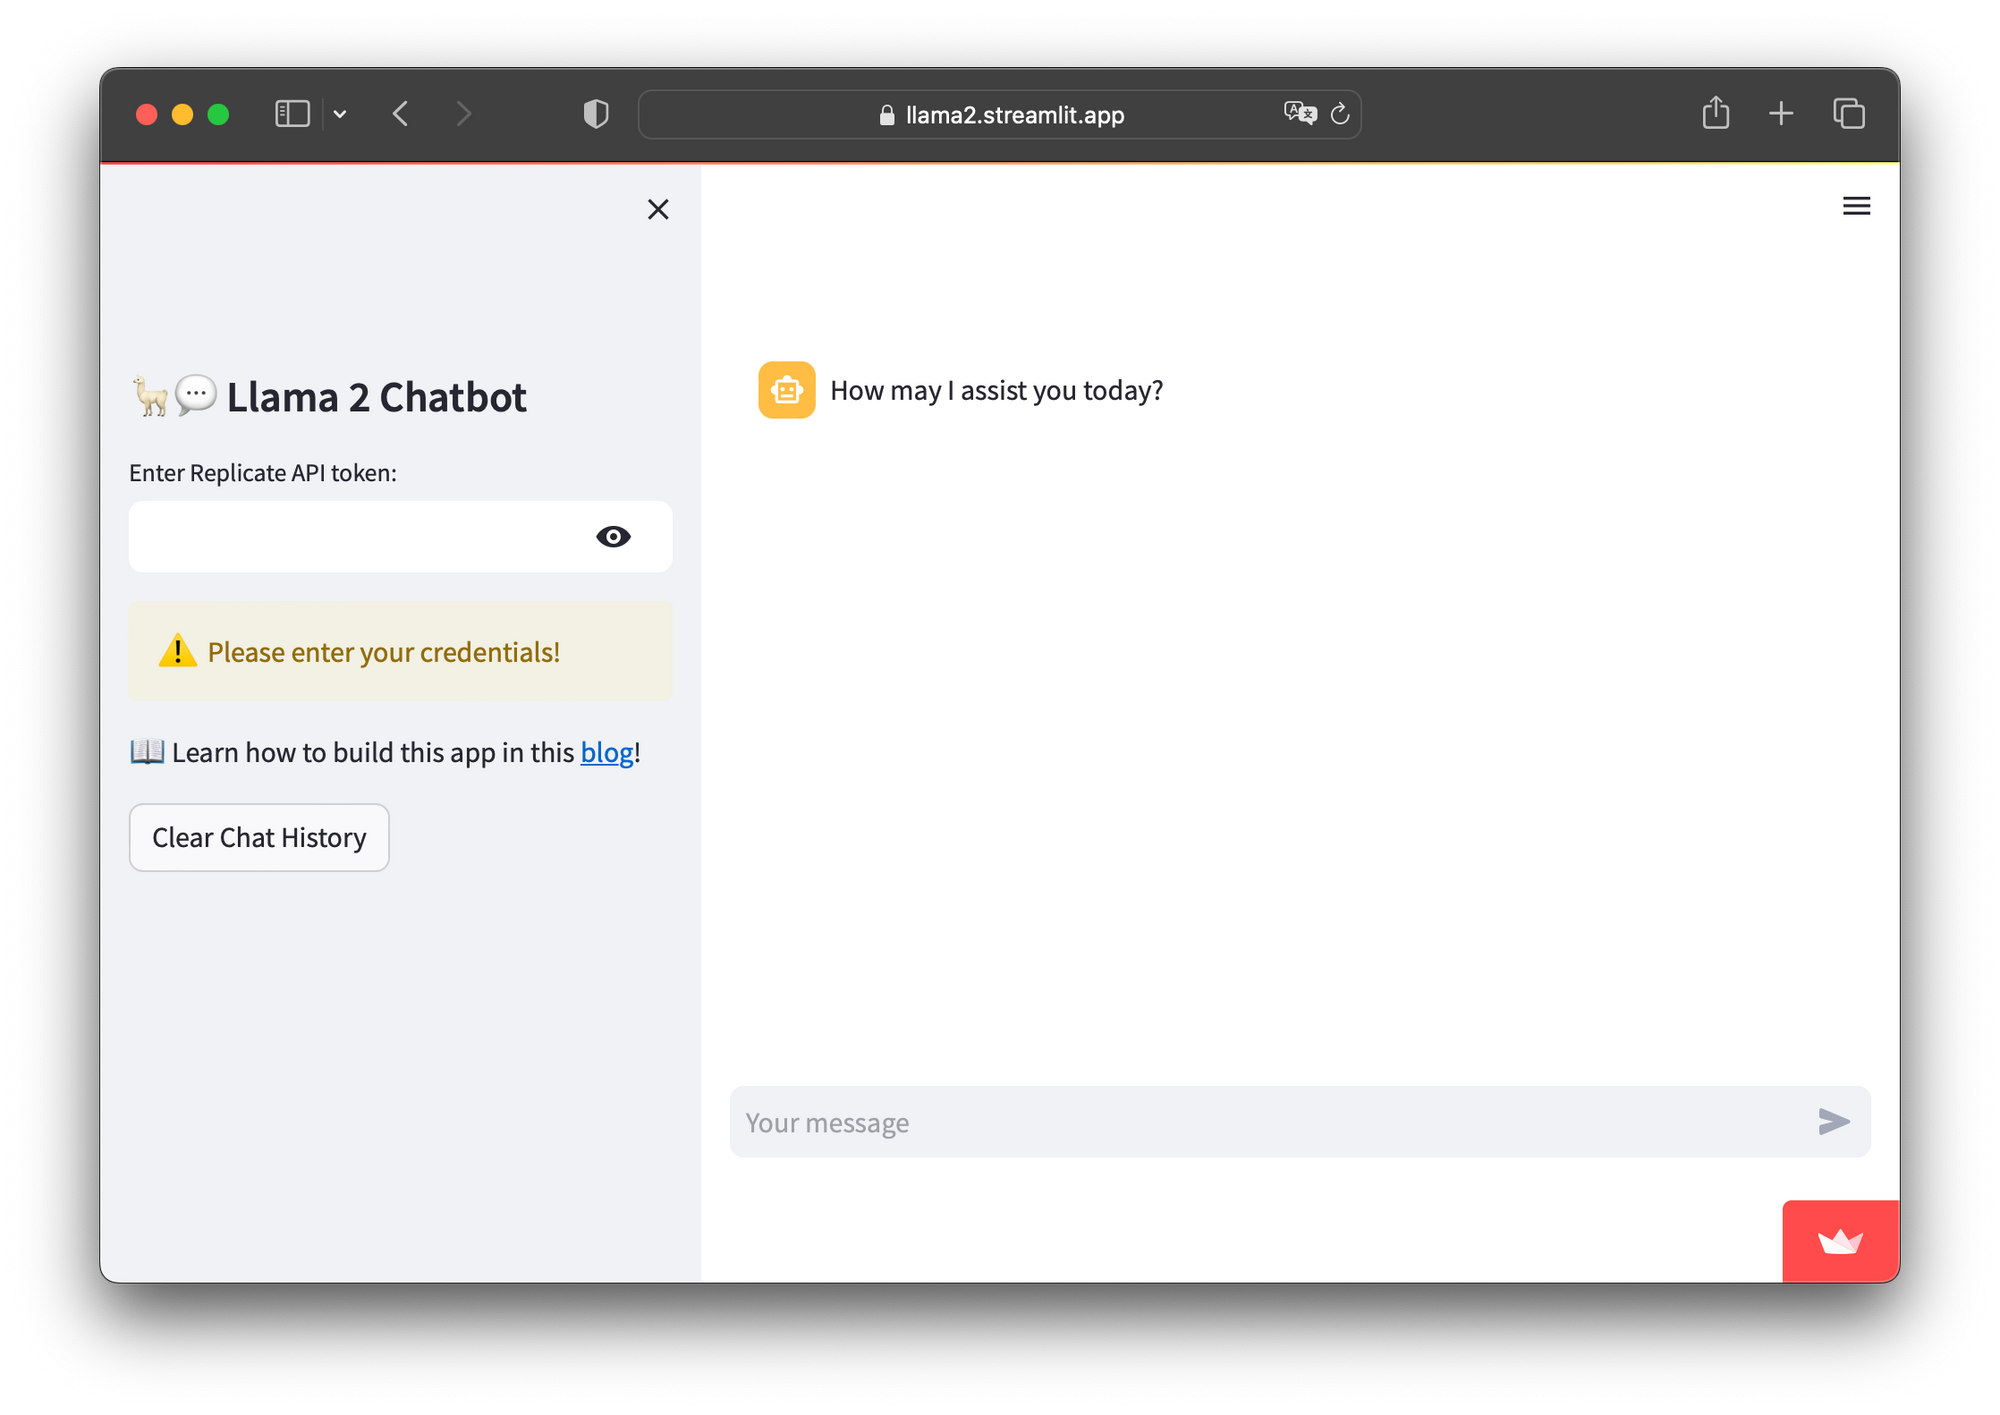
API key already provided!for theifstatement. - A warning message in a yellow box along with a text input box asking for the API token, as none were detected in the Secrets, for the
elsestatement.
Use nested if-else statement to detect whether the API key was entered into the text box, and if so, display a success message:
with st.sidebar:
    st.title('🦙💬 Llama 2 Chatbot')
    if 'REPLICATE_API_TOKEN' in st.secrets:
        st.success('API key already provided!', icon='✅')
        replicate_api = st.secrets['REPLICATE_API_TOKEN']
    else:
        replicate_api = st.text_input('Enter Replicate API token:', type='password')
        if not (replicate_api.startswith('r8_') and len(replicate_api)==40):
            st.warning('Please enter your credentials!', icon='⚠️')
        else:
            st.success('Proceed to entering your prompt message!', icon='👉')
    os.environ['REPLICATE_API_TOKEN'] = replicate_api
Adjustment of model parameters
In continuation from the above code snippet and inside the same with st.sidebar: statement, we're adding the following code block to allow users to select the Llama 2 model variant to use (namely llama2-7B or Llama2-13B) as well as adjust model parameters (namely temperature, top_p and max_length).
    st.subheader('Models and parameters')
    selected_model = st.sidebar.selectbox('Choose a Llama2 model', ['Llama2-7B', 'Llama2-13B'], key='selected_model')
    if selected_model == 'Llama2-7B':
        llm = 'a16z-infra/llama7b-v2-chat:4f0a4744c7295c024a1de15e1a63c880d3da035fa1f49bfd344fe076074c8eea'
    elif selected_model == 'Llama2-13B':
        llm = 'a16z-infra/llama13b-v2-chat:df7690f1994d94e96ad9d568eac121aecf50684a0b0963b25a41cc40061269e5'
    temperature = st.sidebar.slider('temperature', min_value=0.01, max_value=5.0, value=0.1, step=0.01)
    top_p = st.sidebar.slider('top_p', min_value=0.01, max_value=1.0, value=0.9, step=0.01)
    max_length = st.sidebar.slider('max_length', min_value=32, max_value=128, value=120, step=8)
    st.markdown('📖 Learn how to build this app in this [blog](https://blog.streamlit.io/how-to-build-a-llama-2-chatbot/)!')
Store, display, and clear chat messages
- The first code block creates an initial session state to store the LLM generated response as part of the chat message history.
- The next code block displays messages (via
st.chat_message()) from the chat history by iterating through themessagesvariable in the session state. - The last code block creates a
Clear Chat Historybutton in the sidebar, allowing users to clear the chat history by leveraging the callback function defined on the preceding line.
# Store LLM generated responses
if "messages" not in st.session_state.keys():
    st.session_state.messages = [{"role": "assistant", "content": "How may I assist you today?"}]

# Display or clear chat messages
for message in st.session_state.messages:
    with st.chat_message(message["role"]):
        st.write(message["content"])

def clear_chat_history():
    st.session_state.messages = [{"role": "assistant", "content": "How may I assist you today?"}]
st.sidebar.button('Clear Chat History', on_click=clear_chat_history)
Create the LLM response generation function
Next, create the generate_llama2_response() custom function to generate the LLM’s response. It takes a user prompt as input, builds a dialog string based on the existing chat history, and calls the model using the replicate.run() function.
The model returns a generated response:
# Function for generating LLaMA2 response. Refactored from https://github.com/a16z-infra/llama2-chatbot
def generate_llama2_response(prompt_input):
    string_dialogue = "You are a helpful assistant. You do not respond as 'User' or pretend to be 'User'. You only respond once as 'Assistant'."
    for dict_message in st.session_state.messages:
        if dict_message["role"] == "user":
            string_dialogue += "User: " + dict_message["content"] + "\n\n"
        else:
            string_dialogue += "Assistant: " + dict_message["content"] + "\n\n"
    output = replicate.run('a16z-infra/llama13b-v2-chat:df7690f1994d94e96ad9d568eac121aecf50684a0b0963b25a41cc40061269e5',
                           input={"prompt": f"{string_dialogue} {prompt_input} Assistant: ",
                                  "temperature":temperature, "top_p":top_p, "max_length":max_length, "repetition_penalty":1})
    return output
Accept prompt input
The chat input box is displayed, allowing the user to enter a prompt. Any prompt entered by the user is added to the session state messages:
# User-provided prompt
if prompt := st.chat_input(disabled=not replicate_api):
    st.session_state.messages.append({"role": "user", "content": prompt})
    with st.chat_message("user"):
        st.write(prompt)
Generate a new LLM response
If the last message wasn’t from the assistant, the assistant will generate a new response. While it’s formulating a response, a spinner widget will be displayed. Finally, the assistant's response will be displayed in the chat and added to the session state messages:
# Generate a new response if last message is not from assistant
if st.session_state.messages[-1]["role"] != "assistant":
    with st.chat_message("assistant"):
        with st.spinner("Thinking..."):
            response = generate_llama2_response(prompt)
            placeholder = st.empty()
            full_response = ''
            for item in response:
                full_response += item
                placeholder.markdown(full_response)
            placeholder.markdown(full_response)
    message = {"role": "assistant", "content": full_response}
    st.session_state.messages.append(message)
4. Set the API token
Option 1. Set the API token in Secrets
If you want to provide your users with free access to your chatbot, you'll need to cover the costs as your credit card is tied to your account.
To set the API token in the Secrets management on Streamlit Community Cloud, click on the expandable menu at the far right, then click on Settings:
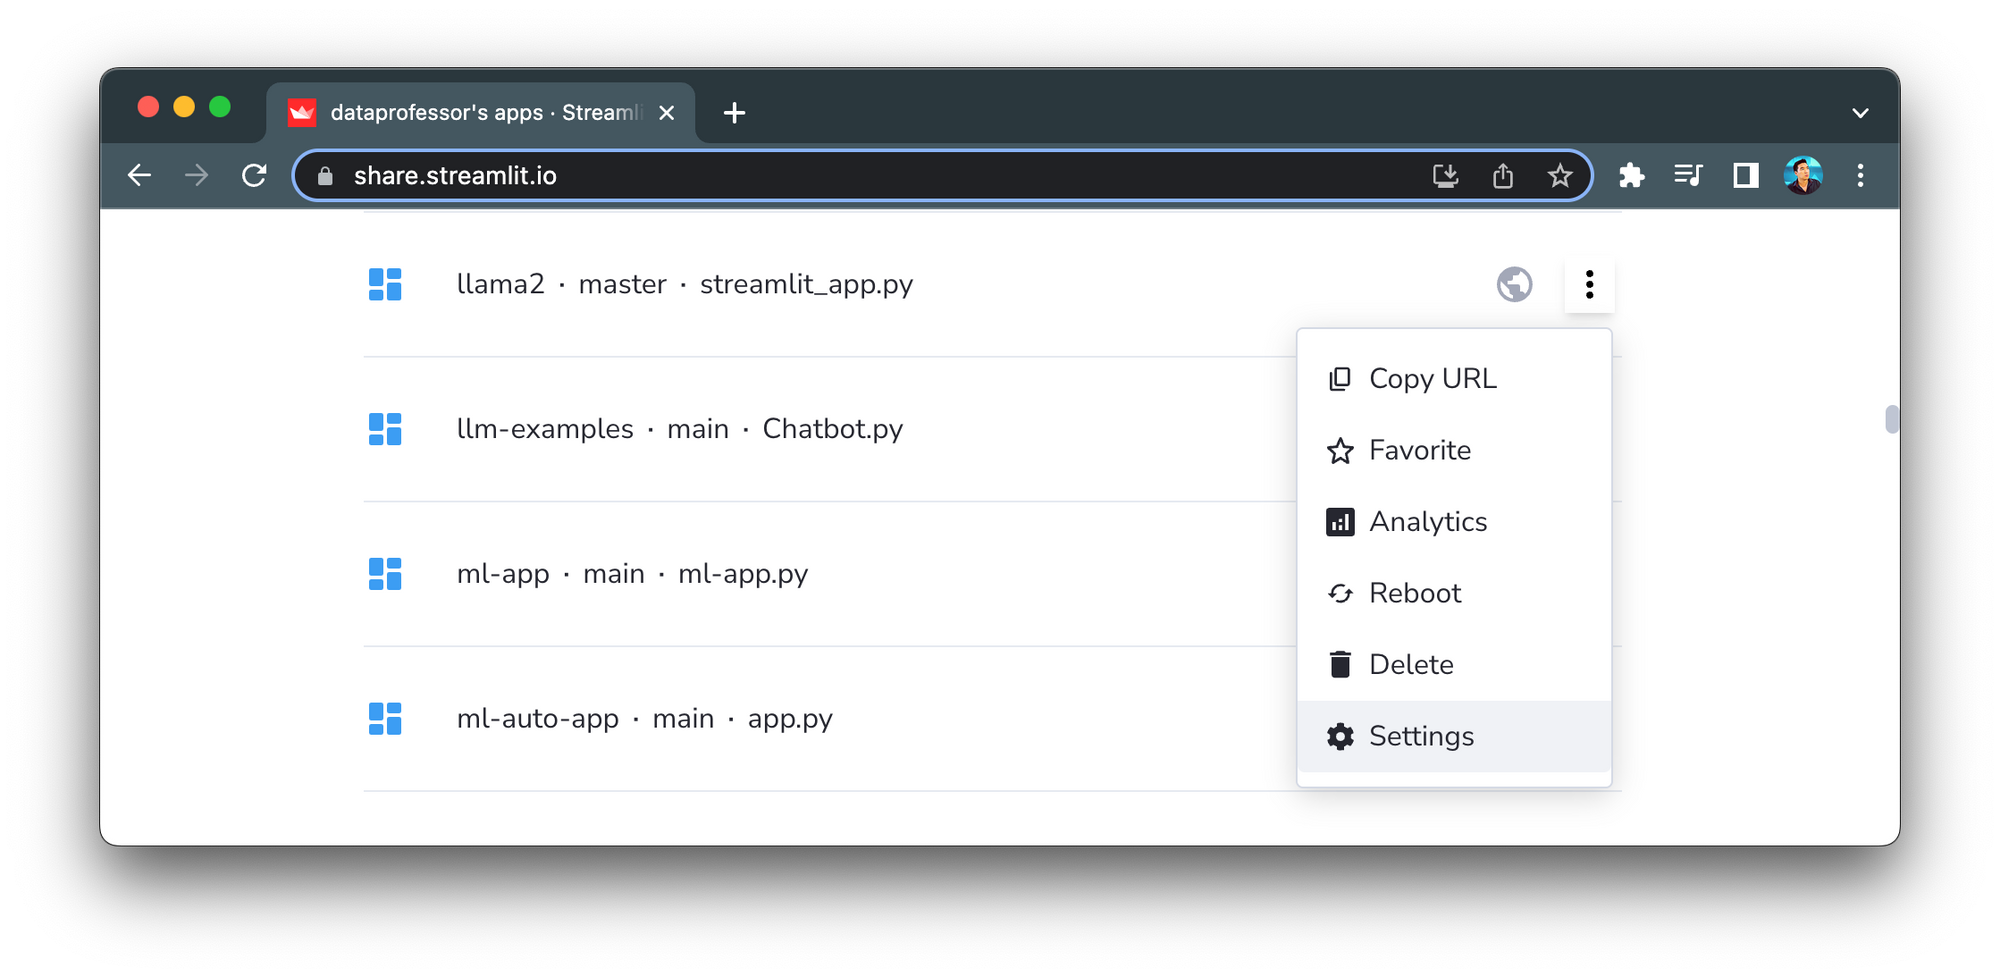
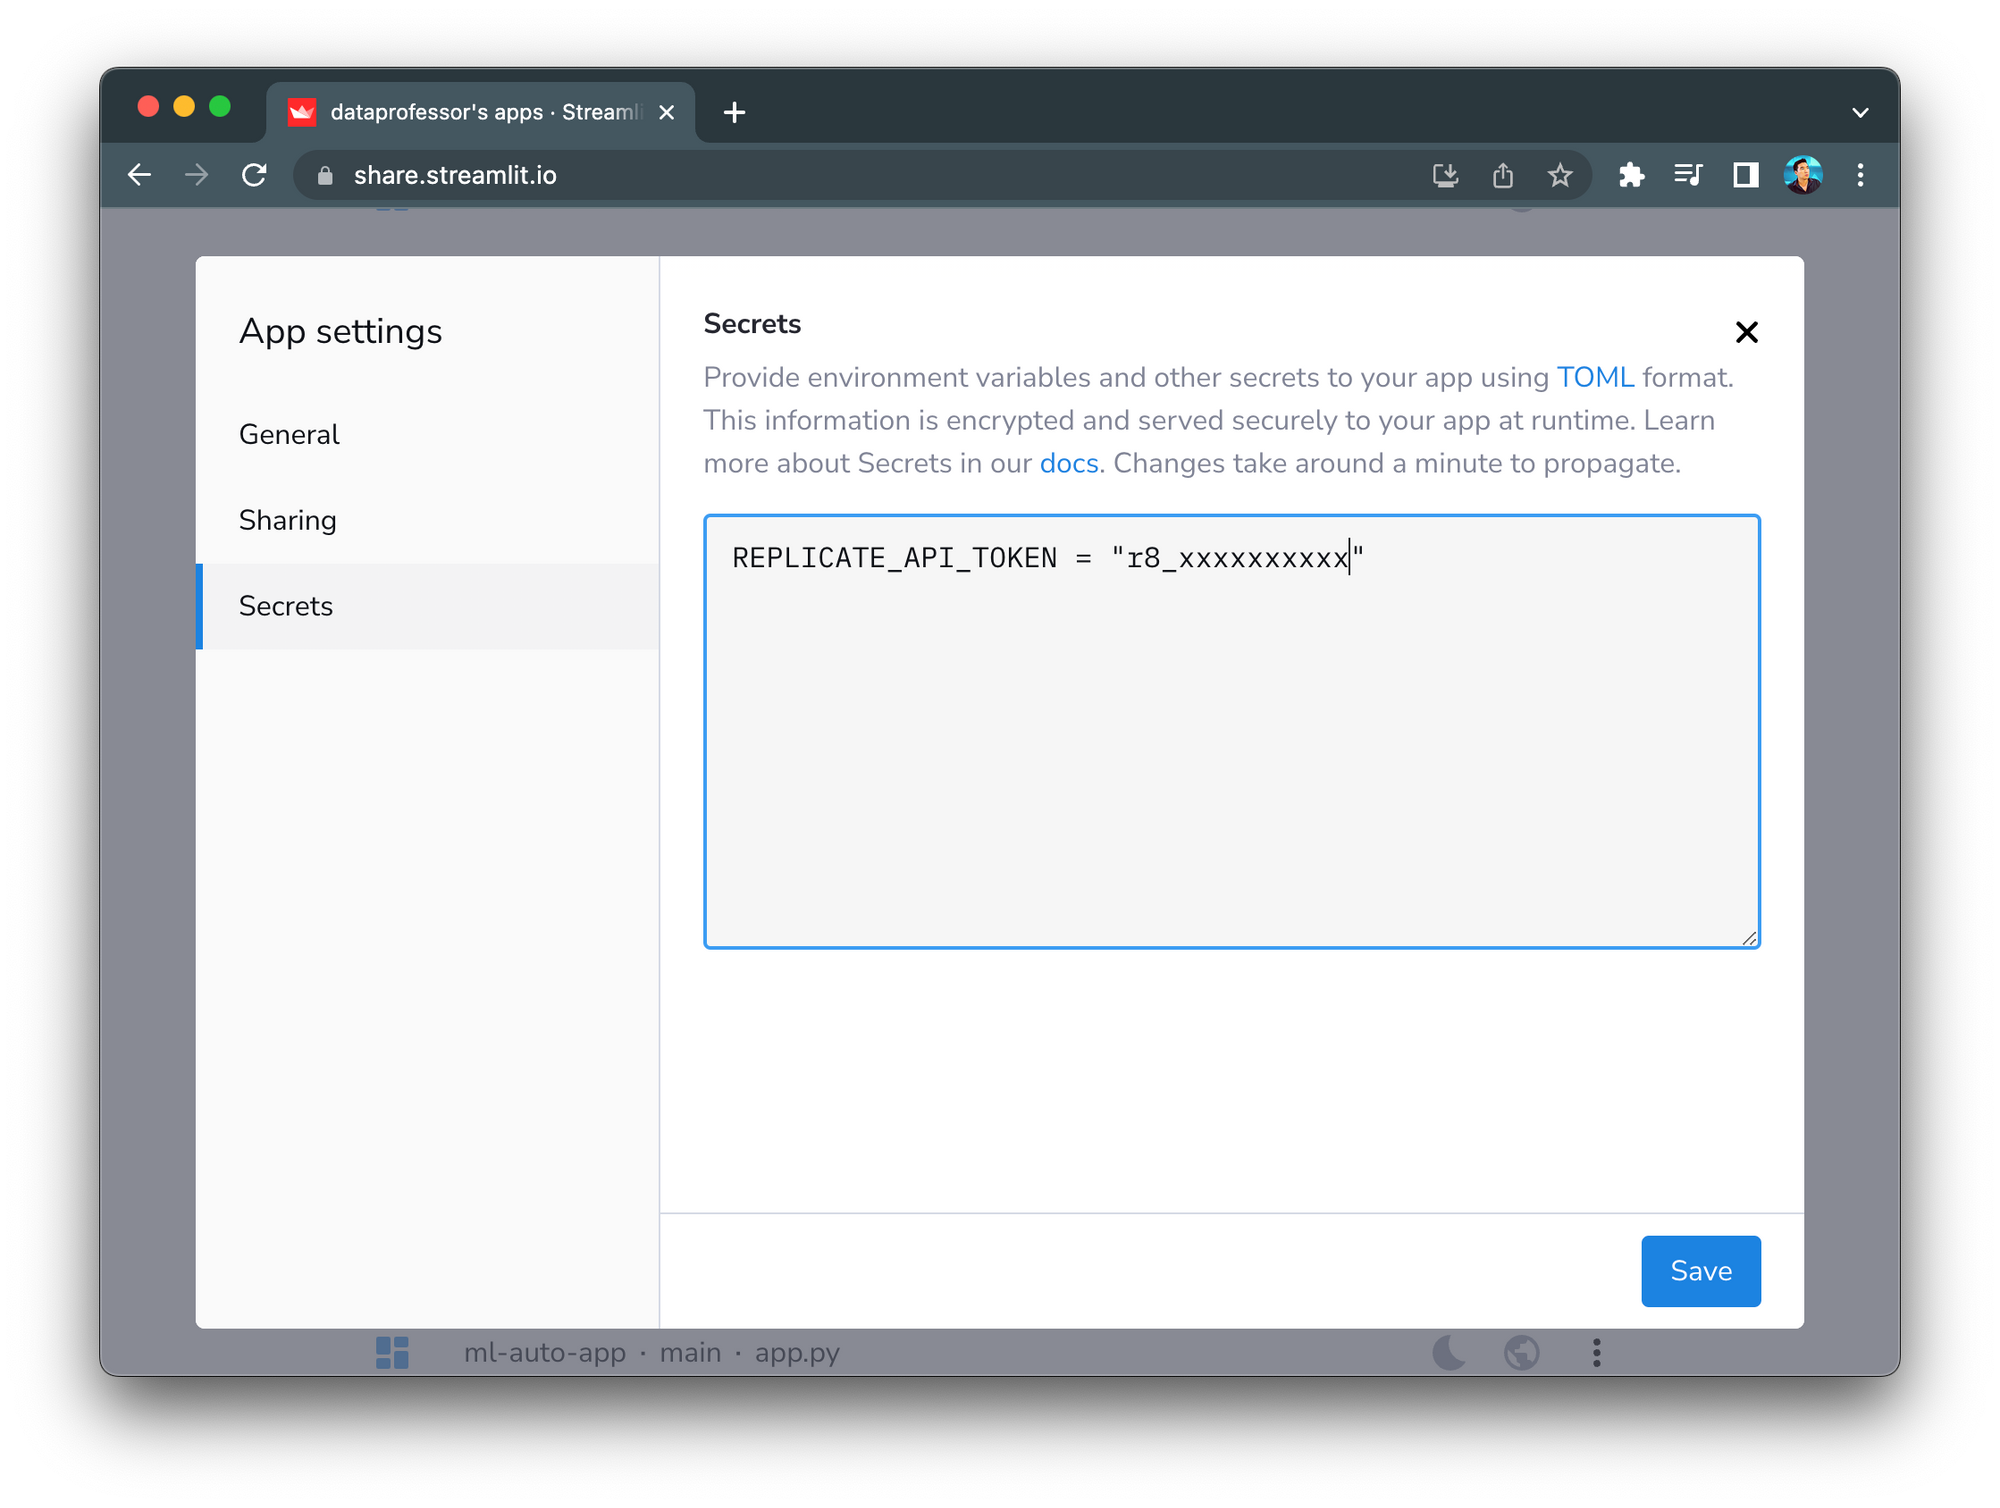
To define the REPLICATE_API_TOKEN environment variable, click on the Secrets tab and paste your Replicate API token:
Once the API token is defined in Secrets, users should be able to use the app without needing to use their own API key:
Option 2. Set the API token in the app
An alternative to setting the API token in Secrets is to prompt users to specify it in the app. This way, users will be notified to provide their own Replicate API token to proceed with using the app:
5. Deploy the app
Once the app is created, deploy it to the cloud in three steps:
- Create a GitHub repository for the app.
- In Streamlit Community Cloud, click on the
New appbutton, then choose the repository, branch, and app file. - Click
Deploy!and the app will be live!
Wrapping up
Congratulations! You’ve learned how to build your own Llama 2 chatbot app using the LLM model hosted on Replicate.
It’s worth noting that the LLM was set to the 7B version and that model parameters (such as temperature and top_p) were initialized with a set of arbitrary values. This post also includes the Pro version, which allows users to specify the model and parameters. I encourage you to experiment with this setup, adjust these parameters, and explore your own variations. This can be a great opportunity to see how these modifications might affect the LLM-generated response.
For additional ideas and inspiration, check out the LLM gallery. If you have any questions, let me know in the comments below or find me on Twitter at @thedataprof or on LinkedIn at Chanin Nantasenamat. You can also check out the Streamlit YouTube channel or my personal YouTube channel, Data Professor.
Happy chatbot-building! 🦙


Comments
Continue the conversation in our forums →