Hey, Streamlit-ers! 👋
My name is Chanin Nantasenamat, PhD. I’m working as a Senior Developer Advocate creating educational content on building Streamlit data apps. In my spare time, I love to create coding and data science tutorials on my YouTube channel, Data Professor.
Are you looking to build an AI-powered chatbot using LLM models but without the heavy API cost? If you answered yes, then keep reading!
You’ll build a chatbot that can generate responses to the user-provided prompt input (i.e., questions) using an open-source, no-cost LLM model OpenAssistant/oasst-sft-6-llama-30b-xor from the unofficial HuggingChat API known as HugChat. You’ll deploy the chatbot as a Streamlit app that can be shared with the world!
In this post, you’ll learn how to:
- Set up the app on the Streamlit Community Cloud
- Build the chatbot
What the HugChat app can do
Before we proceed with the tutorial, let's quickly grasp the app's functionality. Head over to the app and get familiar with its layout—(1) the Sidebar accepts the login credential, and (2) the Main panel displays conversational messages:
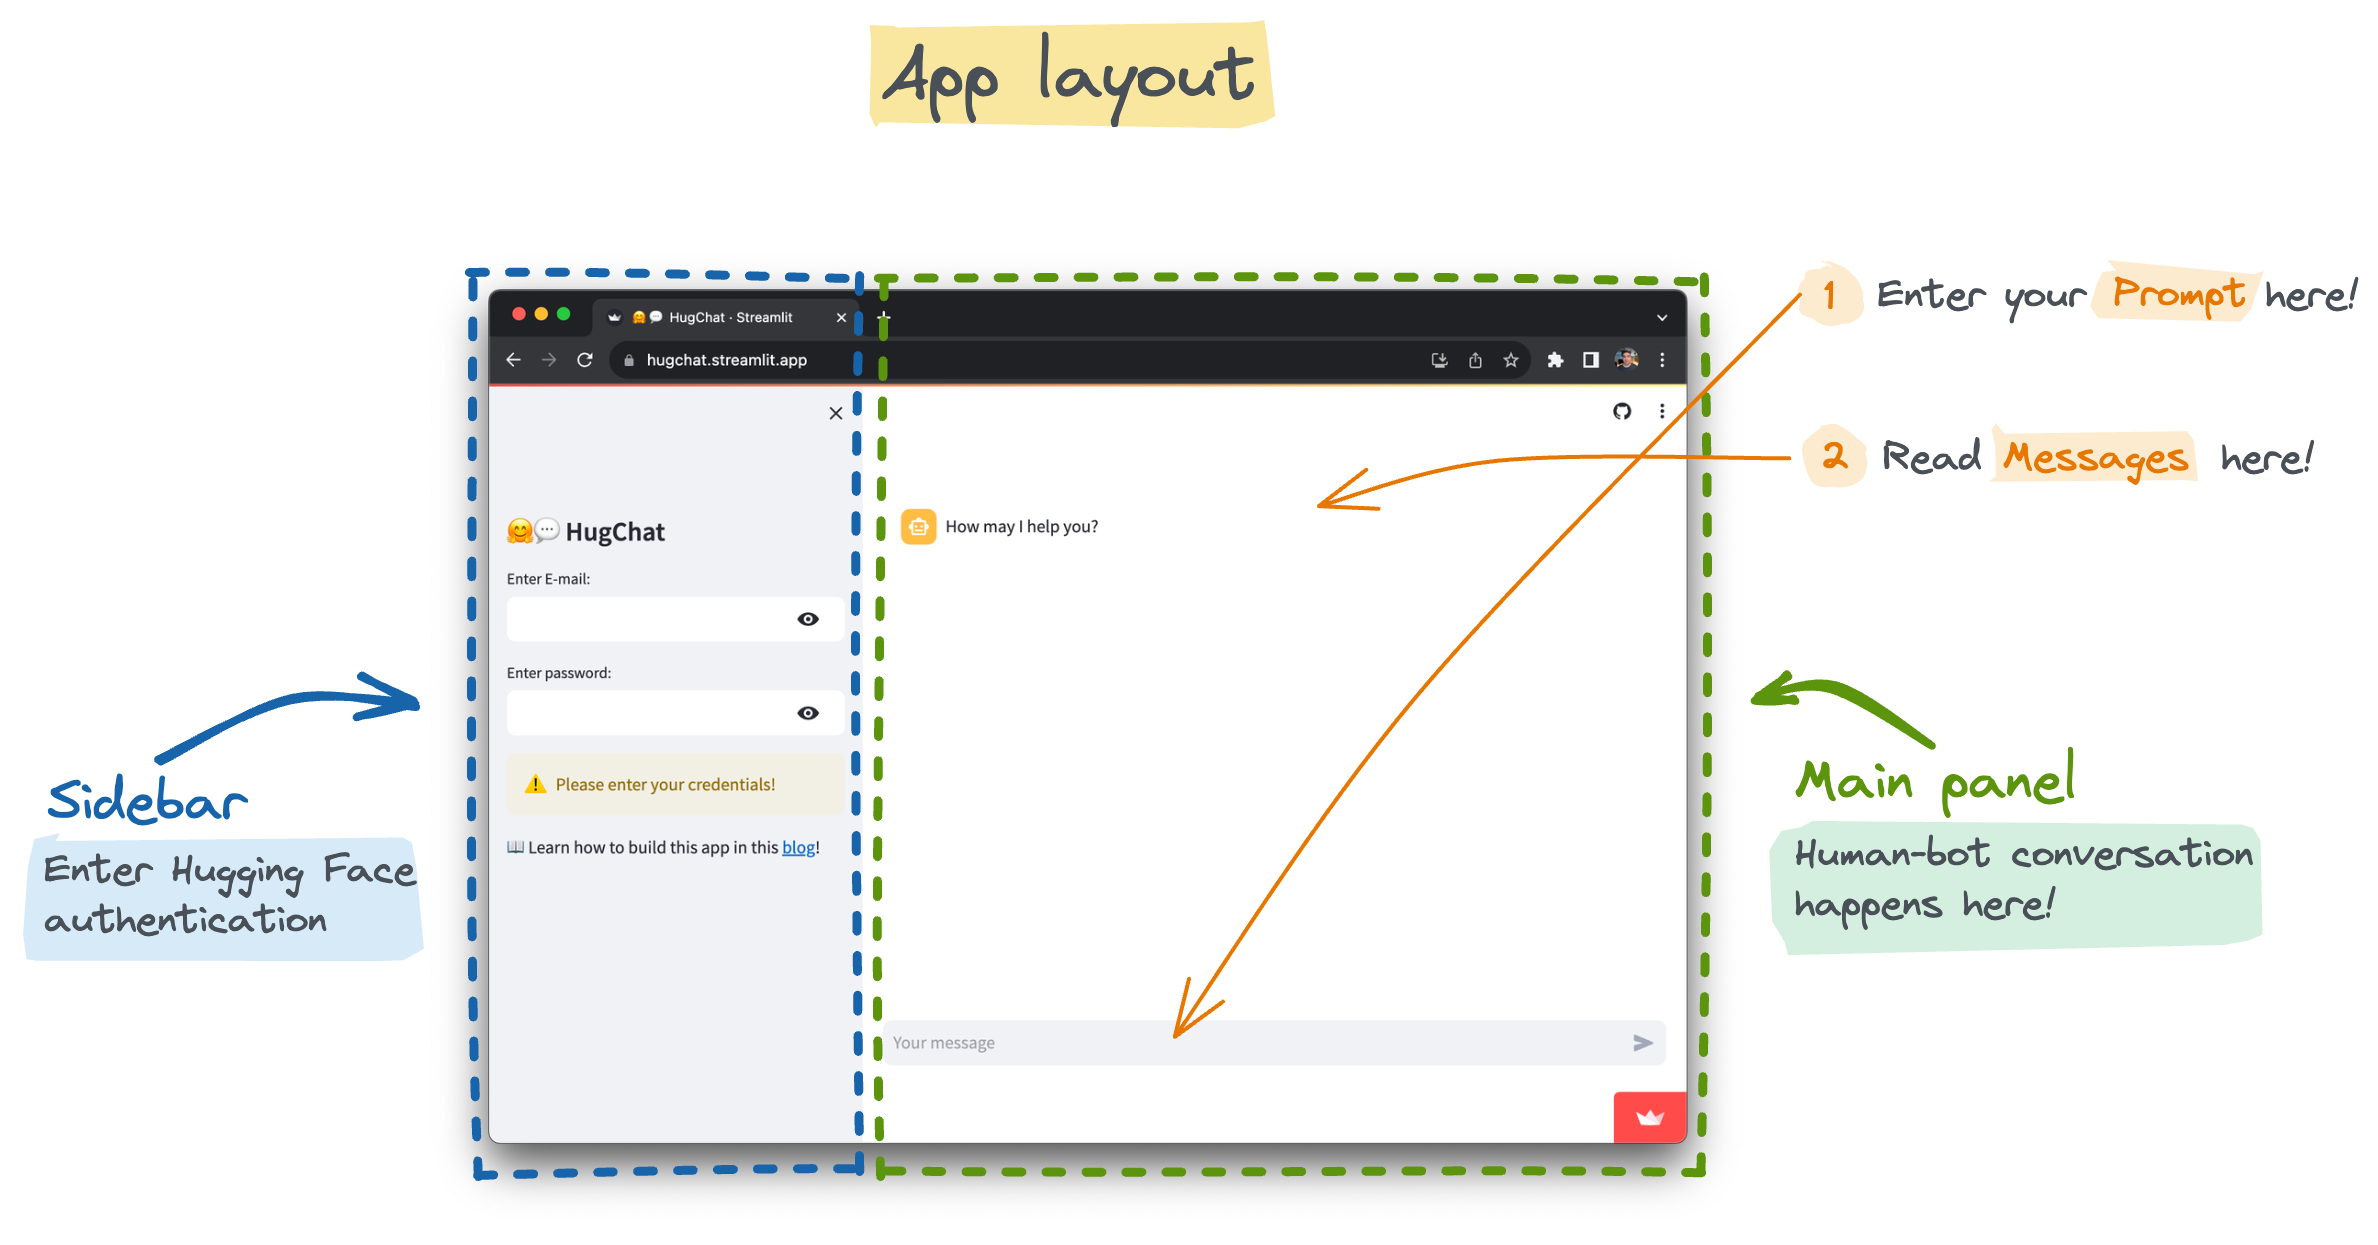
Interact with it by (1) entering your prompt into the text input box and (2) reading the human/bot messages.
Set up the app on the Streamlit Community Cloud
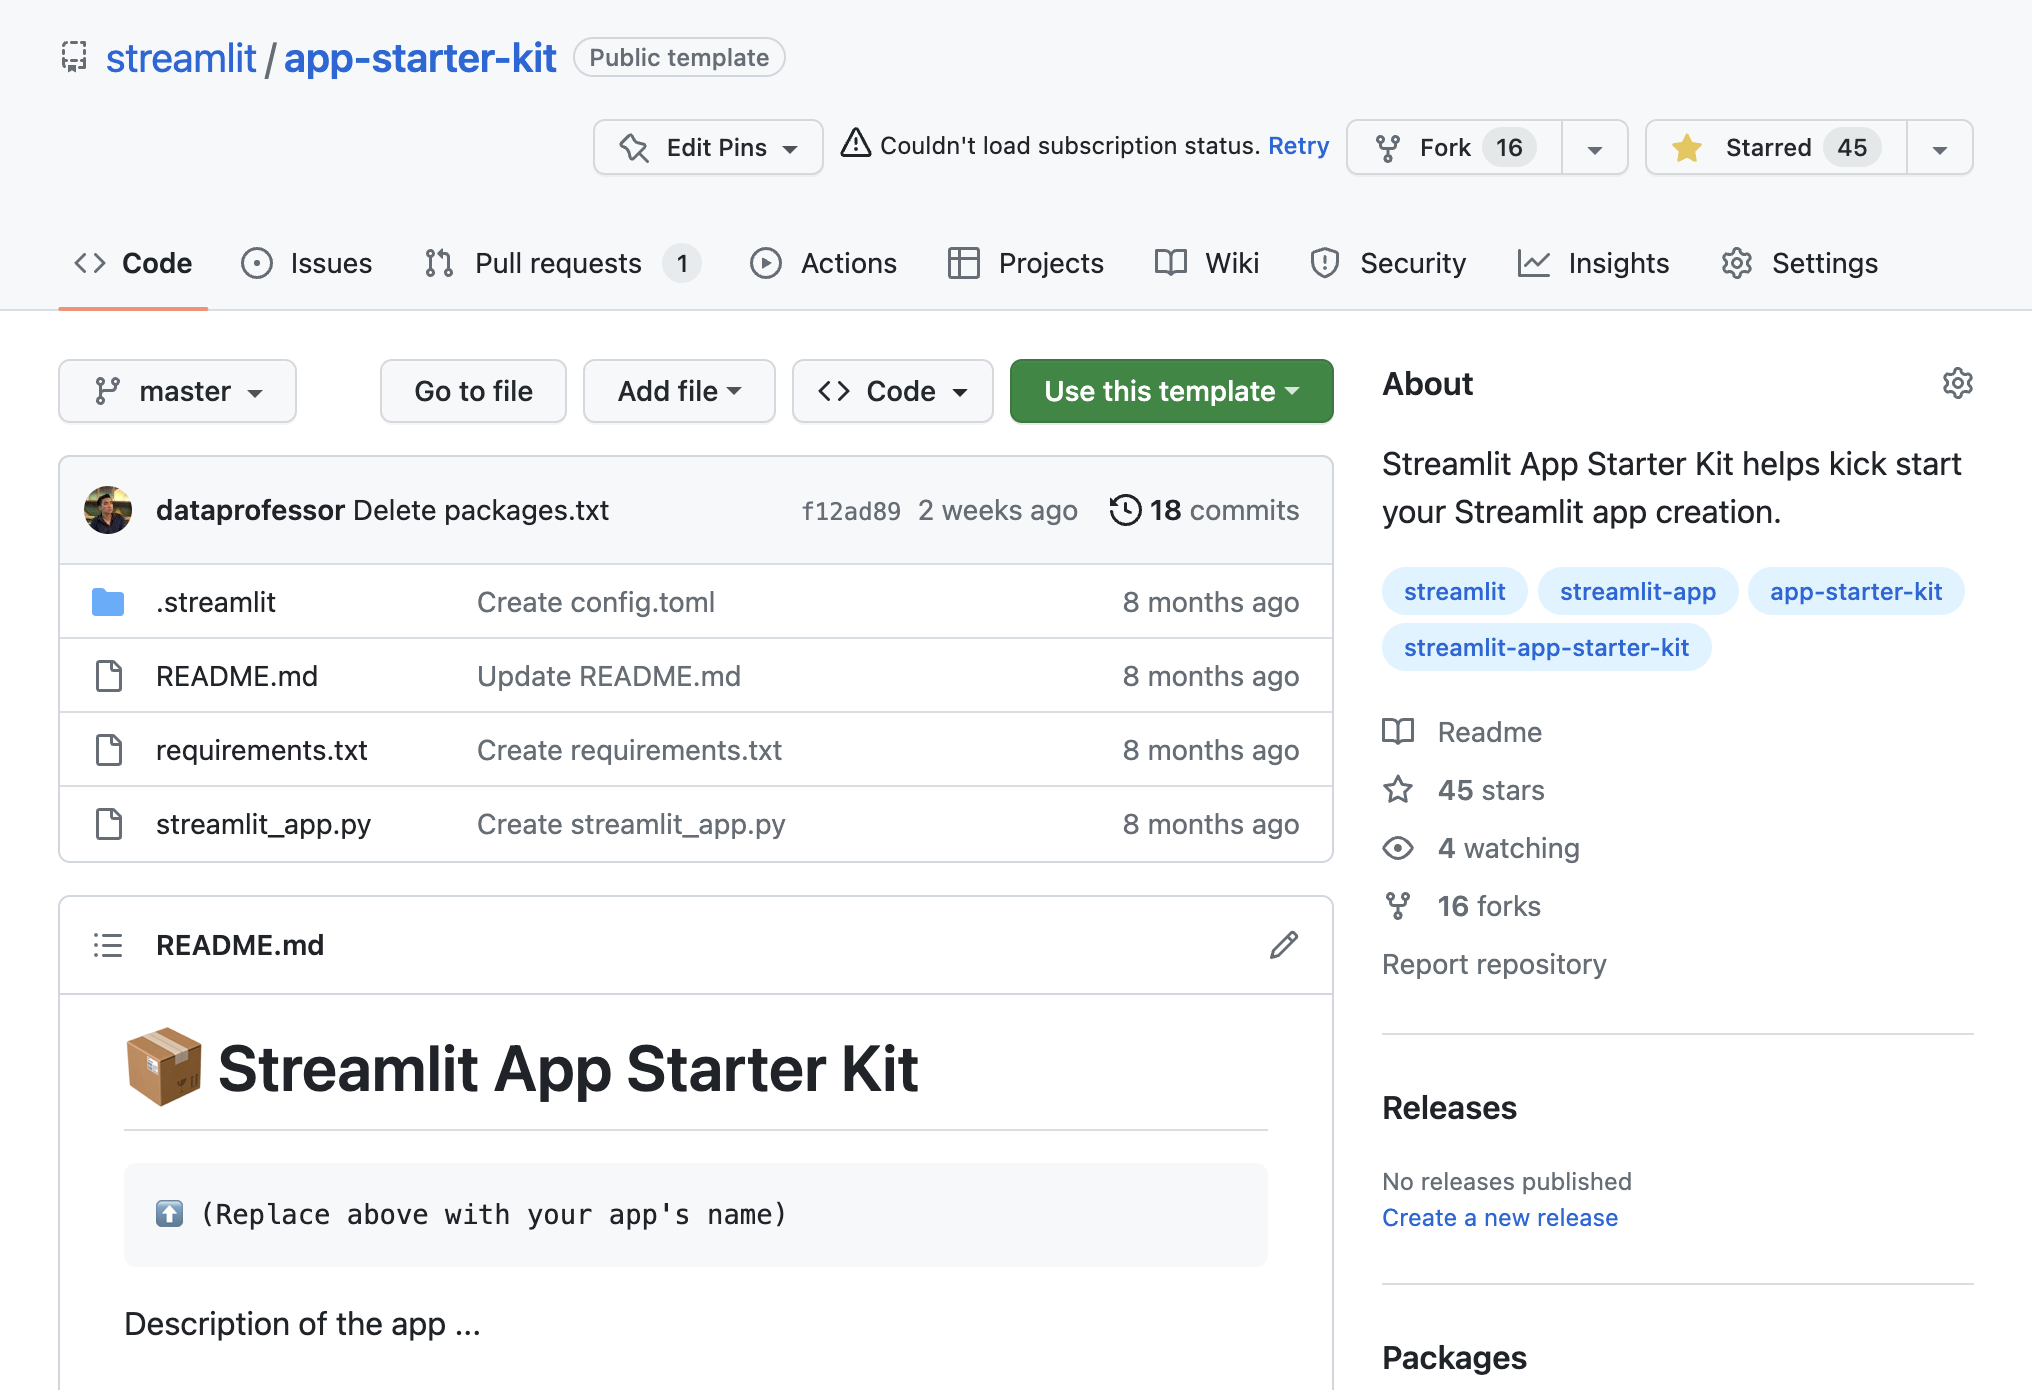
Clone the app-starter-kit repo to use as the template for creating the chatbot app. Then click on "Use this template":
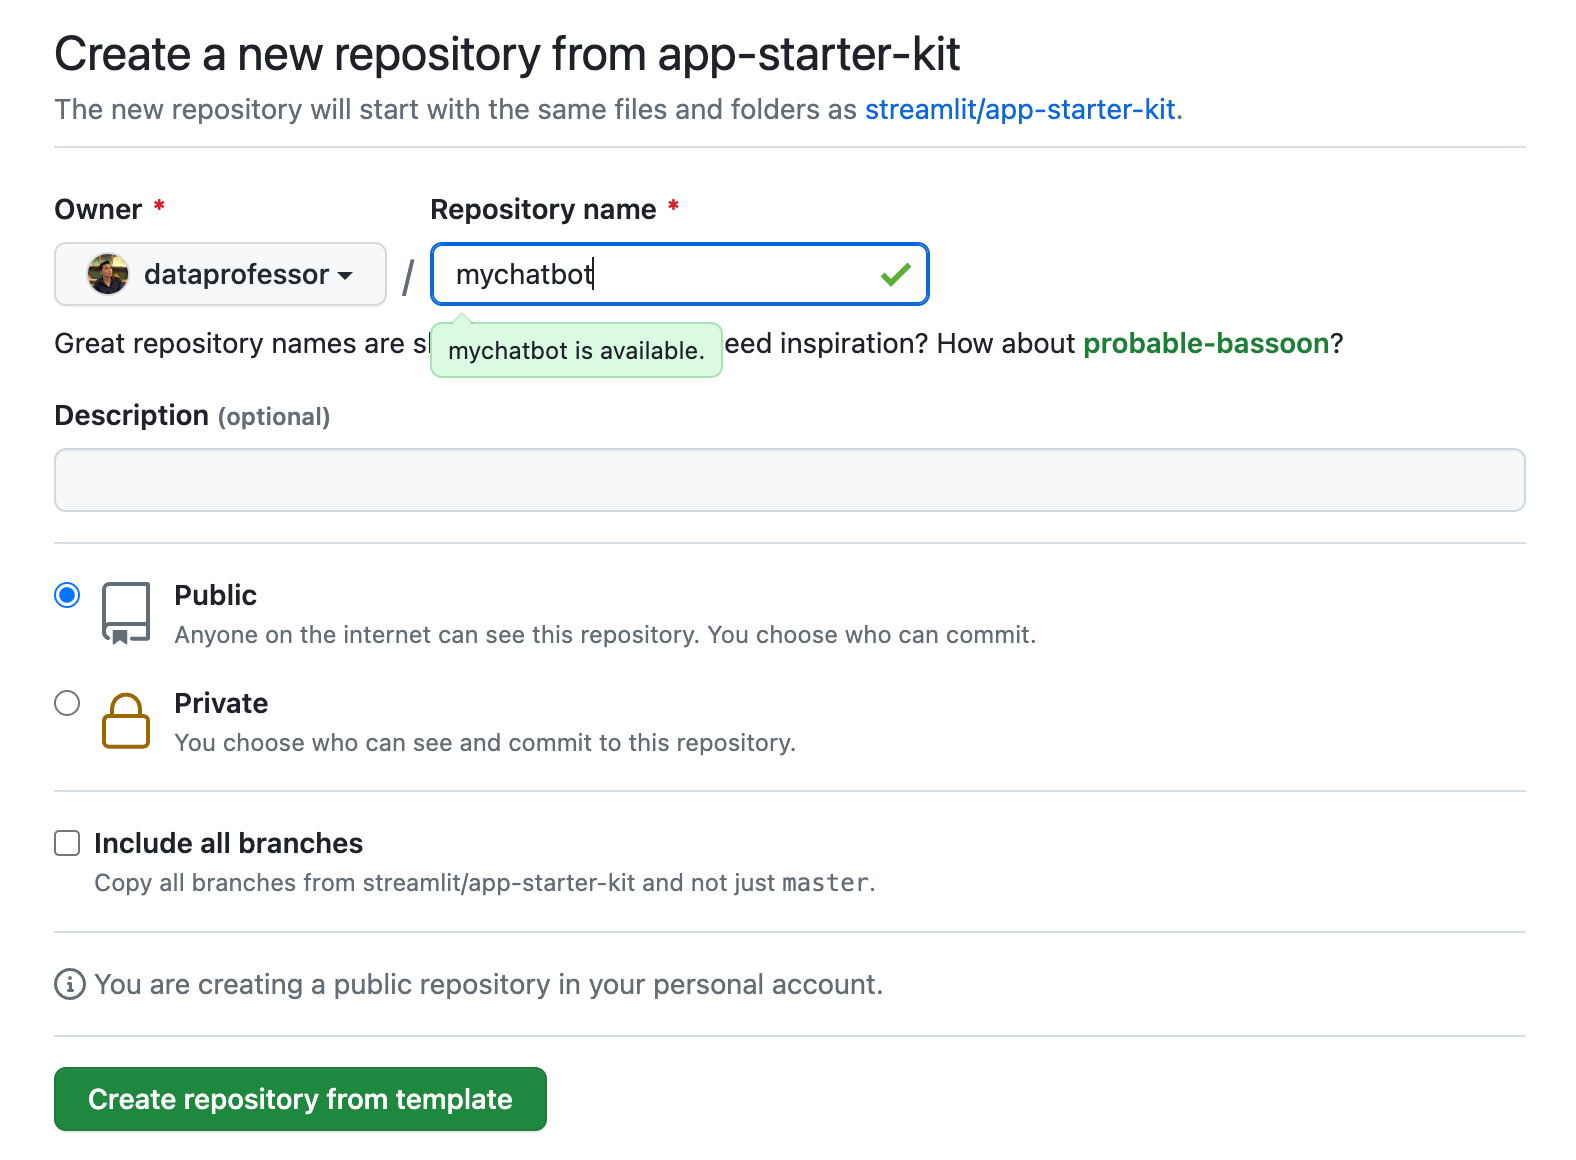
Give the repo a name (such as mychatbot). Next, click "Create repository from the template." A copy of the repo will be placed in your account:
Next, follow this blog post to get the newly cloned repo deployed on the Streamlit Community Cloud. When done, you should be able to see the deployed app:

Edit the requirements.txt file by adding the following prerequisite Python libraries:
streamlit
hugchat==0.0.8
This will spin up a server with these prerequisites pre-installed.
Let's take a look at the contents of streamlit_app.py:
import streamlit as st

st.title('🎈 App Name')

st.write('Hello world!')
In subsequent sections, you will modify the contents of this file with code snippets about the chatbot.
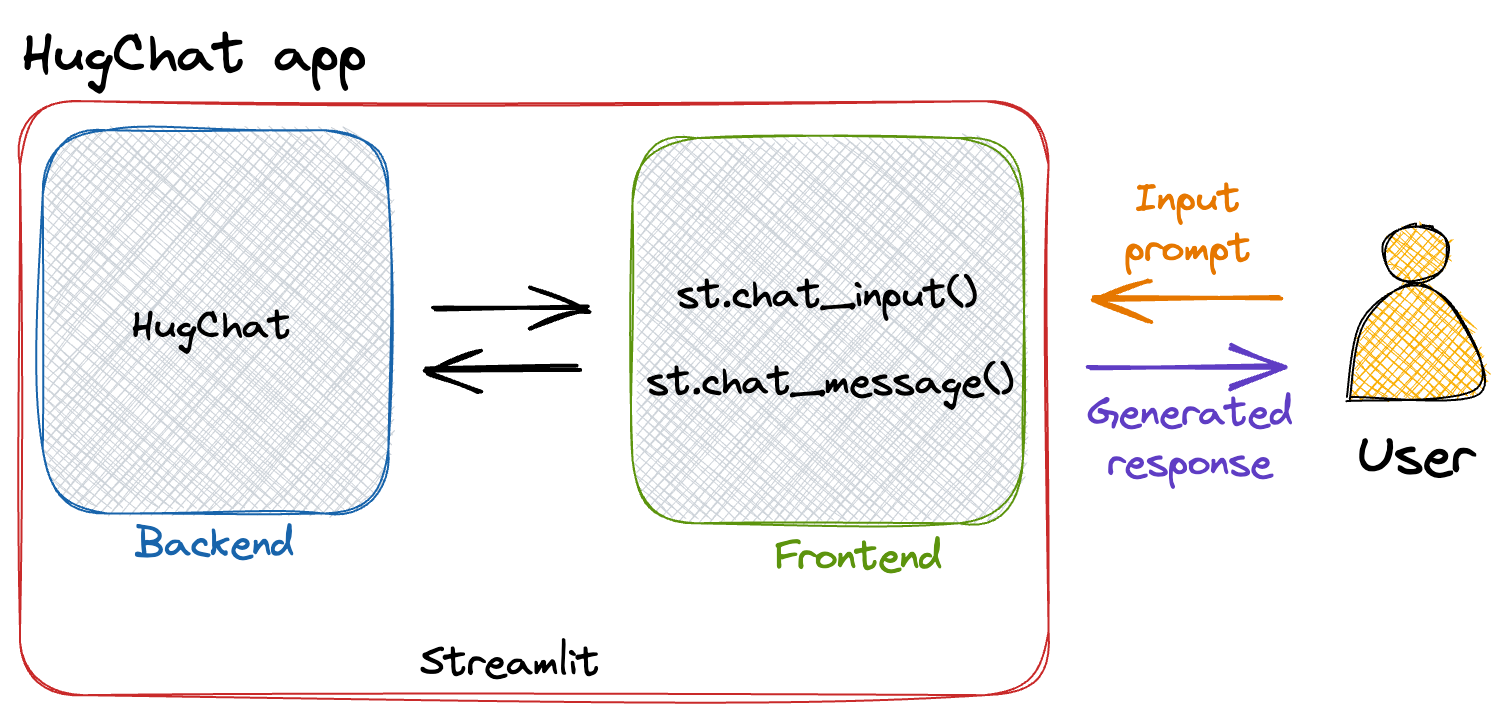
Finally, before proceeding with app building, let's take a look at how the user will interact with it:
- Front-end: The user submits an input prompt (by providing a string of text to the text box via
st.text_input()), and the app generates a response. - Back-end: Input prompt is sent to
hugchat(the unofficial port to the HuggingChat API) viastreamlit-chatfor generating a response. - Front-end: Generated responses are displayed in the app via's
message()command.
Build the chatbot
Fire up the streamlit_app.py file and replace the original content with code snippets mentioned below.
1. Required libraries
Import prerequisite Python libraries:
import streamlit as st
from hugchat import hugchat
from hugchat.login import Login
2. Page config
Name the app using the page_title input argument in the st.set_page_config method (it'll be used as the app title and as the title in the preview when sharing on social media):
st.set_page_config(page_title="🤗💬 HugChat")3. Sidebar
Create a sidebar for accepting Hugging Face authentication credentials:
with st.sidebar:
    st.title('🤗💬 HugChat')
    if ('EMAIL' in st.secrets) and ('PASS' in st.secrets):
        st.success('HuggingFace Login credentials already provided!', icon='✅')
        hf_email = st.secrets['EMAIL']
        hf_pass = st.secrets['PASS']
    else:
        hf_email = st.text_input('Enter E-mail:', type='password')
        hf_pass = st.text_input('Enter password:', type='password')
        if not (hf_email and hf_pass):
            st.warning('Please enter your credentials!', icon='⚠️')
        else:
            st.success('Proceed to entering your prompt message!', icon='👉')
    st.markdown('📖 Learn how to build this app in this [blog](https://blog.streamlit.io/how-to-build-an-llm-powered-chatbot-with-streamlit/)!')
Use the with statement to confine the constituent contents to the sidebar. They include:
- The app title is specified via
st.title() if-elsestatements for detecting login credentials fromst.secretsor to ask from users viast.text_input()- A link to this tutorial blog via
st.markdown()
4. Session state
Initialize the chatbot by with messages session state and giving it a starter message at the first app run:
# Store LLM generated responses
if "messages" not in st.session_state.keys():
    st.session_state.messages = [{"role": "assistant", "content": "How may I help you?"}]
Here, past denotes the human user's input and generated indicates the bot's response.
5. Display chat messages
Conversational messages are displayed iteratively from the messages session state via the for loop together with the use of Streamlit’s chat feature st.chat_message().
# Display chat messages
for message in st.session_state.messages:
    with st.chat_message(message["role"]):
        st.write(message["content"])
6. Function for bot response output
Create the generate_response(prompt) custom function for taking in user's input prompt as an argument to generate an AI response using the HuggingChat API via the hugchat.ChatBot() method (this LLM model can be swapped with any other one). Hugging Face login credentials are accepted via the Login() and sign.login() methods:
# Function for generating LLM response
def generate_response(prompt_input, email, passwd):
    # Hugging Face Login
    sign = Login(email, passwd)
    cookies = sign.login()
    # Create ChatBot
    chatbot = hugchat.ChatBot(cookies=cookies.get_dict())
    return chatbot.chat(prompt_input)
7. Accept user prompt
User’s input prompt message are accepted via the st.chat_input() method and appended to the messages session state followed by displaying the message via st.chat_message() together with st.write():
# User-provided prompt
if prompt := st.chat_input(disabled=not (hf_email and hf_pass)):
    st.session_state.messages.append({"role": "user", "content": prompt})
    with st.chat_message("user"):
        st.write(prompt)
8. Generate bot response output
Use an if condition to detect whether the last response in the messages session state is from the assistant or user. The chatbot will be triggered to generate a response if the last message is not from the chatbot (assistant). In generating the response, the st.chat_message(), st.spinner() and the custom generate_response() function are used where generated messages will display a spinner with a short message saying Thinking.... Finally, the generated response is saved to the messages session state.
# Generate a new response if last message is not from assistant
if st.session_state.messages[-1]["role"] != "assistant":
    with st.chat_message("assistant"):
        with st.spinner("Thinking..."):
            response = generate_response(prompt, hf_email, hf_pass)
            st.write(response)
    message = {"role": "assistant", "content": response}
    st.session_state.messages.append(message)
9. Full code
Putting all of this together, we get the following full code of the app:
import streamlit as st
from hugchat import hugchat
from hugchat.login import Login

# App title
st.set_page_config(page_title="🤗💬 HugChat")

# Hugging Face Credentials
with st.sidebar:
    st.title('🤗💬 HugChat')
    if ('EMAIL' in st.secrets) and ('PASS' in st.secrets):
        st.success('HuggingFace Login credentials already provided!', icon='✅')
        hf_email = st.secrets['EMAIL']
        hf_pass = st.secrets['PASS']
    else:
        hf_email = st.text_input('Enter E-mail:', type='password')
        hf_pass = st.text_input('Enter password:', type='password')
        if not (hf_email and hf_pass):
            st.warning('Please enter your credentials!', icon='⚠️')
        else:
            st.success('Proceed to entering your prompt message!', icon='👉')
    st.markdown('📖 Learn how to build this app in this [blog](https://blog.streamlit.io/how-to-build-an-llm-powered-chatbot-with-streamlit/)!')

# Store LLM generated responses
if "messages" not in st.session_state.keys():
    st.session_state.messages = [{"role": "assistant", "content": "How may I help you?"}]

# Display chat messages
for message in st.session_state.messages:
    with st.chat_message(message["role"]):
        st.write(message["content"])

# Function for generating LLM response
def generate_response(prompt_input, email, passwd):
    # Hugging Face Login
    sign = Login(email, passwd)
    cookies = sign.login()
    # Create ChatBot
    chatbot = hugchat.ChatBot(cookies=cookies.get_dict())
    return chatbot.chat(prompt_input)

# User-provided prompt
if prompt := st.chat_input(disabled=not (hf_email and hf_pass)):
    st.session_state.messages.append({"role": "user", "content": prompt})
    with st.chat_message("user"):
        st.write(prompt)

# Generate a new response if last message is not from assistant
if st.session_state.messages[-1]["role"] != "assistant":
    with st.chat_message("assistant"):
        with st.spinner("Thinking..."):
            response = generate_response(prompt, hf_email, hf_pass)
            st.write(response)
    message = {"role": "assistant", "content": response}
    st.session_state.messages.append(message)
Wrapping up
In this post, I've shown you how to create a chatbot app using an open-source LLM from the unofficial HuggingChat API and Streamlit. In only a few lines of code, you can create your own AI-powered chatbot.
I hope this tutorial encourages you to explore the endless possibilities of chatbot development using different models and techniques. The sky is the limit!
If you have any questions, please leave them in the comments below or contact me on Twitter at @thedataprof or on LinkedIn. Share your app creations on social media and tag me or the Streamlit account, and I'll be happy to provide feedback or help retweet!
Happy Streamlit-ing! 🎈


Comments
Continue the conversation in our forums →