
Hey, community! 👋
My name is Dmitry Kosarevsky, and I’m a data engineer (DE) who is passionate about data science and everything related to this field.
Data science helps us get valuable information from large amounts of data using statistical and computational methods. Artificial Intelligence (AI), like ChatGPT, is quickly being introduced into various fields of activity. We can use our passion for data science to help people interact with AI.
I was impressed with ChatGPT’s many features, like composing poems:
“Ruthless conqueror of the world, ChatGPT as an AI never gets tired of moving up the stairs. He takes away work from mortals, and people experience fear before the great transformation of the era. But after all, responsibility has been invested with huge measures, and the glory of Artificial Intelligence has no limit and no end.”
ChatGPT can be slow and may require a VPN for some countries, like Russia. Some of my friends wanted to test AI without registering. So I built an AI assistant with the official ChatGPT API and Streamlit.
In this post, I’ll show you:
- How to use ChatGPT API
- How to display chat conversation
- How to convert text to speech (TTS)
- How to do localization
- How to put it all together in a Streamlit app
Helper functions
Let's jump right into the code.
First, you'll need some helper functions:
import streamlit as st

def clear_chat() -> None:
    st.session_state.generated = []
    st.session_state.past = []
    st.session_state.messages = []
    st.session_state.user_text = ""

def show_text_input() -> None:
    st.text_area(label=st.session_state.locale.chat_placeholder, value=st.session_state.user_text, key="user_text")

def show_chat_buttons() -> None:
    b0, b1, b2 = st.columns(3)
    with b0, b1, b2:
        b0.button(label=st.session_state.locale.chat_run_btn)
        b1.button(label=st.session_state.locale.chat_clear_btn, on_click=clear_chat)
        b2.download_button(
            label=st.session_state.locale.chat_save_btn,
            data="\\n".join([str(d) for d in st.session_state.messages[1:]]),
            file_name="ai-talks-chat.json",
            mime="application/json",
        )
These functions allow you to clear the Streamlit session state and display a user input area and chat buttons.
1. How to use ChatGPT API
API interaction:
import streamlit as st
import openai

from typing import List

def create_gpt_completion(ai_model: str, messages: List[dict]) -> dict:
    openai.api_key = st.secrets.api_credentials.api_key
    completion = openai.ChatCompletion.create(
        model=ai_model,
        messages=messages,
    )
    return completion
This function takes two inputs:
ai_model—which is the GPT modelmessages—a list of previous chat messages.
It sets the API key using Streamlit's secrets feature and creates an instance of the ChatCompletion class using the create method, passing in the model and messages.
When the API responds, the function returns the result as a dictionary (JSON):
{
  "choices": [
    {
      "finish_reason": "stop",
      "index": 0,
      "message": {
        "content": "How can I help you?",
        "role": "assistant"
      }
    }
  ],
  "created": 1681080142,
  "id": "chatcmpl-73Y1mIfmDFWzuHILFQ8PG3bQcvOzU",
  "model": "gpt-4-0314",
  "object": "chat.completion",
  "usage": {
    "completion_tokens": 6,
    "prompt_tokens": 27,
    "total_tokens": 33
  }
}
Overall, this function provides an easy way to interact with the GPT API and create a chatbot. To maintain context and coherence in the chatbot's responses, use the messages parameter to store the conversation history.
2. How to display chat conversation
The code for displaying a chat conversation using a GPT model consists of three main functions: show_chat, show_gpt_conversation, and show_conversation.
from streamlit_chat import message

def show_chat(ai_content: str, user_text: str) -> None:
    if ai_content not in st.session_state.generated:
        # store the ai content
        st.session_state.past.append(user_text)
        st.session_state.generated.append(ai_content)
    if st.session_state.generated:
        for i in range(len(st.session_state.generated)):
            message(st.session_state.past[i], is_user=True, key=str(i) + "_user", avatar_style="micah")
            message("", key=str(i))
            st.markdown(st.session_state.generated[i])
This is where the streamlit-chat library comes in. It allows us to display the chat with the bot in a convenient format.
The show_chat function displays the conversation messages between the AI and the user. It takes ai_content (the response from the AI) and user_text (the input text from the user) as arguments.
- The function first checks if the
ai_contentis already in thest.session_state.generatedlist. If it isn't, the user input and the AI-generated content are appended to thest.session_state.pastandst.session_state.generatedlists, respectively. - If there are messages stored in the
st.session_state.generatedlist, the function will iterate through the list and display the user's messages, followed by the AI-generated responses using themessagefunction:
def show_gpt_conversation() -> None:
    try:
        completion = create_gpt_completion(st.session_state.model, st.session_state.messages)
        ai_content = completion.get("choices")[0].get("message").get("content")
        st.session_state.messages.append({"role": "assistant", "content": ai_content})
        if ai_content:
            show_chat(ai_content, st.session_state.user_text)
            st.divider()
            show_audio_player(ai_content)
    except InvalidRequestError as err:
        if err.code == "context_length_exceeded":
            st.session_state.messages.pop(1)
            if len(st.session_state.messages) == 1:
                st.session_state.user_text = ""
            show_conversation()
        else:
            st.error(err)
    except (OpenAIError, UnboundLocalError) as err:
        st.error(err)
The show_gpt_conversation function manages the flow of generating the AI response and displaying the conversation to the user. It follows three steps:
- It calls the
create_gpt_completionfunction to generate the AI response using the GPT model and the user input. - The AI response (
ai_content) is added to thest.session_state.messageslist. - If the
ai_contentisn't empty, the function calls theshow_chatfunction to display the conversation messages. It also handles errors using try-except blocks:
def show_conversation() -> None:
    if st.session_state.messages:
        st.session_state.messages.append({"role": "user", "content": st.session_state.user_text})
    else:
        ai_role = f"{st.session_state.locale.ai_role_prefix} {st.session_state.role}. {st.session_state.locale.ai_role_postfix}"  # NOQA: E501
        st.session_state.messages = [
            {"role": "system", "content": ai_role},
            {"role": "user", "content": st.session_state.user_text},
        ]
    show_gpt_conversation()
The show_conversation function manages the conversation state and updates the message list:
- If there are messages in
st.session_state.messages, the user's input (st.session_state.user_text) is added to the list. - If there are no messages, the function creates an introductory AI message with
ai_roleand adds it to the list, followed by the user's input. - The
show_gpt_conversationfunction is called to handle the conversation flow and generate AI responses.
Splitting the code into these functions allows for easy customization and management of the conversation flow between the user and the AI. The helper functions simplify the code, making it easier to read and maintain.
3. How to convert text to speech (TTS)
In the show_gpt_conversation function, you may have noticed a call to the show_audio_player function. But what does it actually do? Let's take a closer look:
from io import BytesIO
from gtts import gTTS, gTTSError

def show_audio_player(ai_content: str) -> None:
    sound_file = BytesIO()
    try:
        tts = gTTS(text=ai_content, lang=st.session_state.locale.lang_code)
        tts.write_to_fp(sound_file)
        st.write(st.session_state.locale.stt_placeholder)
        st.audio(sound_file)
    except gTTSError as err:
        st.error(err)
Let's begin by importing the necessary modules:
BytesIOis part of theiomodule and allows for reading and writing from a byte buffer.gTTSandgTTSErrorare part of the text-to-speech library, which converts text to speech.
Next, let's look at the show_audio_player function with a ai_content parameter used to display and play the text as audio:
- Start the function by creating a
BytesIOobject. This will hold the audio data in memory, making it easier to play the audio later. - Use a
tryblock to handle any possible errors while converting the text to audio. - Inside the
tryblock, instantiate thegTTSobject with the given text and language. - Use
gTTSto convert the input text in the given language to speech. - Write the audio data to the
sound_filebuffer. - Play the text-to-speech audio using Streamlit's
st.audiomethod. - Catch any errors and display information about the exception using the
st.errormethod.
The show_audio_player function is now complete! It takes a string as input, creates an audio file from the text, and then plays it in the Streamlit app.
4. How to do localization
You can do localization for multiple languages with the code below:
The code is below ⤵️
from dataclasses import dataclass
from typing import List

@dataclass
class Locale:
    ai_role_options: List[str]
    ai_role_prefix: str
    ai_role_postfix: str
    title: str
    language: str
    lang_code: str
    chat_placeholder: str
    chat_run_btn: str
    chat_clear_btn: str
    chat_save_btn: str
    select_placeholder1: str
    select_placeholder2: str
    select_placeholder3: str
    radio_placeholder: str
    radio_text1: str
    radio_text2: str
    stt_placeholder: str

AI_ROLE_OPTIONS_EN = [
    "helpful assistant",
    "code assistant",
    "code reviewer",
    "text improver",
    "cinema expert",
    "sports expert",
]

AI_ROLE_OPTIONS_RU = [
    "ассистент, который готов помочь",
    "ассистент программиста",
    "рецензент кода программиста",
    "эксперт по улучшению текста",
    "эксперт по кинематографу",
    "эксперт в области спорта",
]

en = Locale(
    ai_role_options=AI_ROLE_OPTIONS_EN,
    ai_role_prefix="You are a female",
    ai_role_postfix="Answer as concisely as possible.",
    title="AI Talks",
    language="English",
    lang_code="en",
    chat_placeholder="Start Your Conversation With AI:",
    chat_run_btn="Ask",
    chat_clear_btn="Clear",
    chat_save_btn="Save",
    select_placeholder1="Select Model",
    select_placeholder2="Select Role",
    select_placeholder3="Create Role",
    radio_placeholder="Role Interaction",
    radio_text1="Select",
    radio_text2="Create",
    stt_placeholder="To Hear The Voice Of AI Press Play",
)

ru = Locale(
    ai_role_options=AI_ROLE_OPTIONS_RU,
    ai_role_prefix="Вы девушка",
    ai_role_postfix="Отвечай максимально лаконично.",
    title="Разговорчики с ИИ",
    language="Russian",
    lang_code="ru",
    chat_placeholder="Начните Вашу Беседу с ИИ:",
    chat_run_btn="Спросить",
    chat_clear_btn="Очистить",
    chat_save_btn="Сохранить",
    select_placeholder1="Выберите Модель",
    select_placeholder2="Выберите Роль",
    select_placeholder3="Создайте Роль",
    radio_placeholder="Взаимодествие с Ролью",
    radio_text1="Выбрать",
    radio_text2="Создать",
    stt_placeholder="Чтобы Услышать ИИ Нажми Кнопку Проигрывателя",
)
This ⤴️ code shows how to create a simple localization system for an app with two language options: English and Russian. The main components of the code are:
- Importing necessary modules:
dataclassesis used to create data class structures whiletypingis used for specifying type hints. - Creating a parent data class
Locale, which contains the common attributeai_role_optionsfor a list of possible AI roles for all supported languages. - Defining two child data classes,
EnLocaleandRuLocale, which inherit fromLocaleand provide the actual translations for each piece of static text. English translations are provided inEnLocaleand Russian translations inRuLocale. - Assigning AI roles for each language with
AI_ROLE_OPTIONS_ENandAI_ROLE_OPTIONS_RU. - Creating instances of each child data class,
enfor English andrufor Russian, with their corresponding AI role lists.
When implementing localization in an app, you can use the appropriate instance (either en or ru) based on the selected language to display the correct translations for all labels, messages, and other text.
Using this example, you can easily localize for your or multiple languages.
5. How to put it all together in a Streamlit app
You can now create the main logic of the application.
The code is below ⤵️
from streamlit_option_menu import option_menu
from src.utils.lang import en, ru
from src.utils.conversation import show_chat_buttons, show_text_input, show_conversation
import streamlit as st

# --- GENERAL SETTINGS ---
PAGE_TITLE: str = "AI Talks"
PAGE_ICON: str = "🤖"
LANG_EN: str = "En"
LANG_RU: str = "Ru"
AI_MODEL_OPTIONS: list[str] = [
    "gpt-3.5-turbo",
    "gpt-4",
    "gpt-4-32k",
]

st.set_page_config(page_title=PAGE_TITLE, page_icon=PAGE_ICON)

selected_lang = option_menu(
    menu_title=None,
    options=[LANG_EN, LANG_RU, ],
    icons=["globe2", "translate"],
    menu_icon="cast",
    default_index=0,
    orientation="horizontal",
)

# Storing The Context
if "locale" not in st.session_state:
    st.session_state.locale = en
if "generated" not in st.session_state:
    st.session_state.generated = []
if "past" not in st.session_state:
    st.session_state.past = []
if "messages" not in st.session_state:
    st.session_state.messages = []
if "user_text" not in st.session_state:
    st.session_state.user_text = ""

def main() -> None:
    c1, c2 = st.columns(2)
    with c1, c2:
        c1.selectbox(label=st.session_state.locale.select_placeholder1, key="model", options=AI_MODEL_OPTIONS)
        role_kind = c1.radio(
            label=st.session_state.locale.radio_placeholder,
            options=(st.session_state.locale.radio_text1, st.session_state.locale.radio_text2),
            horizontal=True,
        )
        match role_kind:
            case st.session_state.locale.radio_text1:
                c2.selectbox(label=st.session_state.locale.select_placeholder2, key="role",
                             options=st.session_state.locale.ai_role_options)
            case st.session_state.locale.radio_text2:
                c2.text_input(label=st.session_state.locale.select_placeholder3, key="role")
    if st.session_state.user_text:
        show_conversation()
        st.session_state.user_text = ""
    show_text_input()
    show_chat_buttons()

if __name__ == "__main__":
    match selected_lang:
        case "En":
            st.session_state.locale = en
        case "Ru":
            st.session_state.locale = ru
        case _:
            st.session_state.locale = en
    st.markdown(f"<h1 style='text-align: center;'>{st.session_state.locale.title}</h1>", unsafe_allow_html=True)
    main()
This ⤴️ code sets up your app with a chat interface for interacting with different AI models:
- It imports necessary libraries and modules.
- It defines general settings, such as the page title, icon, and language options.
- It sets up Streamlit's page configuration with the specified settings.
- It creates a horizontal option menu for selecting the language (English or Russian).
- It initializes session state values for storing conversation context and user input.
- It defines the
mainfunction, which contains the following elements:
a. Two columns: one for selecting the AI model and toggling between role kinds and another for selecting or creating specific roles.
b. It displays the conversation history withshow_conversationif the user entered text.
c. It displays an input box for the user to type their message withshow_text_input.
d. It displays a series of chat buttons withshow_chat_buttonsto allow users to control chat and send messages. - It executes the
mainfunction and displays the selected language, application title, and chat interface components on the web page.
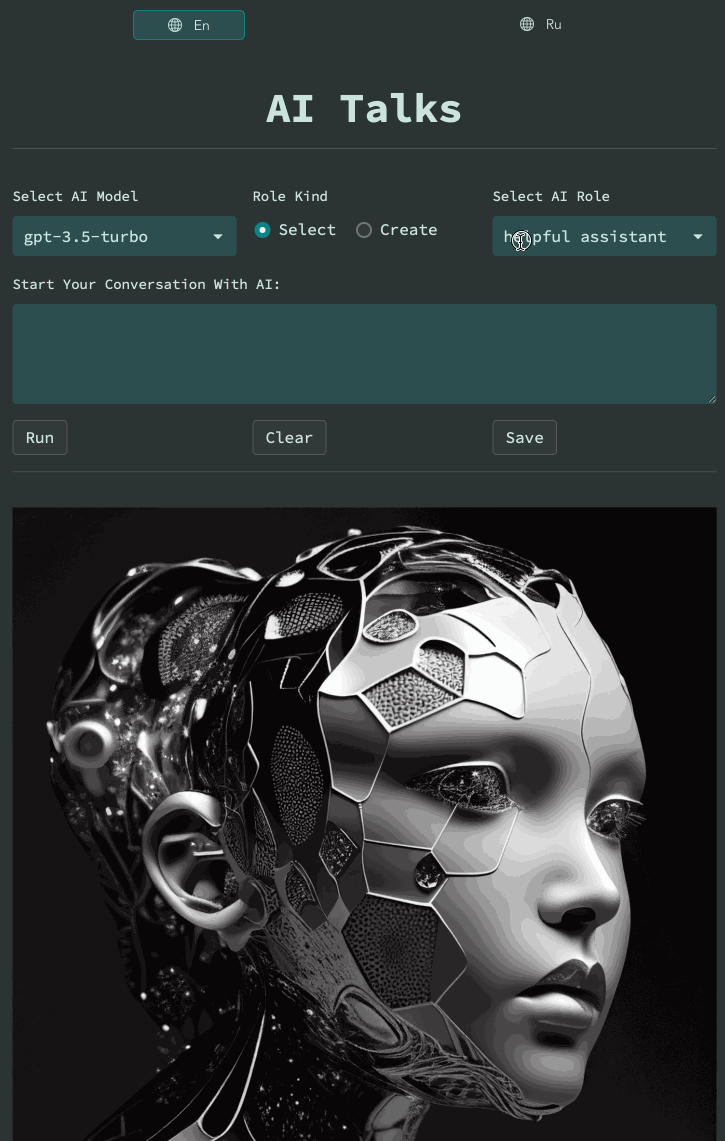
Demo:
Wrapping up
Thank you for reading my post! Now you can build your own AI assistant or use AI Talks from any country without registration and VPN.
At the time of writing, gpt-3.5-turbo and gpt-4 are available, but don't be surprised if gpt-4 is disabled in production due to the high load.
AI Talks repo is waiting for your stars 🙂.
If you have any questions, please post them in the comments below or in the Streamlit Discord app-sharing-gallery. You can also ask questions on Telegram at AI Talks Chat or follow app updates on the AI Talks Telegram channel.
Happy Streamlit-ing! 🎈
P.S.: Check out this post in Russian on Habr, a Russian collaborative blog about IT, computer science, and anything related to the Internet.


Comments
Continue the conversation in our forums →