
Want to create a generative AI solution that combines LLMs, stable diffusion generation, and cloud-based computing for resource-heavy tasks? You’ll need more than code. You’ll need to act as a cloud architect, DevOps engineer, and financial analyst all in one, trapped in a cycle of provisioning resources, monitoring them, and scaling them up or down.
That’s where Covalent comes in.
Covalent is a Pythonic workflow orchestration platform that scales workloads from your laptop to any compute backend. It lets you focus on what you do best—coding, experimenting, and innovating—without the burden of operational complexity.
In this post, we’ll show you how to build an interactive, generative AI app for summarizing news articles. You’ll learn:
- How to build and execute a Covalent workflow
- How to build a Streamlit UI to generate requests for news article summarization
- How to summarize news articles from Quanta
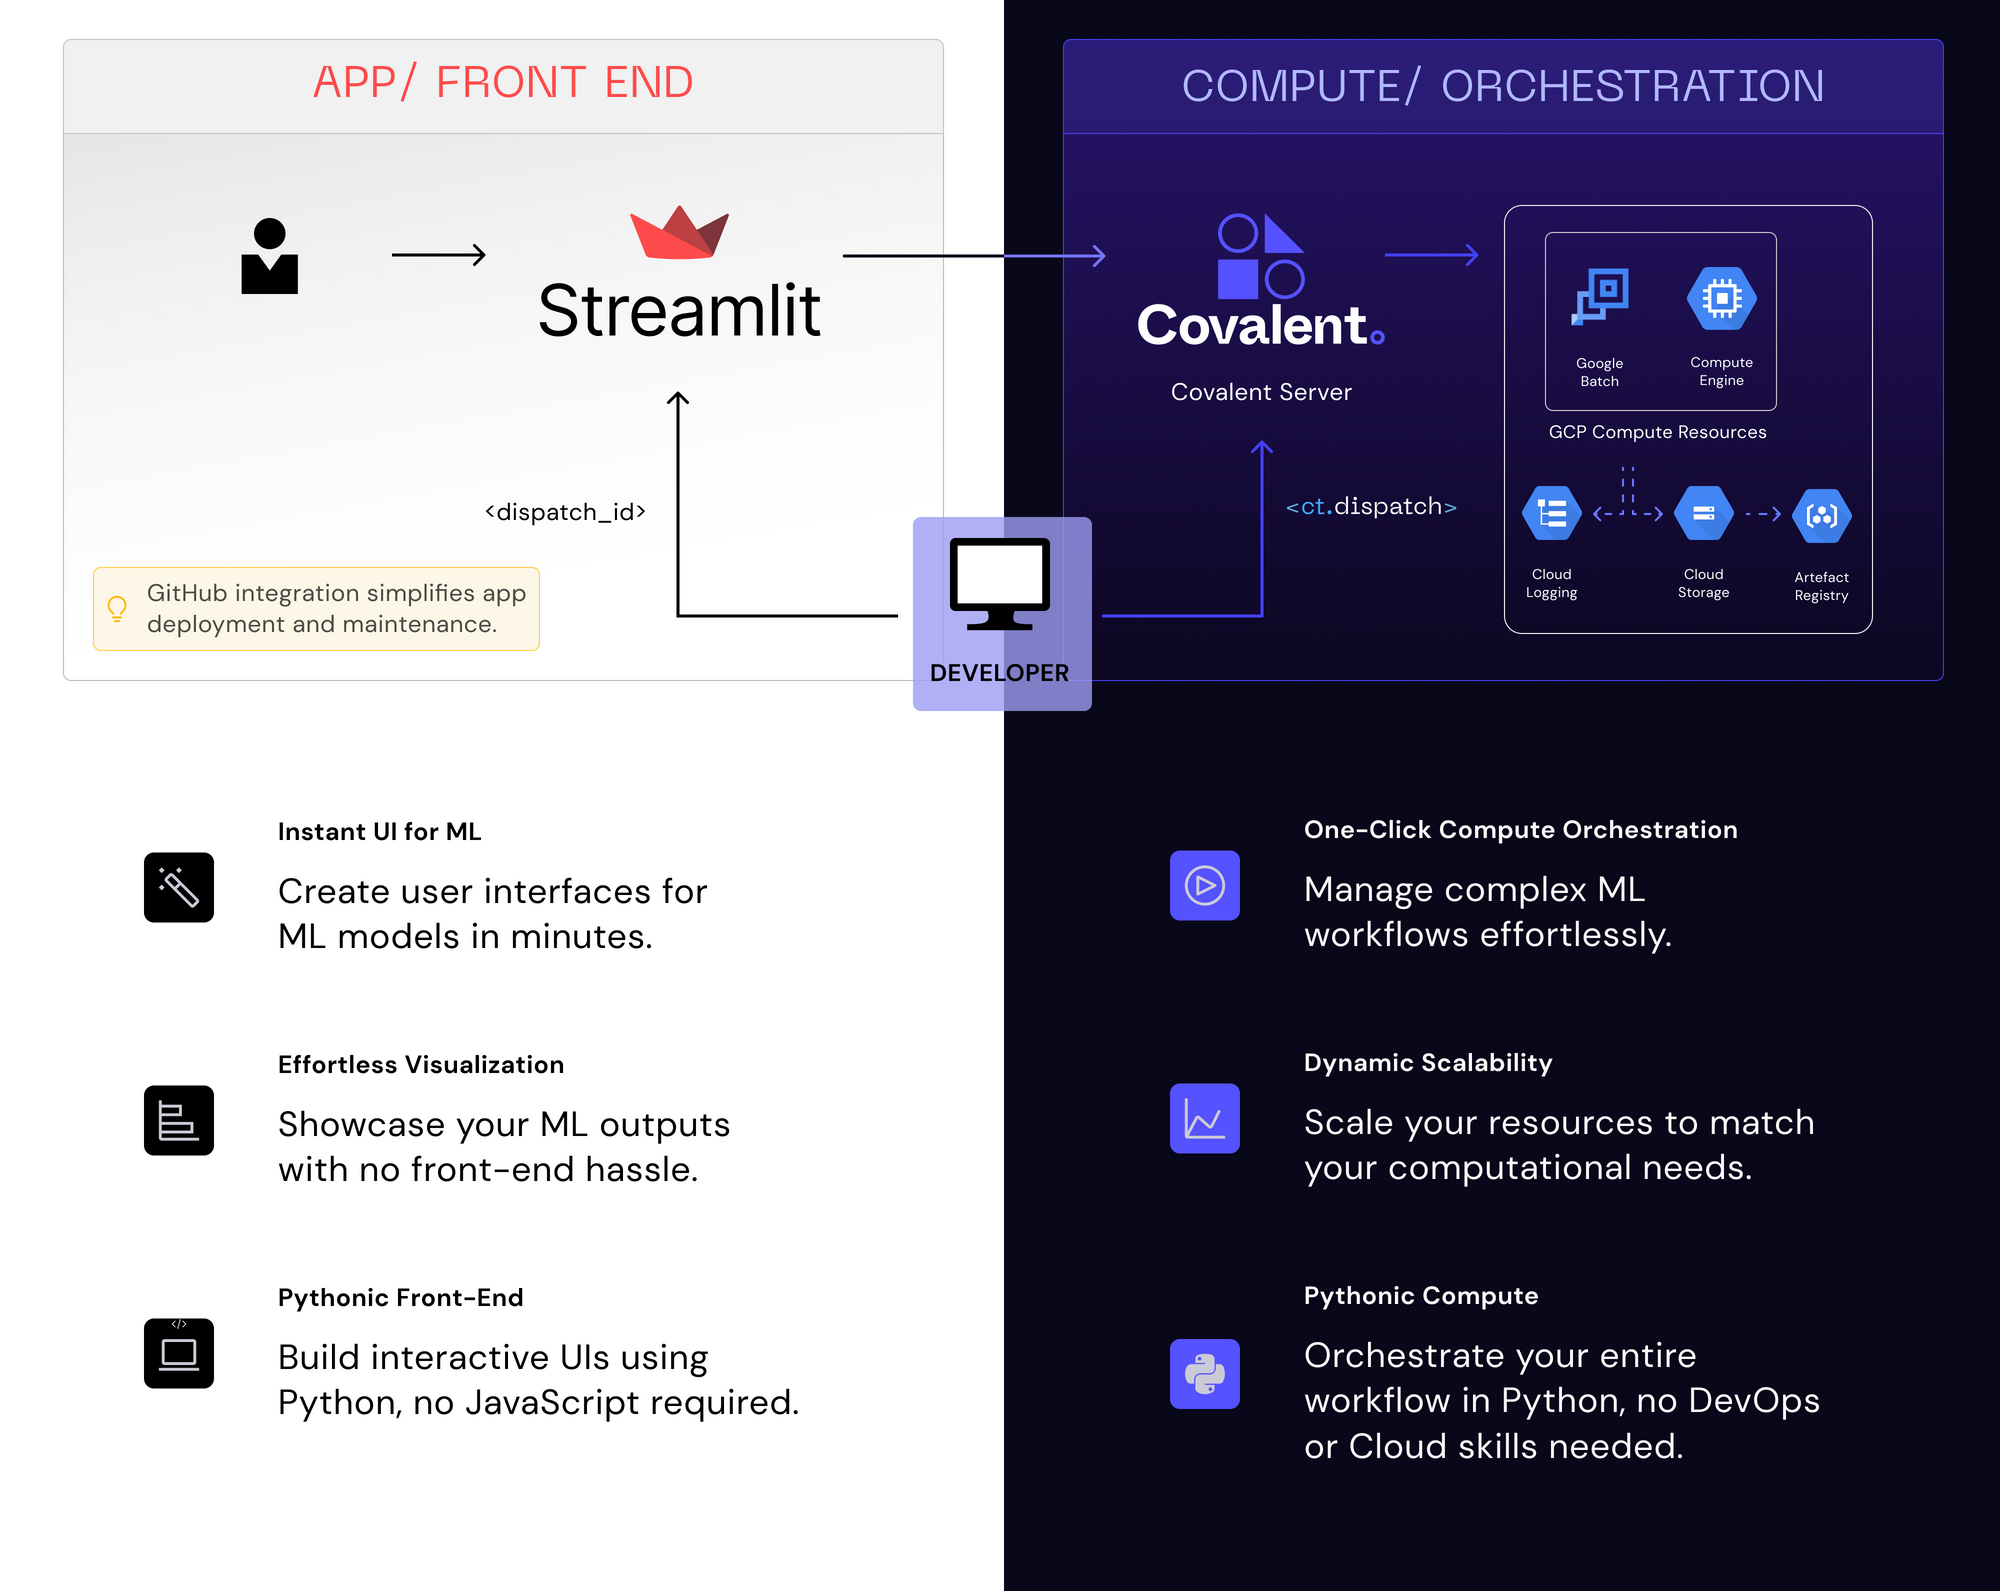
App overview
Let's take a high-level look at the app:
- Users create a Covalent generative AI workflow
- They execute these workflows on the Covalent Server
- Users trigger reruns and refinements of their Covalent workflows via a Streamlit app
1. How to build and execute a Covalent workflow
Covalent SDK is a Python framework that consists of three key components:
These components help researchers define complex workflows in a lightweight and non-destructive manner, with minimal and non-intrusive code changes.
In the following sections, we’ll explain how to use them.
1.1 The electron decorator
The @ct.electron decorator converts a Python function into a remotely executable task that Covalent can use to deploy arbitrary resources. Users can specify resources and constraints for each task by passing different executor objects to electron decorators.
Here is a simple Python function that generates an image from a text prompt using a stable diffusion model:
@ct.electron
def generate_image_from_text(
    summary, model_name="OFA-Sys/small-stable-diffusion-v0", prompt="Impressionist image - "
):
    model = DiffusionPipeline.from_pretrained(model_name)
    model.enable_attention_slicing()

    # Generate image using DiffusionPipeline
    reduced_summary = prompt + summary
    return model(reduced_summary).images[0]
1.2 The executor objects
Covalent executors define the environment in which the workflow will be executed. Each electron (task) can be assigned a different executor, allowing the workflow to be executed across multiple machines. Some tasks may require intensive and parallelizable CPU computation, while others can be completed using serverless, low-intensity CPU processing. This flexibility is crucial for optimizing task execution throughout the workflow, ensuring efficient use of time and resources.
import covalent as ct

# requires installing library covalent-gcpbatch-plugin
gcp_low_cpu_executor = ct.executor.GCPBatchExecutor(
   vcpus = 2,  # Number of vCPUs to allocate
   memory = 512,  # Memory in MB to allocate
   time_limit = 60,  # Time limit of job in seconds
   poll_freq = 1,  # Number of seconds to pause before polling for the job's status
)
gcp_high_cpu_executor = ct.executor.GCPBatchExecutor(
   vcpus = 32,  # Number of vCPUs to allocate
   memory = 32768,  # Memory in MB to allocate
   time_limit = 60,  # Time limit of job in seconds
   poll_freq = 1,  # Number of seconds to pause before polling for the job's status
)

@ct.electron(executor=gcp_low_cpu_executor)
def generate_title(
    article, model_name="JulesBelveze/t5-small-headline-generator",
    max_tokens=84, temperature=1, no_repeat_ngram_size=2
):
    ...

@ct.electron(executor=gcp_high_cpu_executor)
def generate_image_from_text(
		reduced_summary, model_name="OFA-Sys/small-stable-diffusion-v0", prompt="Impressionist image"
):
    ...
1.3 The lattice decorator
The @ct.lattice converts a function composed of electrons into a manageable workflow. You can transform a workflow into a lattice simply by adding this decorator to a function:
@ct.lattice
def news_content_curator(
news_url, image_generation_prompt="Impressionist image",
    summarizer_model="t5-small", summarizer_max_length=40,
    title_generating_model="JulesBelveze/t5-small-headline-generator",
    image_generation_model="OFA-Sys/small-stable-diffusion-v0",
    temperature=1, max_tokens=64, no_repeat_ngram_size=2,
    content_analysis_model="finiteautomata/bertweet-base-sentiment-analysis"
):
		...
Once a lattice (workflow) is defined, you need to dispatch it to run. You can do this using Covalent by calling ct.dispatch and providing the workflow name and parameters:
news_url = '<https://www.quantamagazine.org/math-proof-draws-new-boundaries-around-black-hole-formation-20230816/>'
dispatch_id = ct.dispatch(news_content_curator)(news_url)
Below are the complete workflow steps (find the code here):
@ct.lattice
def news_content_curator(
    news_url, image_generation_prefix,
    summarizer_model="t5-small",
    summarizer_max_length=40,
    title_generating_model="JulesBelveze/t5-small-headline-generator",
    image_generation_model="OFA-Sys/small-stable-diffusion-v0",
    temperature=1, max_tokens=64, no_repeat_ngram_size=2,
    content_analysis_model="finiteautomata/bertweet-base-sentiment-analysis"
):
    article = extract_news_content(news_url)
    content_property = sentiment_analysis(
        article, model_name=content_analysis_model
    )
    reduced_summary = generate_reduced_summary(
        article, model_name=summarizer_model, max_length=summarizer_max_length
    )
    title = generate_title(
        article, model_name=title_generating_model,
        temperature=temperature, max_tokens=max_tokens,
        no_repeat_ngram_size=no_repeat_ngram_size
    )
    generated_image = generate_image_from_text(
        reduced_summary, prompt=image_generation_prefix,
        model_name=image_generation_model
    )
    image_with_title = add_title_to_image(generated_image, title)
    url = save_image(image_with_title)
    return {
        "content_property": content_property, "summary": reduced_summary,
        "title": title, "image": url,
    }
Here is the Covalent workflow for the News article AI summarization app as viewed through the Covalent UI:
When a Covalent workflow is executed, a unique identifier called dispatch_id is generated. This ID serves two purposes:
- It acts as a reference for the specific workflow.
- It allows for the rerun of the entire workflow.
Covalent keeps a record of all previously executed workflows in a scalable database, creating a comprehensive history that you can use to rerun workflows using their respective dispatch IDs.
You can redispatch a workflow in three ways:
- Provide the
dispatch_idto theredispatchmethod to summarize a different news article. - Rerun a workflow while reusing previously computed results. For example, if you want to experiment with a different prompt for generating images from the same news article, while keeping the summarization and headline generation unchanged, you can initiate the workflow again and preserve the use of previous results.
redispatch_id = ct.redispatch(
        dispatch_id, reuse_previous_results=True
)(new_url, "Cubistic image")
- Customize a previously executed workflow by replacing tasks and using the
replace_electronsfeature (learn more here):
def classify_news_genre(
    article, model_name="abhishek/autonlp-bbc-news-classification-37229289"
):
    ...

replace_electrons = {
    "sentiment_analysis": ct.electron(classify_news_genre)
}
redispatch_id = ct.redispatch(
    dispatch_id, replace_electrons=replace_electrons
)(new_url, "Cubistic image", content_analysis_model="abhishek/autonlp-bbc-news-classification-37229289")
2. How to build a Streamlit UI to generate requests for news article summarization
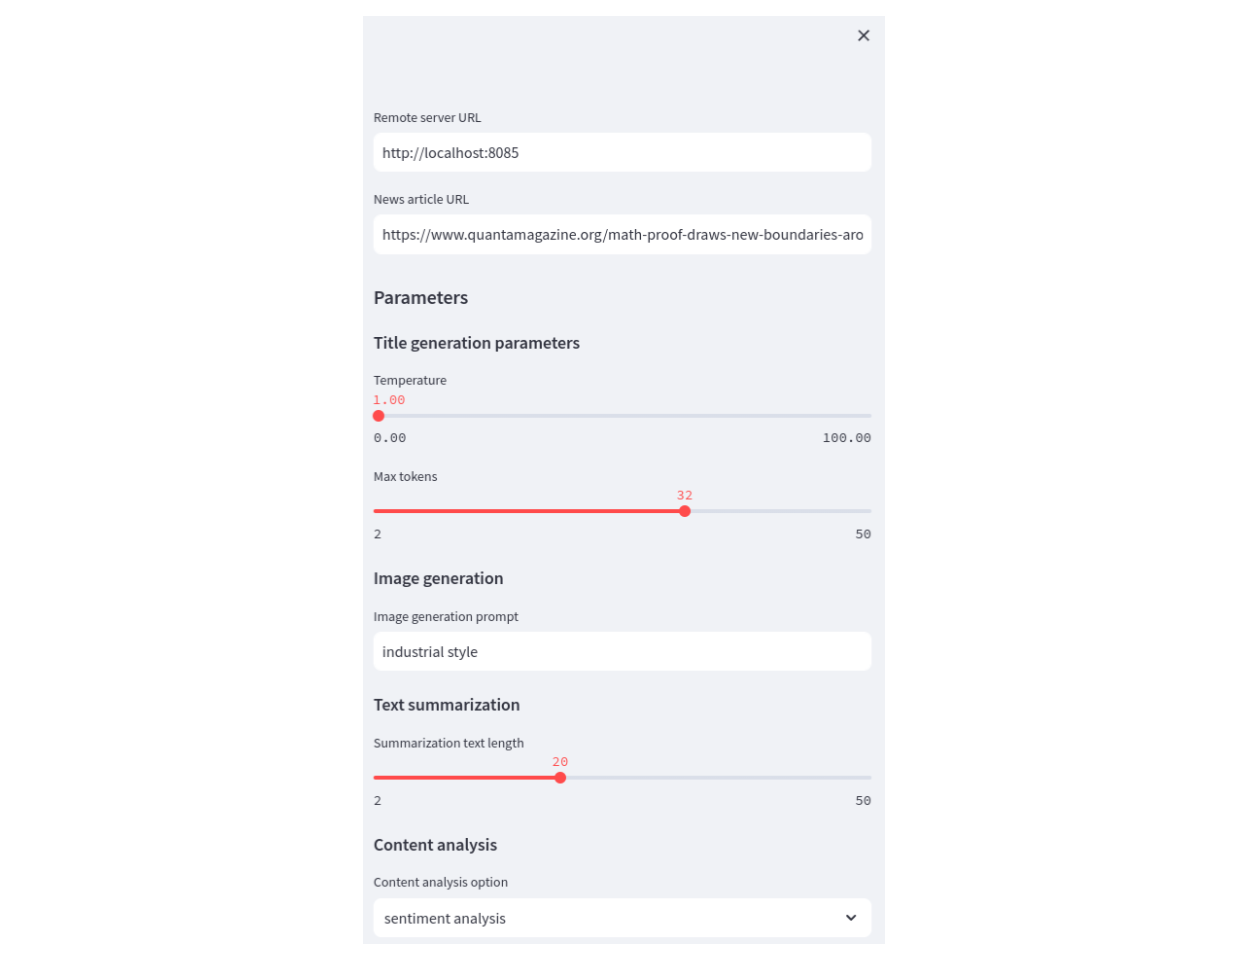
Streamlit lets users adjust parameters for the AI news summarization workflow and trigger previously executed workflows using their dispatch IDs.
The app sidebar contains the parameters with some proposed default values:
import streamlit as st

with st.sidebar:
    server_location = st.text_input(
        "Remote server URL", value="<http://localhost:8085>"
    )
    news_article_url = st.text_input(
        "News article URL",
        value="<https://www.quantamagazine.org/math-proof-draws-new-boundaries-around-black-hole-formation-20230816/>"
    )
    st.header("Parameters")

    # Title generation section
    st.subheader("Title generation parameters")
    title_generating_model = headline_generation_models[0]
    temperature = st.slider(
        "Temperature", min_value=0.0, max_value=100.0, value=1.0,
        step=0.1
    )
    max_tokens = st.slider(
        "Max tokens", min_value=2, max_value=50, value=32,
    )

    # Image generation section
    st.subheader("Image generation")
    image_generation_prefix = st.text_input(
        "Image generation prompt",
        value="industrial style"
    )
    image_generation_model = stable_diffusion_models[0]

    # Text summarization section
    st.subheader("Text summarization")
    summarizer_model = news_summary_generation[0]
    summarizer_max_length = st.slider(
        "Summarization text length", min_value=2, max_value=50, value=20,
    )

    # Content analysis section
    st.subheader("Content analysis")
    selected_content_analysis = st.selectbox(
        "Content analysis option", options=[
            "sentiment analysis",
            "genre classification"
        ]
    )
    if selected_content_analysis == "sentiment analysis":
        content_analysis_model = sentiment_analysis_models[0]
    else:
        content_analysis_model = genre_analysis_models[0]
The main part of the app displays the results from the Covalent server (based on the parameters configured in the sidebar). This process generates an AI-generated summary of the news article, a proposed title, and an AI-generated image that represents the content of the news article.
import requests

st.title("News article AI summarization")
dispatch_id = st.text_input("Dispatch ID")

if st.button("Generate image and text summary"):
    st.write("Generating...")

    container = st.container()

		# select either genre analysis or sentiment analysis
    selected_content_analysis = parameters.pop('selected_content_analysis')
    if selected_content_analysis != 'sentiment analysis':
        replace_electrons = {
            "sentiment_analysis": ct.electron(classify_news_genre)
        }
        parameters[
            "content_analysis_model"
        ] = "abhishek/autonlp-bbc-news-classification-37229289"
    else:
        replace_electrons = {}

    redispatch_id = ct.redispatch(
        dispatch_id, reuse_previous_results=True,
        replace_electrons=replace_electrons
    )(**parameters)

    covalent_info = ct.get_config()['dispatcher']
    address = covalent_info['address']
    port = covalent_info['port']
    covalent_url = f"{address}:{port}/{redispatch_id}"

    st.write(f"Covalent URL on remote server: http://{covalent_url}")

    with container:
        result = ct.get_result(redispatch_id, wait=True).result
        st.subheader(f"Article generated title: {result['title']}")
        st.write(
            "In terms of " +
            selected_content_analysis +
            " content is: " + str(result['content_property'])
        )
        st.image(result['image'])
        st.text_area(
            label="AI generated summary",
            key="summary",
            value=result['summary'], disabled=True
        )
Lastly, within the Streamlit app, you have the option to start the Covalent server for complete automation. This only needs to be done once.
If you want to start the Covalent server and execute a predefined workflow (in a file named workflow_remote.py), just include this code:
def is_covalent_down():
    out = check_output(["covalent", "status"])
    if "Covalent server is stopped" in out.decode('utf-8'):
        return True
    return False

def start_covalent():
    subprocess.run("covalent start --no-cluster", shell=True)

def run_covalent_workflow(workflow_filename):
    dispatch_id = check_output(["python", workflow_filename]).decode("utf-8")
    return dispatch_id.strip()

if is_covalent_down():
    st.write("Covalent is not up. Starting Covalent...")
    start_covalent()

		dispatch_id = run_covalent_workflow("workflow_remote.py")

    # wait for result
    ct.get_result(dispatch_id, wait=True)
    st.session_state['dispatch_id'] = dispatch_id
3. How to summarize news articles from Quanta
Once you construct the Covalent workflows, you can repeatedly execute them through Streamlit. This provides an interactive environment for easily running complex ML workflows and fine-tuning their parameters.
To get started, launch the app and copy the Covalent workflow dispatch IDs.
covalent start) and the Streamlit app (streamlit run streamlit_app.py).Wrapping up
You’ve learned how to build complex ML workflows using an example of a news summarization app. In this setup, a Covalent server handles the ML workflows, while a Streamlit interface manages user interactions. The communication between the two is facilitated through a single (dispatch) ID, which simplifies resource management, improves efficiency, and allows you to focus on the ML aspects.
If you found this interesting, please note that Covalent is a free and open-source tool. You can find more information and additional tutorials in our docs.
Happy workflow building! ⚙️


Comments
Continue the conversation in our forums →