
Streamlit apps often have some sort of a filtering component where developers write code snippets that combine Streamlit inputs, st.dataframe, or the ever-popular streamlit-aggrid component to create easy-to-use UIs.
We on the Streamlit data science team certainly have followed this trend with the following format:
- Use a set of Streamlit native inputs like
st.date_rangeorst.selectboxto get user input. - Use the inputs to filter our data and display it back to the user.
Writing this type of app the first time was fun. But doing it the fifth time—writing different code iterations, figuring out what Streamlit widget fits what data type, configuring it all together—got tiring pretty quickly. To solve this, we built a function filter_dataframe that handles this for us automatically!
In this post, we’ll show you how filter_dataframe works section by section:
Code Section 1. Laying out Streamlit widgets
Code Section 2. Preparing the input dataframe for filtering
Code Section 3. Writing conditionals for different column types
Want to dive right in? Head over to our demo app see it on an example dataframe, and see the full code here.
What is filter_dataframe?
The functionfilter_dataframe lets you:
- Add a filtering UI to any dataframe
- Speed up the development time
- Allow the user to explore a dataset in a self-service way
Here is the code for it:
from pandas.api.types import (
    is_categorical_dtype,
    is_datetime64_any_dtype,
    is_numeric_dtype,
    is_object_dtype,
)
import pandas as pd
import streamlit as st


def filter_dataframe(df: pd.DataFrame) -> pd.DataFrame:
    """
    Adds a UI on top of a dataframe to let viewers filter columns

    Args:
        df (pd.DataFrame): Original dataframe

    Returns:
        pd.DataFrame: Filtered dataframe
    """
    modify = st.checkbox("Add filters")

    if not modify:
        return df

    df = df.copy()

    # Try to convert datetimes into a standard format (datetime, no timezone)
    for col in df.columns:
        if is_object_dtype(df[col]):
            try:
                df[col] = pd.to_datetime(df[col])
            except Exception:
                pass

        if is_datetime64_any_dtype(df[col]):
            df[col] = df[col].dt.tz_localize(None)

    modification_container = st.container()

    with modification_container:
        to_filter_columns = st.multiselect("Filter dataframe on", df.columns)
        for column in to_filter_columns:
            left, right = st.columns((1, 20))
            # Treat columns with < 10 unique values as categorical
            if is_categorical_dtype(df[column]) or df[column].nunique() < 10:
                user_cat_input = right.multiselect(
                    f"Values for {column}",
                    df[column].unique(),
                    default=list(df[column].unique()),
                )
                df = df[df[column].isin(user_cat_input)]
            elif is_numeric_dtype(df[column]):
                _min = float(df[column].min())
                _max = float(df[column].max())
                step = (_max - _min) / 100
                user_num_input = right.slider(
                    f"Values for {column}",
                    min_value=_min,
                    max_value=_max,
                    value=(_min, _max),
                    step=step,
                )
                df = df[df[column].between(*user_num_input)]
            elif is_datetime64_any_dtype(df[column]):
                user_date_input = right.date_input(
                    f"Values for {column}",
                    value=(
                        df[column].min(),
                        df[column].max(),
                    ),
                )
                if len(user_date_input) == 2:
                    user_date_input = tuple(map(pd.to_datetime, user_date_input))
                    start_date, end_date = user_date_input
                    df = df.loc[df[column].between(start_date, end_date)]
            else:
                user_text_input = right.text_input(
                    f"Substring or regex in {column}",
                )
                if user_text_input:
                    df = df[df[column].astype(str).str.contains(user_text_input)]

    return df
Now let’s take a look at how it works!
Code Section 1. Laying out Streamlit widgets
The filter_dataframe function inputs and outputs the same thing—a pandas dataframe. Within the function, we first ask the user if they’d like to filter the dataframe with a checkbox called modify.
We also added comments and type hints to the top of the function to make the code more digestible:
def filter_dataframe(df: pd.DataFrame) -> pd.DataFrame:
    """
    Adds a UI on top of a dataframe to let viewers filter columns

    Args:
        df (pd.DataFrame): Original dataframe

    Returns:
        pd.DataFrame: Filtered dataframe
    """
    modify = st.checkbox("Add filters")

    if not modify:
        return df
Code Section 2. Preparing the input dataframe for filtering
There are several steps you need to take to prep your dataframe for your app. For the first three you need to:
- Make a copy of the pandas dataframe so the user input will not change the underlying data.
- Attempt to cast string columns into datetimes with
pd.to_datetime(). - Localize your datetime columns with
.tz_localize(). The Streamlit date picker (which you’ll use later!) returns dates without a timezone, so you need to take this step to compare the two:
df = df.copy()

# Try to convert datetimes into a standard format (datetime, no timezone)
for col in df.columns:
    if is_object_dtype(df[col]):
    	try:
    	    df[col] = pd.to_datetime(df[col])
    	except Exception:
    	    pass

    if is_datetime64_any_dtype(df[col]):
        df[col] = df[col].dt.tz_localize(None)
Now that your data is in a better format, you need to:
- Set up a container with
st.containerfor your filtering widgets. - Use
st.multiselectto let the user select the columns:
modification_container = st.container()
with modification_container:
    to_filter_columns = st.multiselect("Filter dataframe on", df.columns)
- Loop through each column and deal with each one depending on its type. You’ll write conditionals for each one next!
- Add indentation and an arrow to improve the aesthetics when users select many columns.
for column in to_filter_columns:
    left, right = st.columns((1, 20))
    left.write("↳")
All your data is in the right format. You ensured that your original dataset will remain untouched, and you have prepared your loop to go through all your columns. Now comes the fun part!
Code Section 3. Writing conditionals for different column types
In this function, you’ll want to check for three pandas data types—categorical, numeric, and datetime—then handle the rest as if they’re strings. This is an assumption that works well for us. Your situation might be different, so feel free to add your own conditionals to this list.
For each one create a Streamlit widget that matches your type, then filter your data based on that widget. At the end of this loop, you’ll have to return the entire filtered dataframe.
Let’s take a look at them one by one.
Categorical types
Check for categorical types with the is_categorical_dtype function. Often users don’t cast their data into this type, so assume that anything with fewer than 10 unique values acts like a categorical dtype. As a bonus, it’ll work great with boolean columns (which only have True or False values!).
Now, create a multiselect widget with possible values and use it to filter your dataframe:
# Treat columns with < 10 unique values as categorical
if is_categorical_dtype(df[column]) or df[column].nunique() < 10:
    user_cat_input = right.multiselect(
        f"Values for {column}",
        df[column].unique(),
        default=list(df[column].unique()),
    )
    df = df[df[column].isin(user_cat_input)]
Numeric types
Numeric types are fairly straightforward. You can get the minimum and the maximum from the dataset itself, then assume that the step function is 1% of the range and filter the data accordingly:
elif is_numeric_dtype(df[column]):
    _min = float(df[column].min())
    _max = float(df[column].max())
    step = (_max - _min) / 100
    user_num_input = right.slider(
      f"Values for {column}",
      min_value=_min,
      max_value=_max,
      value=(_min, _max),
      step=step,
    )
    df = df[df[column].between(*user_num_input)]
Datetime types
The datetime dtype is almost the same as the other two. You get the user input with the st.date_input function. Once the user enters two dates, you can filter your dataset:
elif is_datetime64_any_dtype(df[column]):
    user_date_input = right.date_input(
        f"Values for {column}",
        value=(
            df[column].min(),
            df[column].max(),
        ),
    )
    if len(user_date_input) == 2:
        user_date_input = tuple(map(pd.to_datetime, user_date_input))
        start_date, end_date = user_date_input
        df = df.loc[df[column].between(start_date, end_date)]
Other types
We like to convert other dtypes into a string, then let the user search within them for substrings. It might not work for your use case, but for us, it works quite well:
else:
    user_text_input = right.text_input(
        f"Substring or regex in {column}",
    )
    if user_text_input:
        df = df[df[column].astype(str).str.contains(user_text_input)]
Bringing it all together
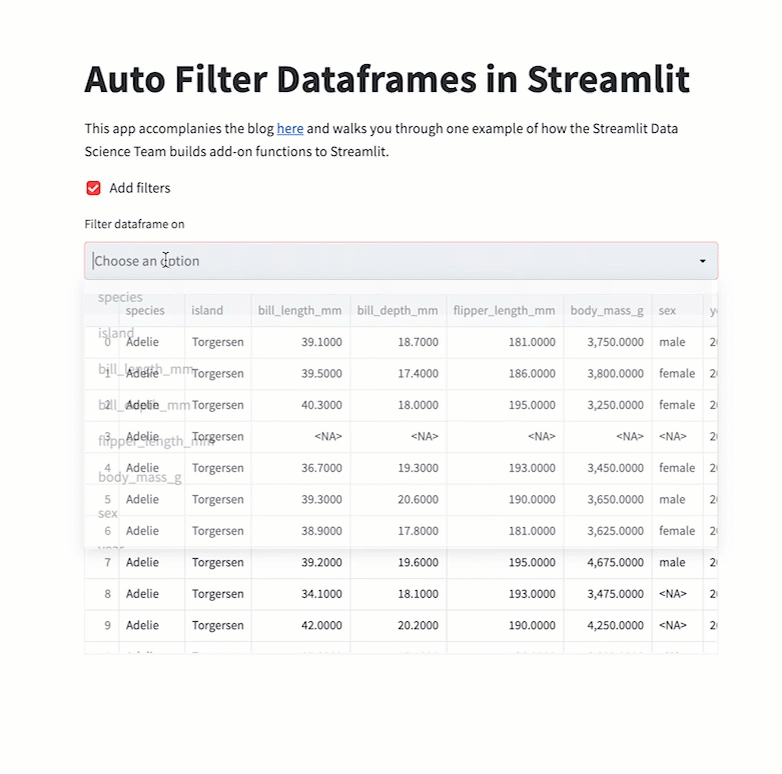
Want to see what the code looks like in action? Go ahead and test it on the palmerpenguins dataset (see this GitHub repo for the data) or on your own data!
We’ve made an example app using the code (check it out below):
import pandas as pd
import streamlit as st
import streamlit.components.v1 as components
from pandas.api.types import (
    is_categorical_dtype,
    is_datetime64_any_dtype,
    is_numeric_dtype,
    is_object_dtype,
)

st.title("Auto Filter Dataframes in Streamlit")
st.write(
    """This app accomodates the blog [here](<https://blog.streamlit.io/auto-generate-a-dataframe-filtering-ui-in-streamlit-with-filter_dataframe/>)
    and walks you through one example of how the Streamlit
    Data Science Team builds add-on functions to Streamlit.
    """
)

def filter_dataframe(df: pd.DataFrame) -> pd.DataFrame:
    <insert the code we wrote here>

data_url = "https://raw.githubusercontent.com/mcnakhaee/palmerpenguins/master/palmerpenguins/data/penguins.csv"

df = pd.read_csv(data_url)
st.dataframe(filter_dataframe(df))
This code will produce the following app:
Wrapping up
You did it! Now you know how to set up your own filter_dataframe function.
If you have any questions or improvements, please drop them in the comments below or make a suggestion on our GitHub repository for this post.
Happy Streamlit-ing! 🎈


Comments
Continue the conversation in our forums →