
Hey, community! 👋
My name is Siavash Yasini, and I’m a Senior Data Scientist at Zest AI.
Like you, I love getting my hands on a new dataset, exploring it, and learning from it. But raw numbers by themselves aren’t great storytellers. Our primal brains are wired for lines, shapes, and colors. That’s why numbers need to be visualized to tell a good story.
The color palette of your data visualization is a crucial component that can make or break your data story. If you're like me, you've probably spent too much time trying to find the perfect set of colors. While creating a custom color palette can be exacting and time-consuming, you don’t have to do it alone. I built an app that can create a color palette from any image — a painting, a movie poster, or a Christmas family photo!
In this post, I'll teach you:
- How to construct an image-loading component
- How to build an image enhancement component with sliders
- How to cluster pixels and use group averages to make a palette
- How to use the color picker widget to display and modify the palette
Want to try the app firsthand? You can check it out here and see the source code here.
How to construct an image-loading component
First, load an image into your app to convert it to a color palette. You can do this in three ways:
- Load from a pre-existing gallery of images or artworks
- Upload a new image file into the app using
st.file_uploader() - Download a new image from a URL
You can make three different tabs using st.tabs() to switch between input modes:

Because of the way Streamlit runs the app (top-to-bottom), the input modes that come later will get higher priority and will overwrite the output of the previous loader. For example, since you ordered the input modes as Gallery → File Uploader → Image URL, if you save the image into a variable img, anything loaded by the gallery will be overwritten by the file uploader and URL downloader outputs.
You can add pop-up warnings for the user when they load an image with a loader lower in the hierarchy and an image is already loaded with a loader higher in the hierarchy.
This is what the code will look like:
# define three tabs for the three loading methods
gallery_tab, upload_tab, url_tab = st.tabs(["Gallery", "Upload", "Image URL"])

with gallery_tab:
    ...

	# raise a warning if file uploader or URL downloader have already loaded an image
    if st.session_state.get("file_uploader"):
        st.warning("To use the Gallery, remove the uploaded image first.")
    if st.session_state.get("image_url"):
        st.warning("To use the Gallery, remove the image URL first.")

    img = ...

with upload_tab:

    img = ...

	# raise a warning if the URL downloader has already loaded an image
    if st.session_state.get("image_url"):
        st.warning("To use the file uploader, remove the image URL first.")

with url_tab:

	img = ...
So if you’re trying to load a pre-existing image from the gallery, but there is an existing link in the URL downloader, you’ll need to remove it. It may not be the most elegant solution, but it works!
Gallery view
For the gallery view, save some images in a public repository and load them directly in the app (use GitHub, AWS S3, or Google Cloud Storage). The st.selectbox contains the names of the saved artworks, so the user can load them by selecting them from the dropdown menu.
Here is what the implementation looks like:
import streamlit as st
from PIL import Image

with gallery_tab:
    options = list(gallery_dict.keys())
    file_name = st.selectbox("Select Art",
                             options=options,
                             index=options.index("Mona Lisa (Leonardo da Vinci)")
                             )
    img_file = gallery_dict[file_name]

    if st.session_state.get("file_uploader"):
        st.warning("To use the Gallery, remove the uploaded image first.")
    if st.session_state.get("image_url"):
        st.warning("To use the Gallery, remove the image URL first.")

    img = Image.open(img_file)
gallery_dict is a dictionary with the filename and the image file path as key-value pairs, and PIL.Image.open() is used to load those files. The results are saved in a variable named img.
File uploader
Implementing the file uploader is easy because there is already a Streamlit widget. It’s called (can you guess?) st.file_uploader()!
Here is what the implementation looks like:
with upload_tab:
    img_file = st.file_uploader("Upload Art", key="file_uploader")
    if file is not None:
        try:
            img = Image.open(img_file)
        except:
            st.error("The file you uploaded does not seem to be a valid image. Try uploading a png or jpg file.")

    if st.session_state.get("image_url"):
        st.warning("To use the file uploader, remove the image URL first.")
This widget lets you upload a file that you can pass to PIL.Image.open() to load. This step may break if the file is not an image or has a format inconsistent with what PIL.Image expects. To prevent this, put the loading part into a try/except block.
except without specifying the Exception type you’re trying to bypass. It can cause deadly errors to pass through the block silently, making it difficult for you to debug your code.URL downloader
Using the file uploader, the users have to find the image, download it locally, then upload it to the app. It sounds easy but is annoying in practice. To make this easy, add a URL downloader to the app so the user can copy the image link and paste it into the app. To do this, you need the requests module (gets you the URL contents) and the io.BytesIO function (makes the contents comprehendible by PIL.Image.open()).
The implementation is similar to what you did for the file uploader:
import requests
from io import BytesIO

with url_tab:
    url = st.text_input("Image URL", key="image_url")

    if url != "":
        try:
            response = requests.get(url)
            img = Image.open(BytesIO(response.content))
        except:
            st.error("The URL does not seem to be valid.")
How to build an image enhancement component with sliders
Now that you have the image uploaded, you’re ready to infer the color palette, right? Not exactly.
The image may not be optimized for color inference. The colors might be too dull, and the image might not have enough brightness or contrast. That’s why you need to make some adjustments:
To do this, use PIL.ImageEnhance. The API is very simple. For example, if you want to enhance the color of the image by a factor of 2.5, you can run:
img = ImageEnhance.Color(img)
img = img.enhance(2.5)
Replace Color with Shapness, Contrast, or Brightness to adjust these image attributes respectively.
You could create four sliders that assign values to each of these attributes and write separate blocks of code. But your code won't be beautiful and DRY (Don’t Repeat Yourself). So let’s approach this methodically. Define a dictionary that contains all the enhancements as keys, with values indicating the ranges and step sizes of the sliders:
enhancement_range = {
  # "enhancement_type": [min, max, step_size]

    "Color": [0., 5., 0.2],
    "Sharpness": [0., 3., 0.2],
    "Contrast": [0.5, 1.5, 0.1],
    "Brightness": [0.5, 1.5, 0.1]
}

enhancement_categories = enhancement_range.keys()

# put adjustment sliders inside an expander
enh_expander = st.sidebar.expander("Image Enhancements", expanded=False)

# create a reset button that resets all enhancements to default value (1.0)
with enh_expander:
    if st.button("reset"):
        for cat in enhancement_categories:
            if f"{cat}_enhancement" in st.session_state:
                st.session_state[f"{cat}_enhancement"] = 1.0

# create sliders for each enhancement category using the dictionary values (min, max, step_size)
enhancement_factor_dict = {
    cat: enh_expander.slider(f"{cat} Enhancement",
                            value=1.,
                            min_value=enhancement_range[cat][0],
                            max_value=enhancement_range[cat][1],
                            step=enhancement_range[cat][2],
                            key=f"{cat}_enhancement")
    for cat in enhancement_categories
}
This way, if you want to change the enhancement type or the range of values, you need to change only the original dictionary.
Let’s apply the values to the image using ImageEnhance:
from PIL import ImageEnhance

for cat in enhancement_categories:
	# apply the enhancement class to the image
	# e.g. for cat='Color' this would be the same as
    # img = ImageEnhance.Color(img)
    img = getattr(ImageEnhance, cat)(img)

	# apply the enhencement value from the corresponding st.slider
    img = img.enhance(enhancement_factor_dict[cat])
Show the image
The only thing left is to show the image on the app using st.image():
with st.expander("🖼  Artwork", expanded=True):
    st.image(img, use_column_width=True)
And voilà!
How to cluster pixels and use group averages to make a palette
Now, onto the fun stuff. The idea here is simple. An image is a collection of pixels that have three values assigned to them: red (R), green (G), and blue (B). The pixel’s location on the canvas is irrelevant. What matters is where it’s located within the RGB coordinate space.
Let’s decompose the image and get rid of the pixel location:
r, g, b = np.array(img).reshape(-1, 3).T
df_rgb = pd.DataFrame({"R": r, "G": g, "B": b}).sample(n=sample_size)
Group the pixels that are close together and use the average RGB values to represent each group (a single color). For example, if you want to make a five-color palette from Mona Lisa, look at the pixel distribution (here it’s projected into 2D using the PCA algorithm):
![]()
Then select five clusters and assign the average value of each cluster to a palette slot:
![]()
To do this, use a machine learning algorithm K-means clustering—sklearn.cluster.KMeans. You need to provide only the number of clusters (your palette size).
This is what the implementation looks like:
from sklearn.cluster import KMeans

palette_size = st.sidebar.number_input("palette size",
																			 min_value=1,
																			 max_value=20,
																		   value=5,
																			 step=1,
																			 help="Number of colors to infer from the image.")

model = KMeans(n_clusters=palette_size)
clusters = model.fit_predict(df_rgb)

palette = model.cluster_centers_.astype(int).tolist()
That’s it! You now have your color palette.
How to use the color picker widget
It's time to try the amazing st.color_picker() widget! Use it to adjust your colors if they're not 100% perfect:
To avoid the palette taking up half the page, put each color into a separate column:
columns = st.columns(palette_size)
for i, col in enumerate(columns):
    with col:
        st.session_state[f"col_{i}"]= \\
				    st.color_picker(label=str(i),
                    value=palette[i],
                    key=f"pal_{i}")
Beautiful!
Finally, provide the user with a matplotlib or plotly code snippet (so they don't have to copy-paste every single hex code into their coding environment):
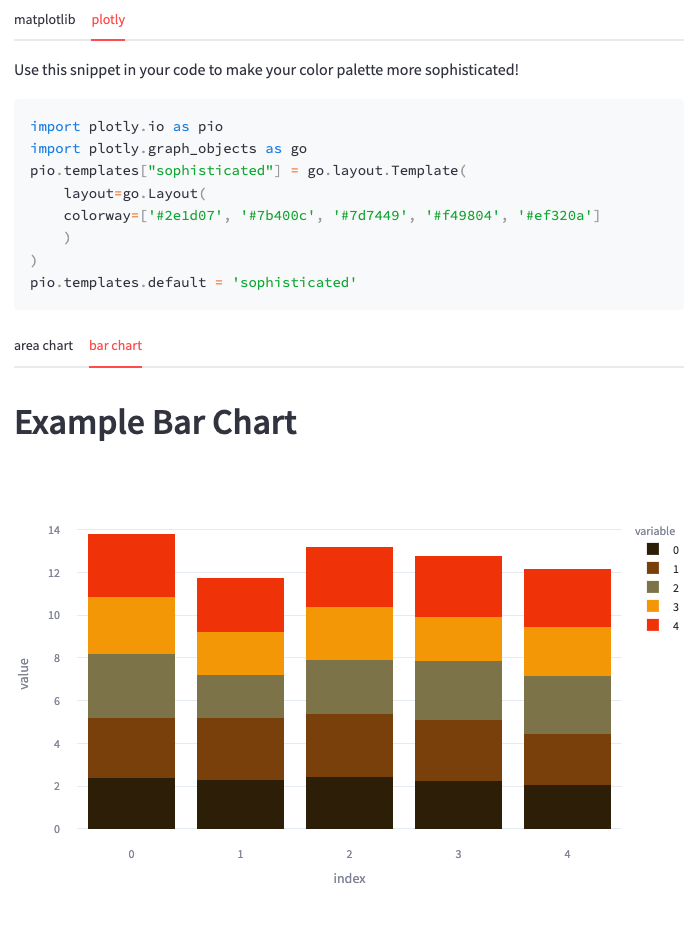
Thanks to st.code() widget, you can copy the whole code block with one click. 😄
Wrapping up
Congratulations! You've learned how to build an app that can show you what colors Leonardo Da Vinci used to put that smile on Mona Lisa's face. You've also learned how to use st.image, st.tabs, st.file_uploader, and st.color_picker widgets. If you want to learn even more, check out the source code.
I'd love to hear your thoughts, questions, comments, and feedback. Get in touch with me on LinkedIn or through my website.
Happy app-building! 👷


Comments
Continue the conversation in our forums →