Large language models (LLMs) have revolutionized how we process and understand text data, enabling a diverse array of tasks spanning text generation, summarization, classification, and much more. Combining LangChain and Streamlit to build LLM-powered applications is a potent combination for unlocking an array of possibilities, especially for developers interested in creating chatbots, personal assistants, and content creation apps.
In the previous four LangChain tutorials, you learned about three of the six key modules: model I/O (LLM model and prompt templates), data connection (document loader, text splitting, embeddings, and vector store), and chains (summarize chain and question-answering chain).
This tutorial explores the use of the fourth LangChain module, Agents. Specifically, we'll use the pandas DataFrame Agent, which allows us to work with pandas DataFrame by simply asking questions.
We'll build the pandas DataFrame Agent app for answering questions on a pandas DataFrame created from a user-uploaded CSV file in four steps:
- Get an OpenAI API key
- Set up the coding environment
- Build the app
- Deploy the app
What are Agents?
According to Harrison Chase, agents "use an LLM to determine which actions to take and in what order." An action can refer to using tools, observing their output, or returning a response to the user. Tools are entities that take a string as input and return a string as output. Examples of tools include APIs, databases, search engines, LLMs, chains, other agents, shells, and Zapier.
Agents are comprised of two types:
- Action agents
- Plan-and-execute agents
Using Agents in LangChain
To use an agent in LangChain, you need to specify three key elements:
- LLM. LLM is responsible for determining the course of action that an agent would take to fulfill its task of answering a user query. If you're using the OpenAI LLM, it's available via
OpenAI()fromlangchain.llms. - Tools. These are resources that an agent can use to accomplish its task, such as querying a database, accessing an API, or searching Google. You can load them via
load_tools()fromlangchain.agents. - Agent. The available agent types are action agents or plan-and-execute agents. You can access them via
AgentType()fromlangchain.agents.
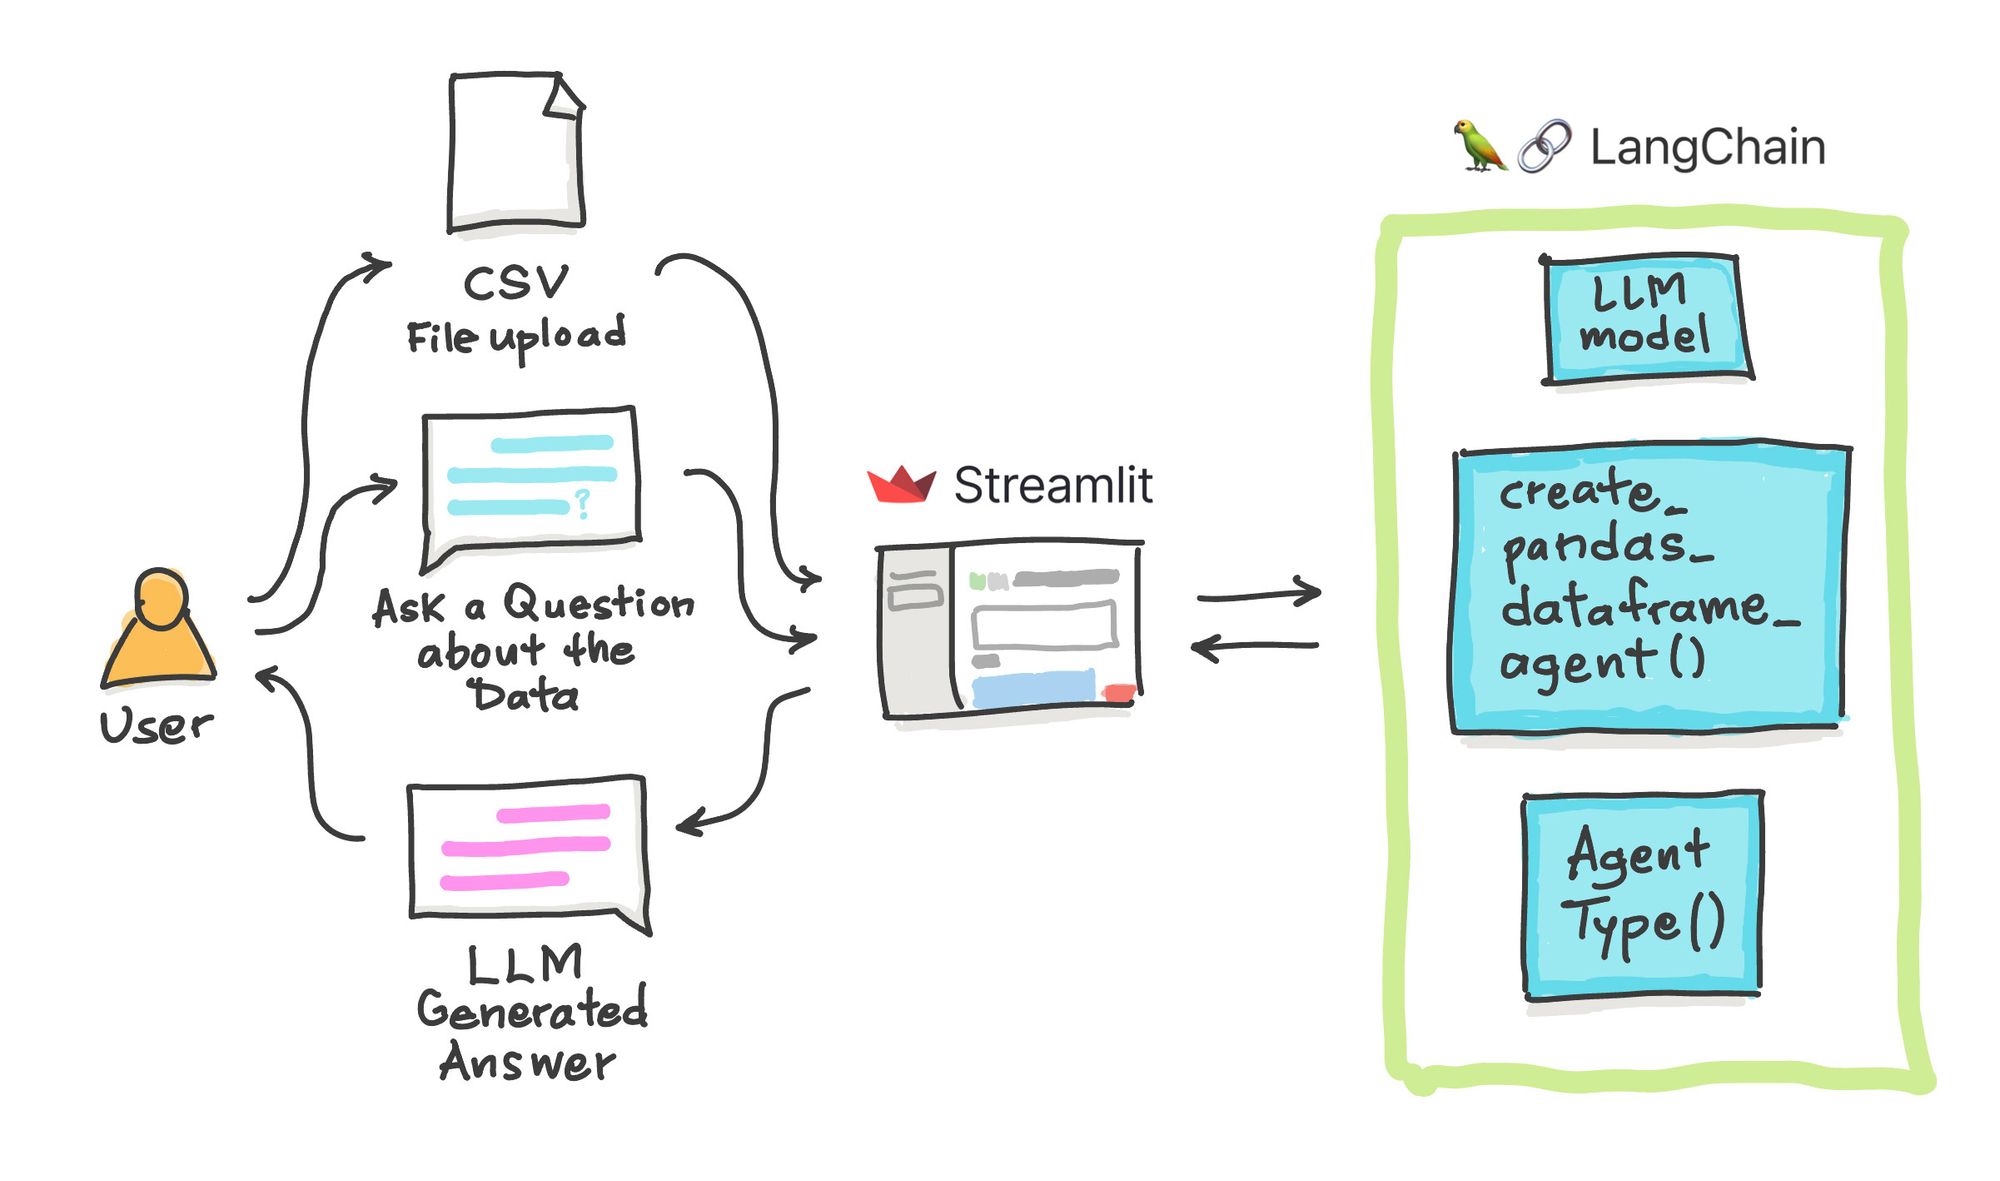
In this tutorial, we'll be using the pandas DataFrame Agent, which can be created using create_pandas_dataframe_agent() from langchain.agents.
App overview
Let's take a look at the general flow of the app.
Once the app is loaded, the user should perform the following steps in sequential order:
- Upload a CSV file. You can also tweak the underlying code to read in tabular formats such as Excel or tab-delimited files.
- Select an example query from the drop-down menu or provide your own custom query by selecting the "Other" option.
- Enter your OpenAI API key.
That's all for the frontend! As for the backend, the pandas DataFrame Agent will work its magic on the data and return an LLM-generated answer.

Now let's take a look at the app in action:
Step 1. Get an OpenAI API key
You can find a detailed walkthrough on obtaining an OpenAI API key in LangChain Tutorial #1.
Step 2. Set up the coding environment
Local development
To set up a local coding environment with the necessary libraries, use pip install as shown below (make sure you have Python version 3.7 or higher):
pip install streamlit openai langchain pandas tabulate
Cloud development
In addition to using a local computer to develop apps, you can deploy them on the cloud using Streamlit Community Cloud. You can use the Streamlit app template to do this (read more here).
Next, add the following Python libraries to the requirements.txt file:
streamlit
openai
langchain
pandas
tabulate
Step 3. Build the app
App overview
The entire app consists of 47 lines of code, as shown below:
import streamlit as st
import pandas as pd
from langchain.chat_models import ChatOpenAI
from langchain.agents import create_pandas_dataframe_agent
from langchain.agents.agent_types import AgentType

# Page title
st.set_page_config(page_title='🦜🔗 Ask the Data App')
st.title('🦜🔗 Ask the Data App')

# Load CSV file
def load_csv(input_csv):
  df = pd.read_csv(input_csv)
  with st.expander('See DataFrame'):
    st.write(df)
  return df

# Generate LLM response
def generate_response(csv_file, input_query):
  llm = ChatOpenAI(model_name='gpt-3.5-turbo-0613', temperature=0.2, openai_api_key=openai_api_key)
  df = load_csv(csv_file)
  # Create Pandas DataFrame Agent
  agent = create_pandas_dataframe_agent(llm, df, verbose=True, agent_type=AgentType.OPENAI_FUNCTIONS)
  # Perform Query using the Agent
  response = agent.run(input_query)
  return st.success(response)

# Input widgets
uploaded_file = st.file_uploader('Upload a CSV file', type=['csv'])
question_list = [
  'How many rows are there?',
  'What is the range of values for MolWt with logS greater than 0?',
  'How many rows have MolLogP value greater than 0.',
  'Other']
query_text = st.selectbox('Select an example query:', question_list, disabled=not uploaded_file)
openai_api_key = st.text_input('OpenAI API Key', type='password', disabled=not (uploaded_file and query_text))

# App logic
if query_text is 'Other':
  query_text = st.text_input('Enter your query:', placeholder = 'Enter query here ...', disabled=not uploaded_file)
if not openai_api_key.startswith('sk-'):
  st.warning('Please enter your OpenAI API key!', icon='⚠')
if openai_api_key.startswith('sk-') and (uploaded_file is not None):
  st.header('Output')
  generate_response(uploaded_file, query_text)
Import libraries
To start, import the necessary libraries:
- Streamlit. A low-code web framework used for creating the app's frontend
- pandas. A data wrangling framework for loading the CSV file as a DataFrame
- LangChain. An LLM framework that coordinates the use of an LLM model to generate a response based on the user-provided prompt.
import streamlit as st
import pandas as pd
from langchain.chat_models import ChatOpenAI
from langchain.agents import create_pandas_dataframe_agent
from langchain.agents.agent_types import AgentType
Display the app title
Next, display the title of the app:
# Page title
st.set_page_config(page_title='🦜🔗 Ask the Data App')
st.title('🦜🔗 Ask the Data App')
Load the CSV file
Since the CSV file is one of the app's inputs, along with the data query, you need to create a custom function to load it (use pandas' read_csv() method). Once loaded, display the DataFrame inside an expander box:
# Load CSV file
def load_csv(input_csv):
  df = pd.read_csv(input_csv)
  with st.expander('See DataFrame'):
    st.write(df)
  return df
Create the LLM response generation function
The next step is to process data using the Agent, specifically the pandas DataFrame Agent, and the LLM model (GPT 3.5).
To create an instance of the LLM model, use ChatOpenAI() and set gpt-3.5-turbo-0613 as the model_name. Next, create the pandas DataFrame Agent using the create_pandas_dataframe_agent() method and assign the LLM model, defined by llm, and the input data, defined by df.
# Generate LLM response
def generate_response(csv_file, input_query):
  llm = ChatOpenAI(model_name='gpt-3.5-turbo-0613', temperature=0.2, openai_api_key=openai_api_key)
  df = load_csv(csv_file)
  # Create Pandas DataFrame Agent
  agent = create_pandas_dataframe_agent(llm, df, verbose=True, agent_type=AgentType.OPENAI_FUNCTIONS)
  # Perform Query using the Agent
  response = agent.run(input_query)
  return st.success(response)
Input widgets
Next, create input widgets to accept various variables for data analysis. These include:
- The user-provided CSV file (stored in the
uploaded_filevariable) - The input query (stored in the
question_listandquery_textvariables) - The OpenAI API (stored in the
openai_api_keyvariable)
# Input widgets
uploaded_file = st.file_uploader('Upload a CSV file', type=['csv'])
question_list = [
  'How many rows are there?',
  'What is the range of values for MolWt with logS greater than 0?',
  'How many rows have MolLogP value greater than 0.',
  'Other']
query_text = st.selectbox('Select an example query:', question_list, disabled=not uploaded_file)
openai_api_key = st.text_input('OpenAI API Key', type='password', disabled=not (uploaded_file and query_text))
Define the app logic
The app logic is defined in this last code block. Follow these steps:
- Check if the user has selected the
Otheroption from the drop-down select box defined inquery_textto provide a custom text query. If so, the user can enter their query text. - Check if the user has provided their OpenAI API key. If not, a reminder message is displayed for the user to enter their API key.
- Perform a final check for the API key and the user-provided CSV file. If the check is successful (meaning the user has provided all necessary information), we proceed to generate a response from the pandas DataFrame Agent.
# App logic
if query_text is 'Other':
  query_text = st.text_input('Enter your query:', placeholder = 'Enter query here ...', disabled=not uploaded_file)
if not openai_api_key.startswith('sk-'):
  st.warning('Please enter your OpenAI API key!', icon='⚠')
if openai_api_key.startswith('sk-') and (uploaded_file is not None):
  st.header('Output')
  generate_response(uploaded_file, query_text)
Step 4. Deploy the app
Once the app has been created, it can be deployed to the cloud in three steps:
- Create a GitHub repository to store the app files.
- Go to the Streamlit Community Cloud, click the
New appbutton, and select the appropriate repository, branch, and application file. - Finally, click
Deploy!.
After a few moments, the app should be ready to use!
Wrapping up
You've learned how to build an Ask the Data app that lets you ask questions to understand your data better. We used Streamlit as the frontend to accept user input (CSV file, questions about the data, and OpenAI API key) and LangChain for backend processing of the data via the pandas DataFrame Agent.
If you're looking for ideas and inspiration, check out the Generative AI page and the LLM gallery. And if you have any questions, please post them in the comments below or on Twitter at @thedataprof, on LinkedIn, on the Streamlit YouTube channel, or on my personal YouTube channel, Data Professor.
I can't wait to see what you'll build! 🎈


Comments
Continue the conversation in our forums →