
TL;DR
- Streamlit lets you build a real web app, in 20 lines of Python.
- Streamlit Sharing hosts that app for you. No server needed.
- Firestore lets you store and fetch data. No server needed, either!
- Combine them for a serverless web app with persistent data, written entirely in Python!
Table of Contents
- Intro: What is Firestore, and why should we use it?
- Part 1: A simple Streamlit Sharing app
- Part 2: Setting up Firestore
- Part 3: Building the Reddit home page
- Part 4: Tips and tricks for app development
Intro: What is Firestore, and why should we use it?
So what even is this Firestore thing? Well, from their website:
Cloud Firestore is a flexible, scalable database for mobile, web, and server development...
Let's break that down! First, Firestore is a database - that means it's a good place to store data, and retrieve it later. If you're into ML/data science, and have been building dashboards with Streamlit, the data you work with probably looks like Pandas tables, Numpy arrays, CSV files. These tend to be fairly static. You'll rarely need to create new entries or update them, let alone make your data accessible from apps all over the world. But many web apps need to be dynamic, allowing lots of edits to the data and creation of new data — and databases excel at this! Every consumer web app you can think of (Gmail, Youtube, Slack, Airbnb) have databases that manage the things that their users create (emails, videos, chat messages, and listings).
Unlike other databases, Firestore is flexible. In technical terms, we call it a "NoSQL" database, which means that you don't have to design a fixed schema for how your data will be structured before you begin. This is great for quick prototyping! Oftentimes, when I'm making a web app, I don't exactly know what it will look like or do, much less how I should store my data.

As an analogy, let's say I wanted to bake a bunch of desserts. A SQL database is a bit like having to write out a pie recipe beforehand, and then always following it line-by-line. I can efficiently bake lots of pies, which will be tasty if my original recipe was good. But the NoSQL approach is more like: let me start with something vaguely pie-like, but maybe it'll become a tart, or drift towards more of a cupcake... I can experiment until I land on something that really hits the spot.
Finally, Firestore is hosted on the cloud. This means that it's a service, very much like GitHub or our very own Streamlit Sharing, where you don't have to worry about maintaining your own servers. You don't need to worry about scaling, uptime, or a bunch of other issues that can get in the way of building out your idea.
What are some downsides of Firestore?
First, as a hosted service, Firestore can cost you money. They do have a generous free tier to start out with — no credit card needed! And if your app exceeds the free limits, they'll inform you and stop new writes. Even if you hit the paid tier, Firestore is pretty cheap; I run a side project with hundreds of daily users and thousands of daily writes, and Firestore only costs me ~$1/month.
Second, other databases may perform better on complicated queries, or when you get to e.g. millions of daily users. For pure speed of setup, Firestore is great, but if you already know that scaling will be an issue, you may want to consider other options like SQLite, MongoDB, or Cloud Spanner.
And finally, most Firestore users use JavaScript, so there are fewer Python code snippets and Stack Overflow answers to find. For this tutorial, we'll use Firestore's Python library, which is very pleasant to work with. Here's a snippet from their Python API for inspiration:
from google.cloud import firestore

# Add a new user to the database
db = firestore.Client()
doc_ref = db.collection('users').document('alovelace')
doc_ref.set({
    'first': 'Ada',
    'last': 'Lovelace',
    'born': 1815
})

# Then query to list all users
users_ref = db.collection('users')

for doc in users_ref.stream():
    print('{} => {}'.format(doc.id, doc.to_dict()))
Pretty easy to read, right?
Part 1: A simple Streamlit Sharing app
Okay! If you're sold on the awesomeness of Firestore, I'm now going to show you how to bake in that awesomeness into a Streamlit app. Let's cook up a simple version of the Reddit home page, from scratch! (Okay, that was the last cooking analogy, I promise.)
Once again, Streamlit is the fastest way to build web apps in Python. Streamlit Sharing is the fastest way to put your app online, so you can share it with the world. Here's what Sharing can do for you, in 1 minute:
Here in Part 1, I'm going to walk you step-by-step through the process of building a Streamlit Sharing app, even if you've never done it before. Ready? Let's do this!
If you're already a Streamlit master, feel free to skip down to Part 2; just remember to pip install google-cloud-firestore , or the equivalent in your Python library manager of choice.
Setting up your Git repo
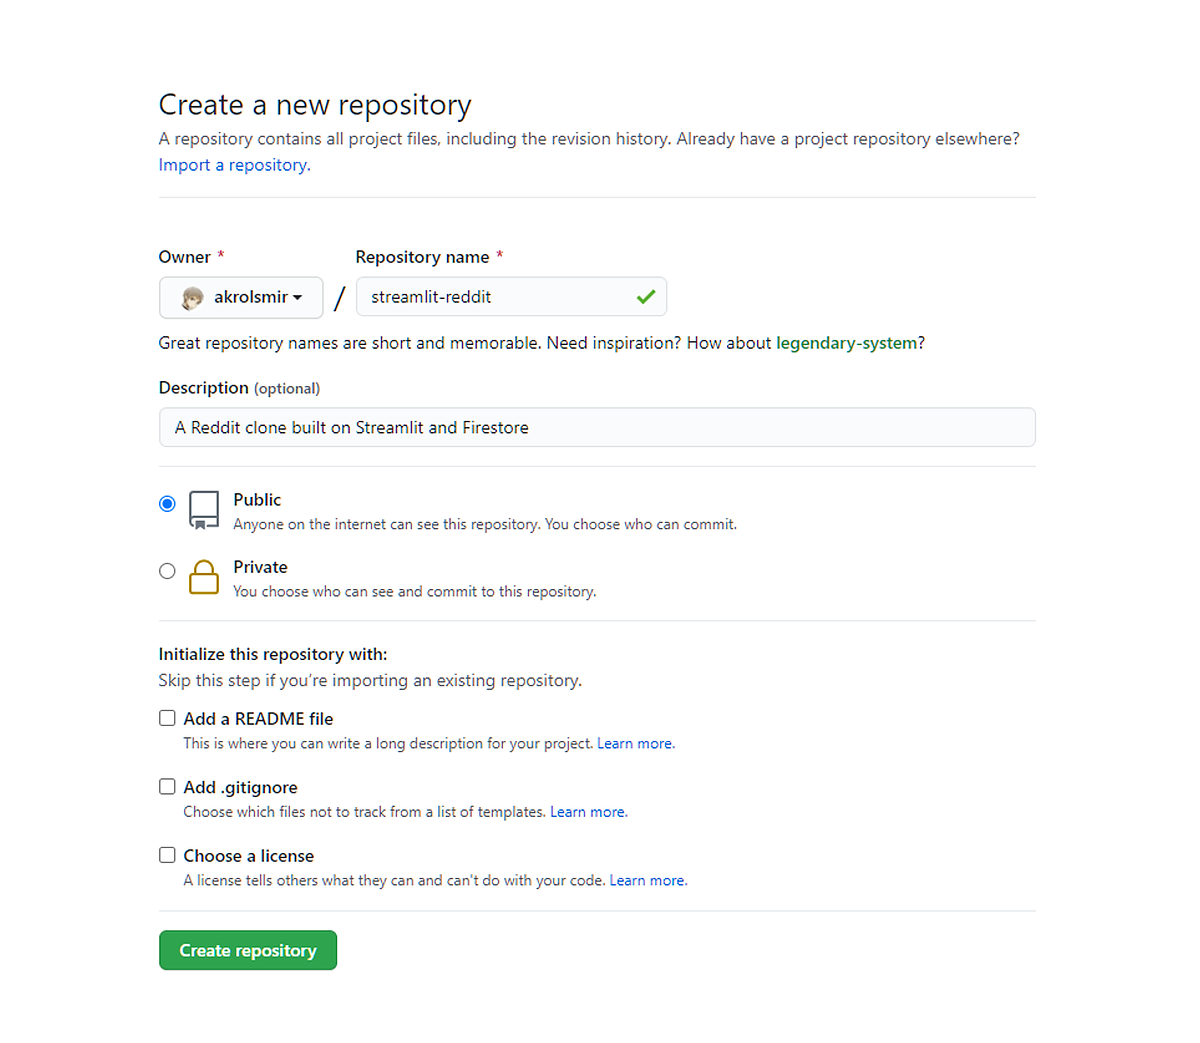
We'll start by creating a new repo on GitHub — the folder where all your code will go. Name it whatever you like! (I'm calling mine streamlit-reddit). Make sure it's public, though, so we can host it on Streamlit Sharing later.
Next, you'll want to download (aka "clone") this repo on your own computer. (You'll need to have Git installed.) Open up a local shell, and run the following commands, replacing {username} with your own GitHub username:
# Creates a copy of this repo on your computer
$ git clone https://github.com/{username}/streamlit-reddit.git

# Enters the repo, which is currently empty
$ cd streamlit-reddit
Running Streamlit on your own computer
With our Git repo set up, let's add in the two main files every Streamlit Sharing app needs:
requirements.txt — A list of the Python libraries we use, so Streamlit Sharing will know to install them.
For this tutorial, we'll only be using two libraries: Streamlit itself, and the Python client for Firestore. So this is all you need inside your requirements.txt file:
streamlit
google-cloud-firestore
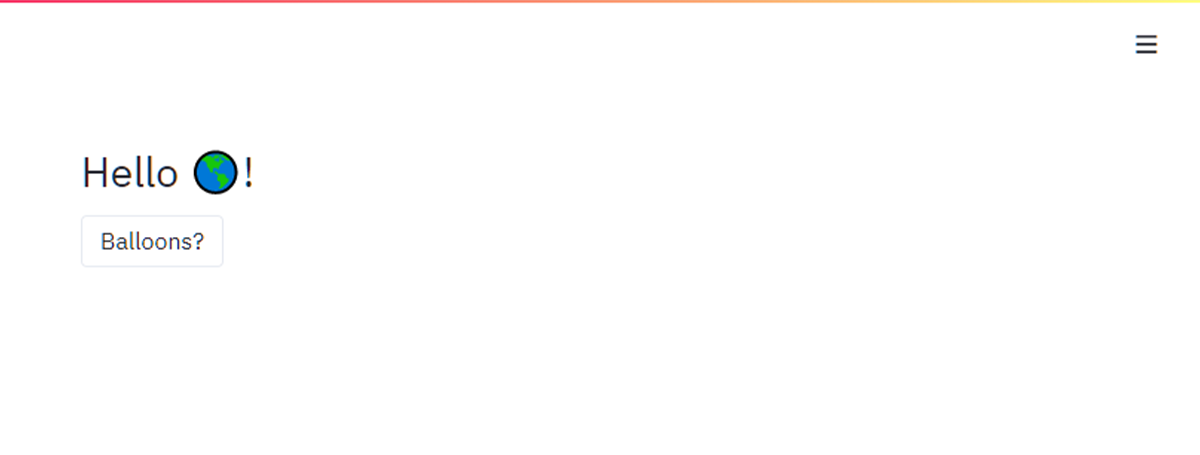
streamlit_app.py — Where our app code will go! Let's start with just a few lines:
import streamlit as st

st.header('Hello 🌎!')
if st.button('Balloons?'):
    st.balloons()
This app imports the Streamlit library, and then shows some text and a button. When you click on the button, a bunch of balloons will float up from the bottom of the screen!
Now, we're going to use Pip to install the Streamlit and the Firestore libraries onto your own computer. (If you prefer pipenv or poetry or conda, any of those are fine too!)
# Install all the libraries mentioned in requirements.txt
$ pip install -r requirements.txt
...
We're ready to run our starter Streamlit app!
# Run this Streamlit app on your own computer
$ streamlit run streamlit_app.py
You can now view your Streamlit app in your browser.

  Local URL: http://localhost:8501
  Network URL: http://192.168.1.3:8501
If you see the Streamlit app launched on your own browser, that means everything worked. (You may have to enter in the URL, like http://localhost:8501). Try clicking on that button!
Deploying your app on Streamlit Sharing
Okay, we're ready to put our app on Streamlit Sharing! First, we need to save our changes to Git (aka "commit"), and then upload (aka "push") our changes onto GitHub. Again, from a shell that's inside your repo:
# Add and all changes in your files
$ git commit -am "Create requirements.txt and a simple Streamlit app"

# Push all commits back to GitHub
$ git push
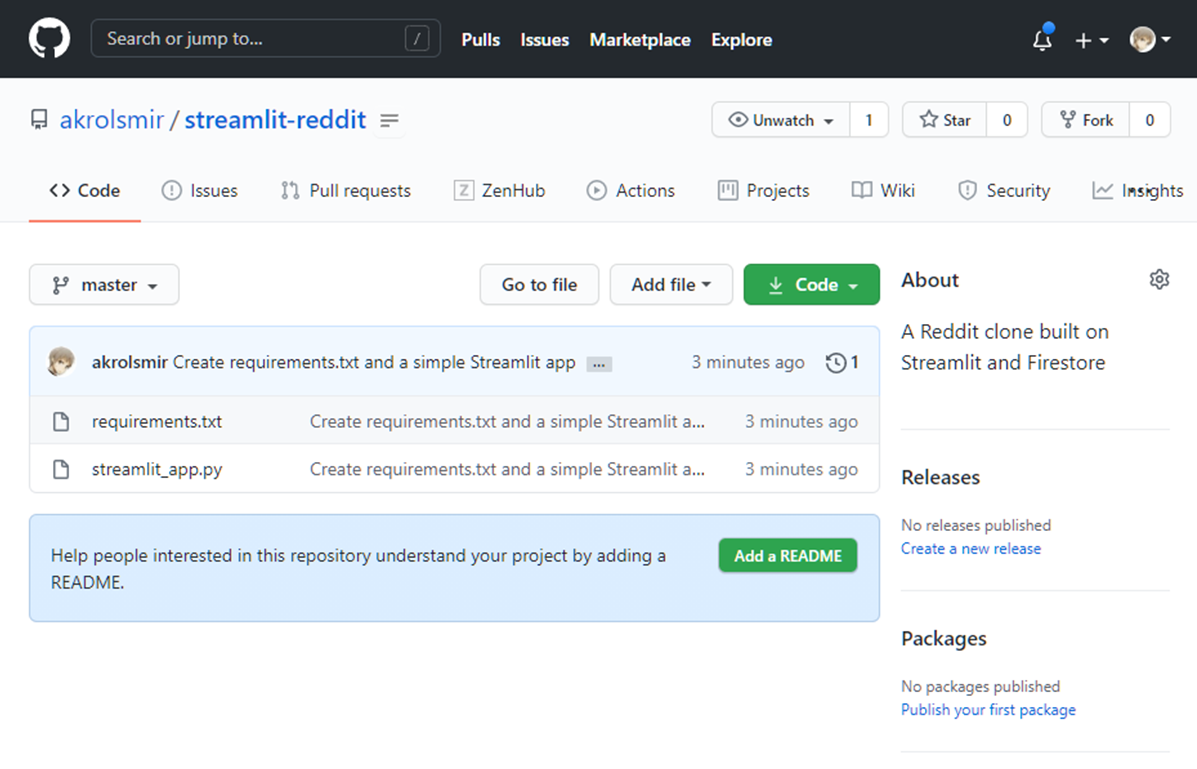
Now if you go to the GitHub page for your repo, you should see the code that you just wrote:
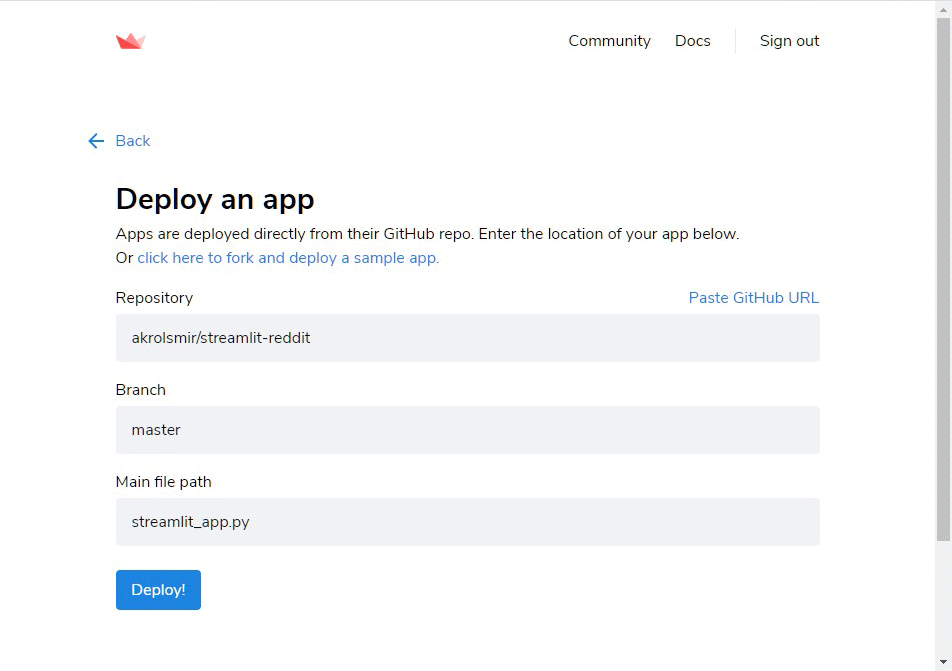
Once your code is on GitHub, you're ready to deploy your app for the world to see! Head over to https://share.streamlit.io/ and create a new app. (If you don't have access to Sharing yet, post below in the comments and we'll sort you out.) Here's a great tutorial on deploying through sharing if you'd like to read more.
Fill in the name of your repo — the others should populate automagically — then click "Deploy!" 🎈
That URL you're on is one that anyone on Earth can go to and play with. Isn't that cool? You've gone from "literally nothing" to "functioning, globally-hosted Streamlit app" in the space of 15 minutes! But hold on to your horses, we're about to get to the really cool stuff: saving data online, with Firestore.
Part 2: Setting up Firestore
Once again, Firestore is the database we're using to create, edit, and read our data. For our Reddit home page, we're going to use it to store things like the links, titles, and later upvotes. Here in Part 2, I'll walk you through how to set that up.
Set up a Firebase account
To clear up some potential confusion: Firestore is the database we're using, one of many services provided by Firebase (which is a part of Google). You'll want to sign in to your Google account at https://console.firebase.google.com/. Then, create a Firebase project:
These are the steps to create an account:
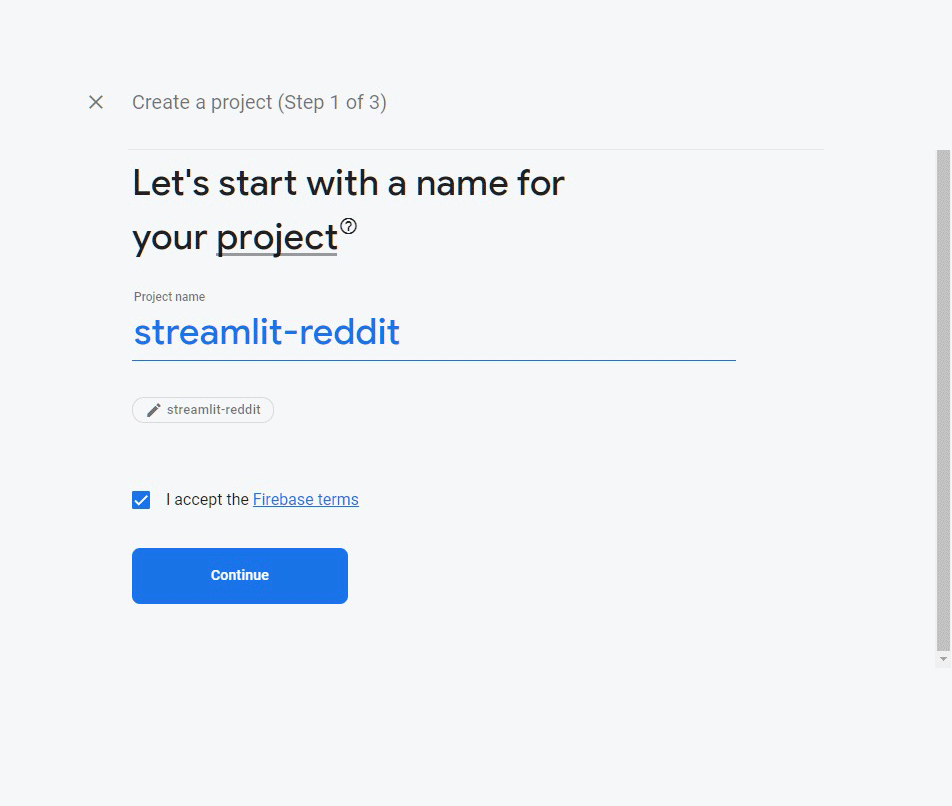
- Name your project
- Enable analytics [You can skip this since we're not using it today, but I think Analytics are really cool 🙂]
- Accept terms and click create!
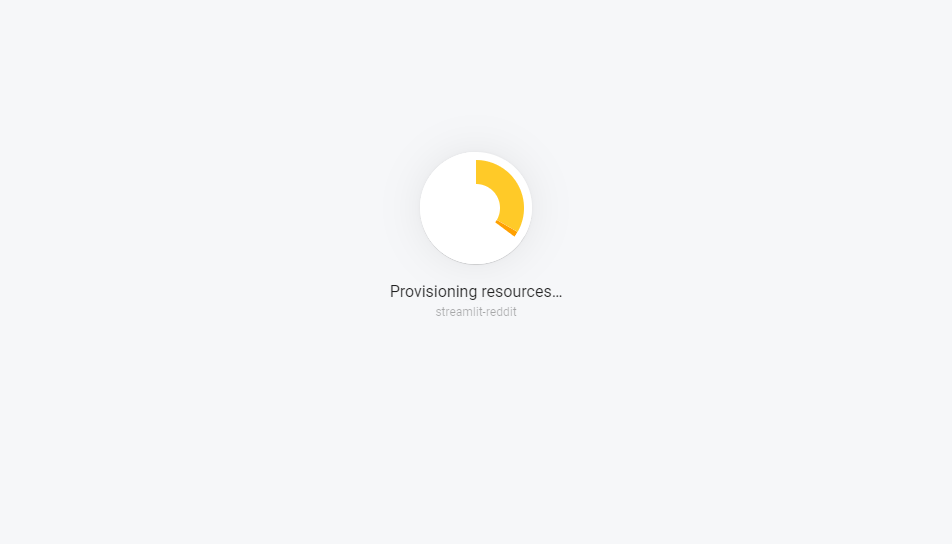
Once created, you'll see Firebase loading and will be notified when the project is ready [this is pretty quick].
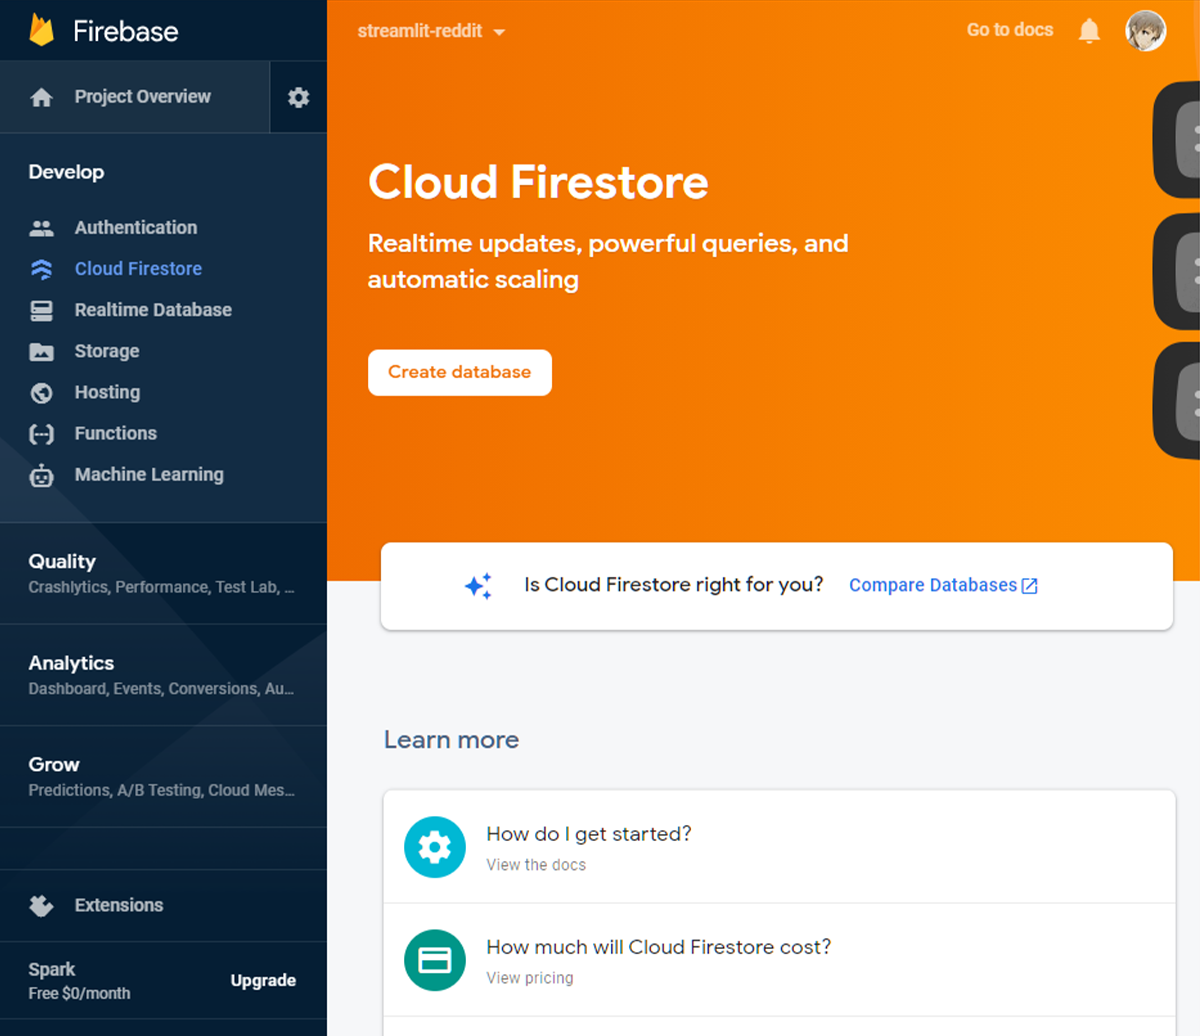
Awesome, our Firebase project is set up! Firebase has a lot of different tools for building web apps, but the only one we're using today is Firestore. So let's turn that on by creating a Cloud Firestore database.
Create a Firestore database
Start it in test mode, which means anyone can read or write to it for the next 30 days (you can change this later!)
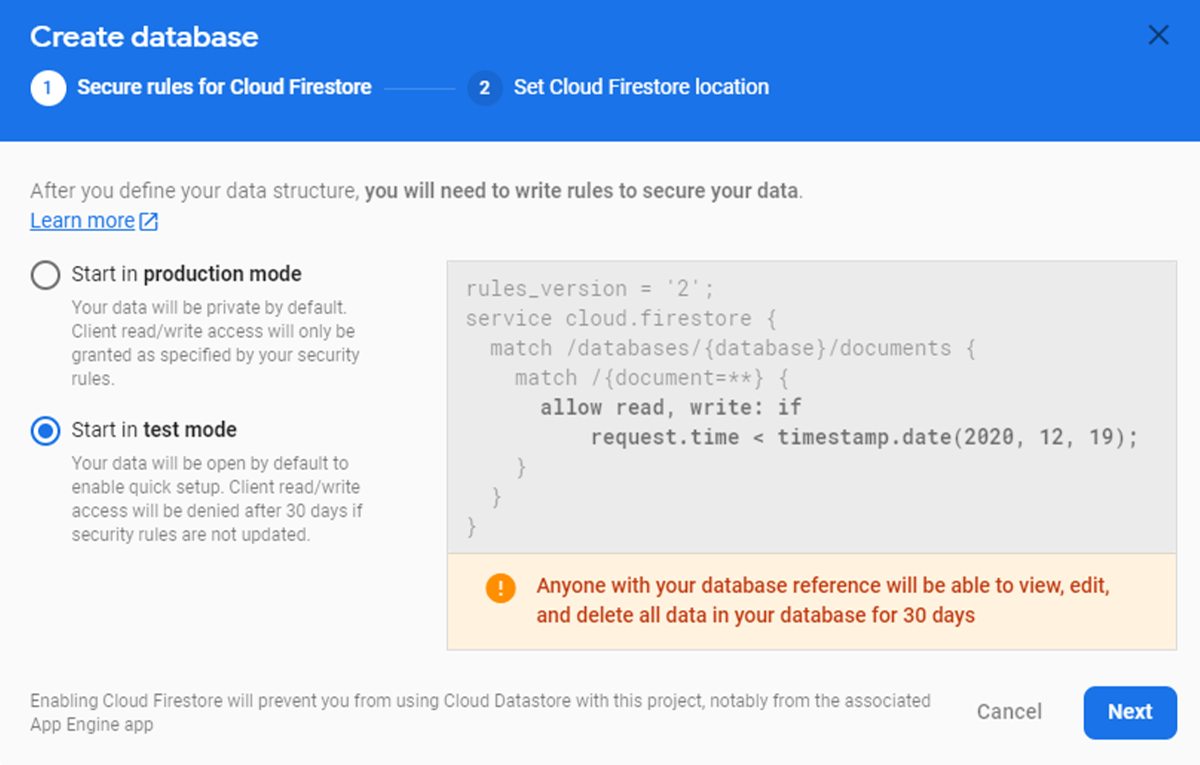
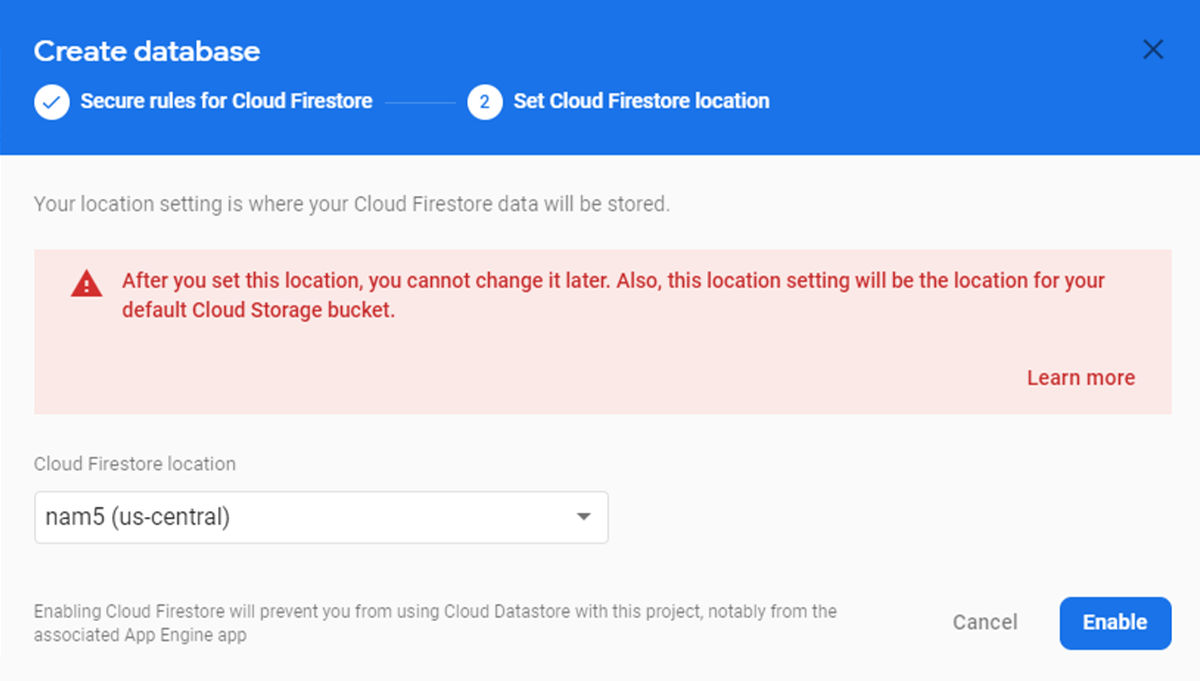
And pick a physical location for where the data is hosted. (Don't worry about the scary red text. This isn't super important, but closer to you generally means the data will load a little bit faster.)
Create your first collection and document
Now that the Firestore database is created, we can start putting data into it. But first, some terminology:
- A document is a grouping of key-value pairs; think "Python dict, but the keys are always strings". It's where you will be storing all your data! If you were building a chat app, you might represent one
userin her own document. Or onemessagemight be its own document. - Just like dicts can contain other dicts, documents can contain other documents!
- Each document has an ID, a string that uniquely identifies it.
- A collection is a set of documents. Your chat app might have a collection of
users, and a separate collection ofmessages, with the understanding that the documents in each will look different. - But note that as a flexible, NoSQL database, Firestore will not enforce any rules about which documents go in which collections! It's all up to you.
- Collections have IDs as well, to distinguish them from other collections.
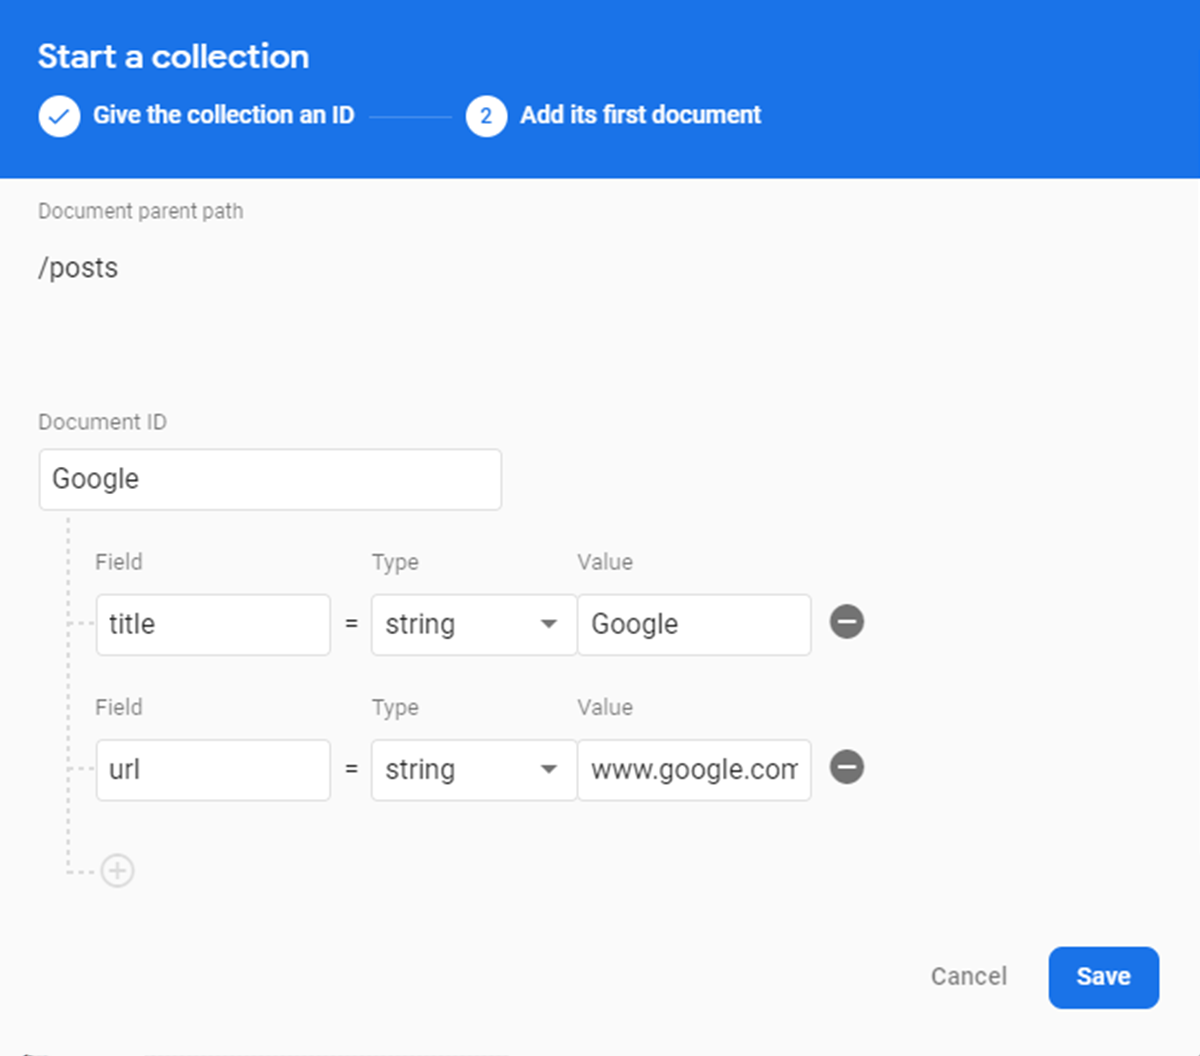
Our Reddit clone will include a bunch of posts. So let's make a collection for them!

And then we'll want to create an example post document. Let's make a post that links to the Google website. Pick an ID, then add in a title and a url field for the post:
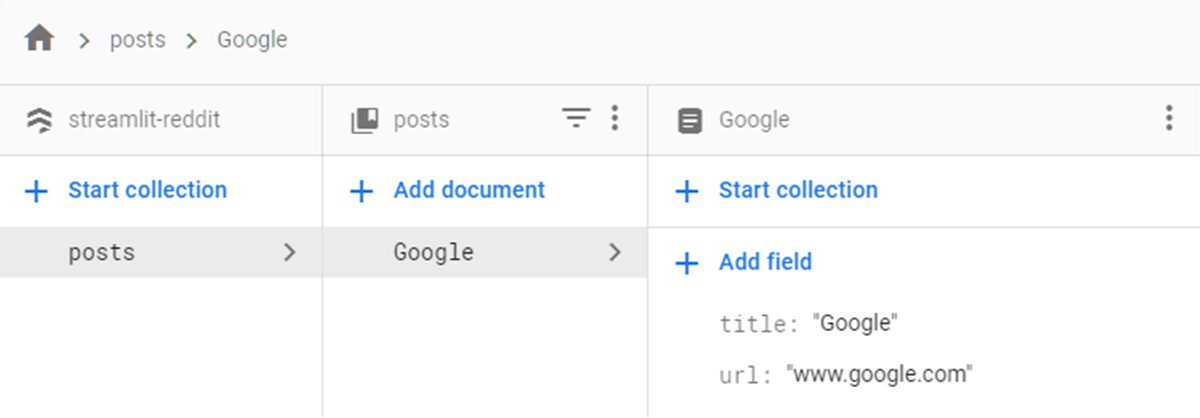
Now you'll have your first piece of data visible from your web console! The console is a place where you can manually edit your database. It's already a cool way to peek under the hood, and you can make changes directly through the web editor.
But sit tight, and I'll show you how to create new data programmatically — that is, in your Python app!
Download your account keys 🗝️
Before we get there, one last thing: we need to get a service account key so that our Streamlit app will be able to read and write data to this database. You can think of this key as a password that your Python code uses to log in to Firestore — except instead of a text password like "hunter2", it's a JSON file instead.
To download this JSON file, first go to "Project settings":

Then go to "Service accounts", select "Python", and click "Generate new private key"
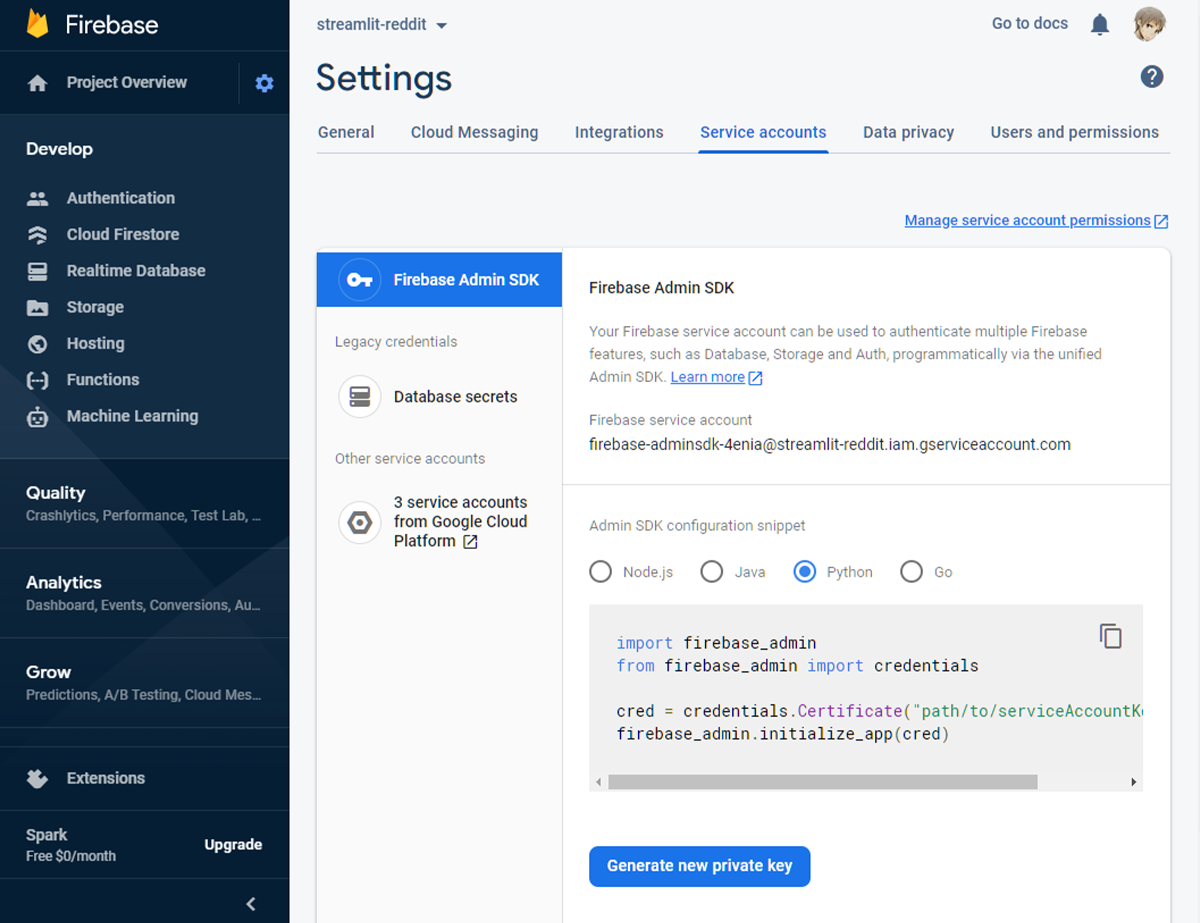
You should have downloaded a file that looks like streamlit-reddit-firebase-adminsdk-4enia-e106b71674.json. Move it into your Git repo, and let's rename it to something simpler like firestore-key.json.
That's it, we're done setting up Firestore!
To be continued...
We now have everything set up to start coding in earnest. Check out Parts 3 & 4, where we provide step-by-step instructions to build the entire Reddit app, as well as tips and tricks for working with Firestore + Streamlit. For now, here's a sneak peak of an example streamlit_app.py to get you started — see how far you can get by iterating on this!
- Normally you should NEVER store a key in a public GitHub. We're doing it right now because it's a test. And in the next section I'll show you how to secure that in Streamlit Sharing using Secrets!
import streamlit as st
from google.cloud import firestore

# Authenticate to Firestore with the JSON account key.
db = firestore.Client.from_service_account_json("firestore-key.json")

# Create a reference to the Google post.
doc_ref = db.collection("posts").document("Google")

# Then get the data at that reference.
doc = doc_ref.get()

# Let's see what we got!
st.write("The id is: ", doc.id)
st.write("The contents are: ", doc.to_dict())
Questions? Something didn't work right? Just want to show off your cool Firestore app? Let us know below in the comments section!
And of course, thanks to Henrikh and Fanilo for providing feedback on this article~


Comments
Continue the conversation in our forums →