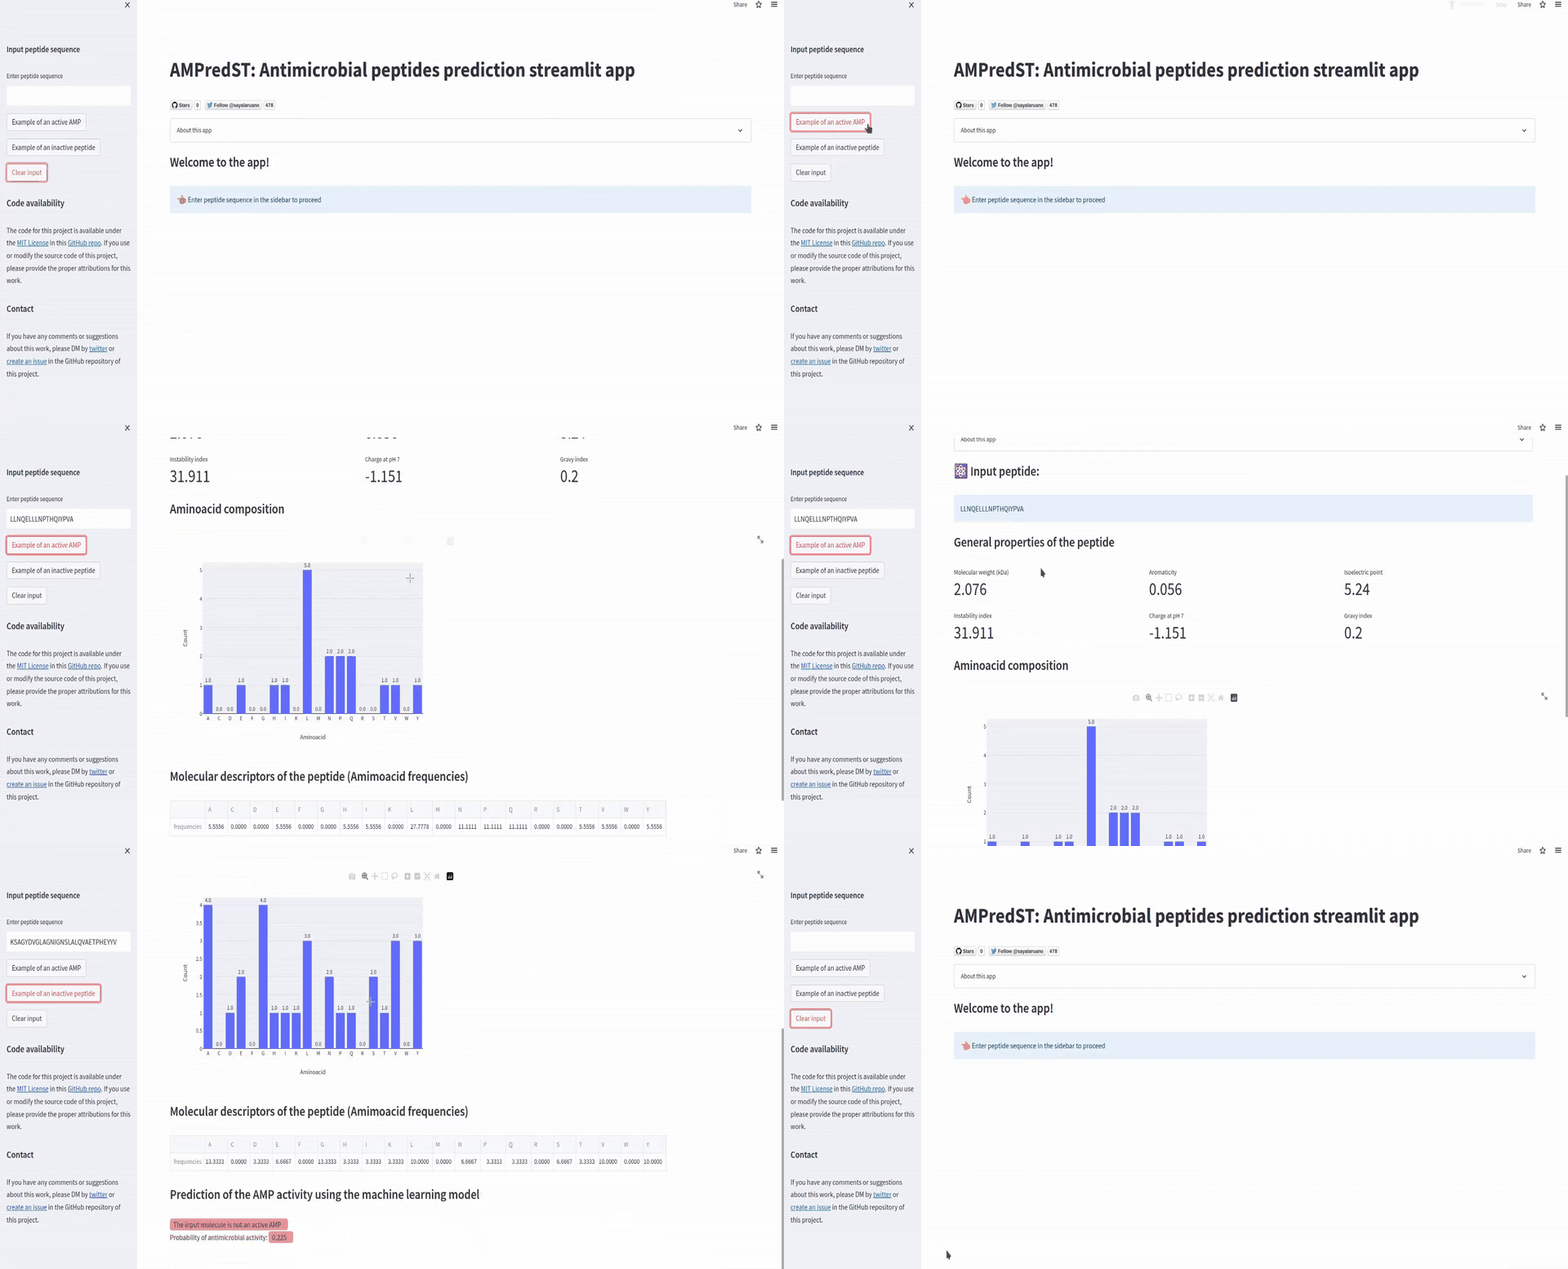
Drug discovery is a long and complicated process. Bringing a new drug to the market can take decades and cost millions. Antimicrobial peptides or AMPs (bioactive drugs that control infectious diseases caused by superbugs) and ML algorithms can help, but it’s hard to deploy computational models for public feedback.
That’s why I built AMPredST—a web application that predicts antimicrobial activity and general AMP properties (based on my previous project).

In this post, I’ll show you how Streamlit can extend your ML models’ use for drug discovery. You’ll learn:
- How to create a user-friendly interface for retrieving molecular inputs
- How to display important data from the input molecules
- How to deploy and use an ML model for predicting potential drugs
How to create a user-friendly interface for retrieving molecular inputs
First, use the st.session_state to store the sequence input and share this value between the app’s reruns. Then add functions for defining default values of active and inactive peptides and removing the input sequence.
Include your app’s inputs and default functionalities in the sidebar:
- An input widget (
st.sidebar.text_input) for entering the peptide sequence - Three buttons (
st.sidebar.button) for implementing the previously defined functions
After getting the input, the main page of the app will show a sub-header (st.subheader) and an informational message (st.info) of the input sequence (these values change depending on the information provided in the input widget from the sidebar):
if 'peptide_input' not in st.session_state:
  st.session_state.peptide_input = ''

# Input peptide
st.sidebar.subheader('Input peptide sequence')

def insert_active_peptide_example():
    st.session_state.peptide_input = 'LLNQELLLNPTHQIYPVA'

def insert_inactive_peptide_example():
    st.session_state.peptide_input = 'KSAGYDVGLAGNIGNSLALQVAETPHEYYV'

def clear_peptide():
    st.session_state.peptide_input = ''

peptide_seq = st.sidebar.text_input('Enter peptide sequence', st.session_state.peptide_input, key='peptide_input', help='Be sure to enter a valid sequence')
st.sidebar.button('Example of an active AMP', on_click=insert_active_peptide_example)
st.sidebar.button('Example of an inactive peptide', on_click=insert_inactive_peptide_example)
st.sidebar.button('Clear input', on_click=clear_peptide

if st.session_state.peptide_input == '':
  st.subheader('Welcome to the app!')
  st.info('Enter peptide sequence in the sidebar to proceed', icon='👈')
else:
  st.subheader('⚛️ Input peptide:')
  st.info(peptide_seq)


How to display important data from the input molecules
After getting the input sequence, you can calculate the properties that characterize the molecule. Analyze the protein sequences from the Biopython library with functions like molecular_weight, gravy, or aromaticity (read more here).
Use st.metric with st.columns to display these quantities:
if st.session_state.peptide_input != '':
		# General properties of the peptide
		st.subheader('General properties of the peptide')
		analysed_seq = ProteinAnalysis(peptide_seq)
		mol_weight = analysed_seq.molecular_weight()
		aromaticity = analysed_seq.aromaticity()
		instability_index = analysed_seq.instability_index()
		isoelectric_point = analysed_seq.isoelectric_point()
		charge_at_pH = analysed_seq.charge_at_pH(7.0)
		gravy = analysed_seq.gravy()

		col1, col2, col3 = st.columns(3)
		col1.metric("Molecular weight (kDa)", millify(mol_weight/1000, precision=3))
		col2.metric("Aromaticity", millify(aromaticity, precision=3))
		col3.metric("Isoelectric point", millify(isoelectric_point, precision=3))

		col4, col5, col6 = st.columns(3)
		col4.metric("Instability index", millify(instability_index, precision=3))
		col5.metric("Charge at pH 7", millify(charge_at_pH, precision=3))
		col6.metric("Gravy index", millify(gravy, precision=3))

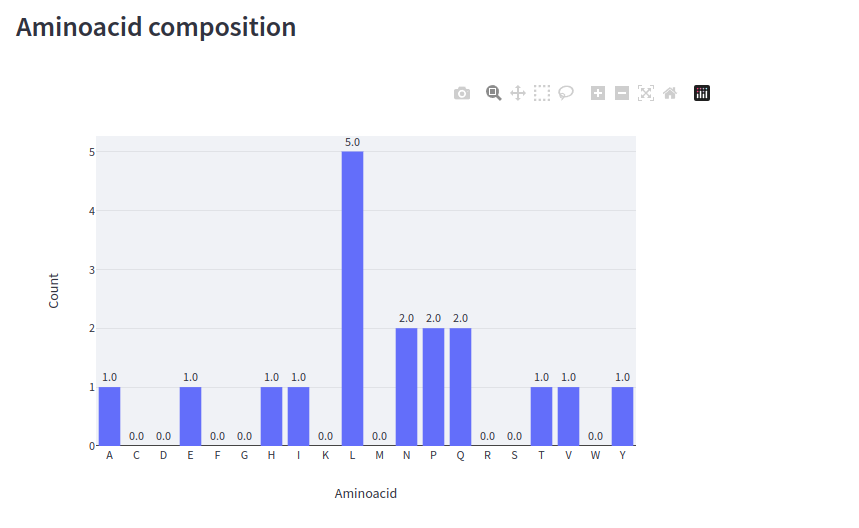
Streamlit has functions for creating interactive plots using Python libraries like Matplotlib, Altair, or Plotly. Create an interactive bar plot of the input peptide’s amino acid composition with Plotly (st.plotly_chart):
# Bar plot of the aminoacid composition
count_amino_acids = analysed_seq.count_amino_acids()

st.subheader('Aminoacid composition')

df_amino_acids =  pd.DataFrame.from_dict(count_amino_acids, orient='index', columns=['count'])
df_amino_acids['aminoacid'] = df_amino_acids.index
df_amino_acids['count'] = df_amino_acids['count'].astype(int)

plot = px.bar(df_amino_acids, y='count', x='aminoacid',
        text_auto='.2s', labels={
                "count": "Count",
                "aminoacid": "Aminoacid"
            })
plot.update_traces(textfont_size=12, textangle=0, textposition="outside", showlegend=False)
st.plotly_chart(plot)

Finally, calculate the frequency of the amino acids from the peptide sequence and show the dataframe with st.write. The ML algorithm will use this feature matrix as input to predict the activity of the peptide sequence:
# Calculate Amino acid composition feature from the AMP
amino_acids_percent = analysed_seq.get_amino_acids_percent()

amino_acids_percent = {key: value*100 for (key, value) in amino_acids_percent.items()}

df_amino_acids_percent =  pd.DataFrame.from_dict(amino_acids_percent, orient='index', columns=['frequencies']).T

st.subheader('Molecular descriptors of the peptide (Amimoacid frequencies)')

st.write(df_amino_acids_percent)

How to deploy and use an ML model for predicting potential drugs
Now, you can use your ML to predict promising new drugs. But first, ensure your model’s file size doesn’t exceed GitHub limits (to deploy to Streamlit Community Cloud).
Compress the model’s bin file into a zip file and use the zip file library to load the model into the script (or use the Git Large File Storage extension):
# Function to unzip the model
@st.experimental_singleton
def unzip_model(zip_file_name):
    # opening Zip using 'with' keyword in read mode
    with zipfile.ZipFile(zip_file_name, 'r') as file:
        # printing all the information of archive file contents using 'printdir' method
        print(file.printdir())
        # extracting the files using 'extracall' method
        print('Extracting all files...')
        file.extractall()
        print('Done!') # check your directory of a zip file to see the extracted files

# Assigning zip filename to a variable
zip_file_name = 'ExtraTreesClassifier_maxdepth50_nestimators200.zip'

# Unzip the file with the defined function
unzip_model(zip_file_name)
Next, load the ML model using the pickle library and predict the peptide activity:
# Function load the best ML model
@st.experimental_singleton
def load_model(model_file):
  with open(model_file, 'rb') as f_in:
      model = pickle.load(f_in)
  return model

# Load the model
model_file = 'ExtraTreesClassifier_maxdepth50_nestimators200.bin'
model = load_model(model_file)

y_pred = model.predict_proba(df_amino_acids_percent)[0, 1]
active = y_pred >= 0.5
I recommend you create cache-decorated functions for the previous tasks using the st.experimental_singleton decorator, which will store an object for each function and share it across all users connected to the app.
Finally, show the model’s results on the app’s main page. If you want, color the text to highlight the active and inactive resulting peptides using the amazing annotated_text Streamlit component:
# Print results
st.subheader('Prediction of the AMP activity using the machine learning model')
if active == True:
  annotated_text(
  ("The input molecule is an active AMP", "", "#b6d7a8"))
  annotated_text(
  "Probability of antimicrobial activity: ",
  (f"{y_pred}","", "#b6d7a8"))
else:
  annotated_text(
  ("The input molecule is not an active AMP", "", "#ea9999"))
  annotated_text(
  "Probability of antimicrobial activity: ",
  (f"{y_pred}","", "#ea9999"))


Wrapping up
Congratulations! You’ve learned how to deploy your ML models for drug discovery in an app that can help the entire scientific community!
If you have any comments or suggestions, please leave them below in the comments, email me, DM me on Twitter, or create an issue in the repo.
Thank you for reading, and happy Streamlit-ing! 🎈


Comments
Continue the conversation in our forums →